Speed up DNSDist with AF_XDP

Chinese readers can read the Chinese version of this article.
中文读者可阅读本文的中文版本

Preface

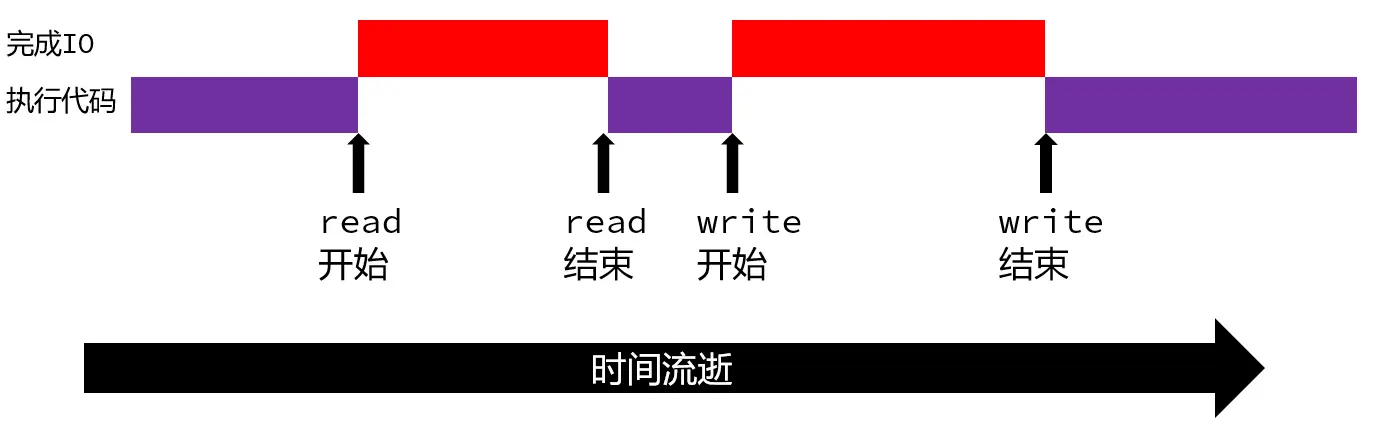
DNSDist is an excellent DNS load balancer, and AF_XDP is an emerging high-performance Linux asynchronous IO interface that benefits from eBPF.
It is a great honor for Y7n05h to participate in the AF_XDP transformation of DNSDist as a contributor.

It’s an honor to have Y7n05h as a contributor to improve DNSDist with AF_XDP.

The changes to the UDP part of DNSDist have long since come to an end. This performance-improving modification requires profiling data to validate.

So, let’s start the fun performance analysis.

Test environment information

Laptop
OS: ArchLinux
Kernel Version: 5.19.1-arch2-1
CPU: AMD Ryzen 7 4800H with Radeon Graphics
MEM: DDR4 64G
NIC: Intel Corporation Wi-Fi 6 AX200 (rev 1a)
DNSPerf Version: 2.9.0
GCC Version: 12.1.1
Libxdp Version:1.2.5

PC1
OS: ArchLinux
Kernel Version: 5.19.1-arch2-1
CPU: Intel(R) Core(TM) i5-8500 CPU @ 3.00GHz
MEM: DDR4 8G
NIC: Intel Corporation Wi-Fi 6 AX200 (rev 1a)

PC2
OS: Ubuntu
Kernel Version: 5.15.0-46-generic
CPU: 12th Gen Intel(R) Core(TM) i7-12700KF
MEM: DDR4 64G
NIC: Broadcom Inc. and subsidiaries BCM4360 802.11ac Wireless Network Adapter (rev 03)

Thanks to @yegetables for lending PC2 to Y7n05h.

Source Code:
DNSDist With AF_XDP(AF_XDP verion): https://github.com/Y7n05h/pdns/commit/d42e356a48a433a9f4efae9c3dd648101a37abdf
DNSDist Without AF_XDP(Normal version): https://github.com/Y7n05h/pdns/commit/f5e76c2a6932ec4360d38219fb515d26d538b40d

In this test, Y7n05h uses Laptop to generate the requests for testing, PC1 to run the DNSDist instance to be tested, and PC2 to run the SmartDNS service.
Laptop, PC1 and PC2 are all connected to the gateway (192.168.30.1) using WIFI, and Laptop, PC1 and PC2 access each other via WIFI. Unfortunately, the network used in this test environment was still used by numerous other devices during the test, so Y7n05h cannot exclude experimental errors caused by fluctuations in the network environment.

The test tool uses DNSPerf. The test resolves A records for 12018 different domains, only once for each domain in each test.

For the tests, SmartDNS was used as the DNS server. There is no particular reason to use SmartDNS, except that Y7n05h is familiar with it and it is easy to build and deploy SmartDNS on Ubuntu.

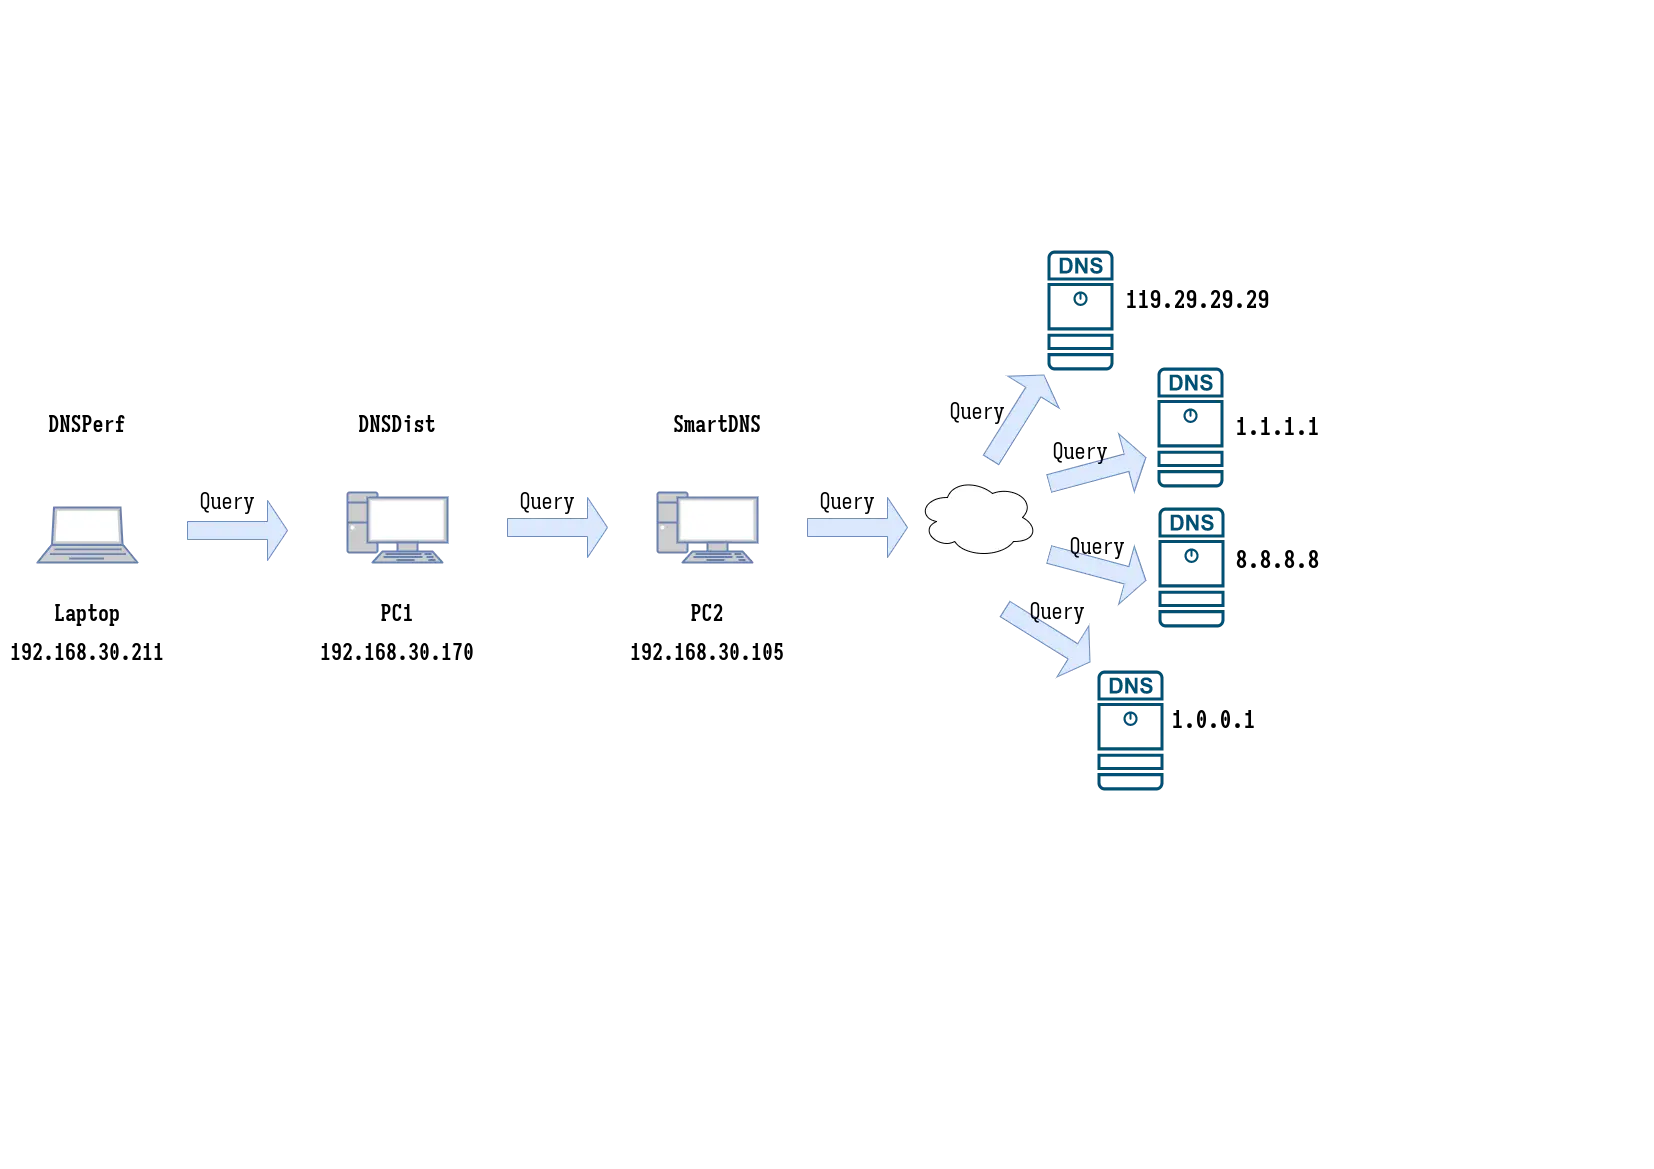
During the test, Y7n05h used Laptop to send DNS query requests to PC1 running DNSDist. SmartDNS then concurrently sends the DNS requests to the 4 DNS servers 1.1.1.1, 1.0.0.1, 8.8.8.8, 119.29.29.29 (if necessary) and replies to DNSDist with the first response received.

In this test, Y7n05h sent a lot of DNS query requests to the above 4 public DNS servers frequently due to testing needs, Y7n05h expresses sincere thanks to Cloudflare, Google, DNSPod for providing these public DNS services. (Although Y7n05h performed a large number of DNS queries during the test, these queries are cached by DNSDist, SmartDNS, and not every query sends a request to the above servers. (Therefore Y7n05h feels this is acceptable, which is fundamentally different from DDoS.) Also, in order to eliminate as much interference as possible from the DNS service’s cache for this test, Y7n05h has used DNSPerf to repeatedly send resolution requests to SmartDNS for all domains used in the test before the start of this test.

In the current network environment, Y7n05h’s subjective guess is that DNS query requests are still dominated by A records and AAAA records. Since Y7n05h’s environment does not have good IPv6 support, the resolution of A records was used as a performance indicator in this test. Since Y7n05h cannot verify the correctness of the DNS resolution results, we do not consider correctness as a metric in this performance analysis.

It should also be noted that the DNSDist configuration used in this test has been simplified for testing purposes and may differ significantly from the DNSDist configuration in the production environment. Therefore, this test by Y7n05h does not fully reflect the performance of AF_XDP’s optimization of DNSDist in a production environment.

As we all know, the DNS protocol uses recursive resolution, and the response time of requests is greatly affected by whether the query domain hits the DNS server’s cache or not.

In summary, this test by Y7n05h may be biased and may be inaccurate. The following is only the opinion of Y7n05h.

Performance Tests

The uniq.txt contains and only contains 12018 non-repeating domains.

In this article, the horizontal axis of all lines is the number of runs, and the number of DNSPerf runs is incremented by 1 for each DNSPerf run, the result of multiple DNSPerf executions for the same DNSDist process instance on the same curve. The points on the same curve are listed in chronological order from left to right. Any two DNSPerf’s do not overlap.

To simplify the exposition of this paper, Y7n05h hereby agrees with the reader that

  • The version of DNSDist that uses AF_XDP is omitted as “AF_XDP version”.
  • DNSDist version without AF_XDP is omitted as “Normal version”.

Test 1

The following command was used in this test to run DNSPerf:

1
dnsperf -s 192.168.30.170 -p 5300 -d uniq.txt

In test 1, Y7n05h ran the AF_XDP version first, then the Normal version, and finally the AF_XDP version again.

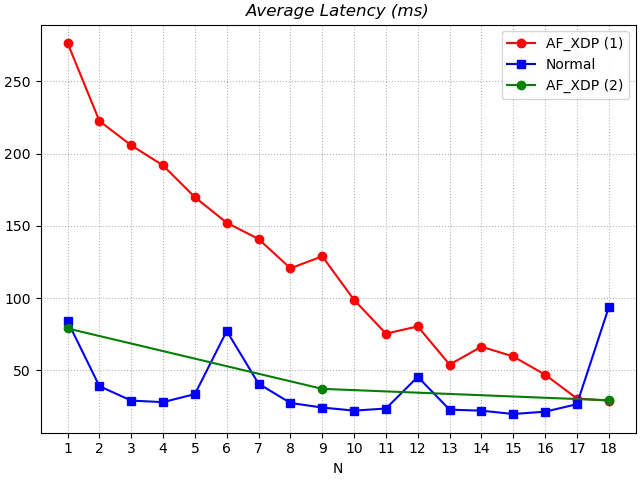
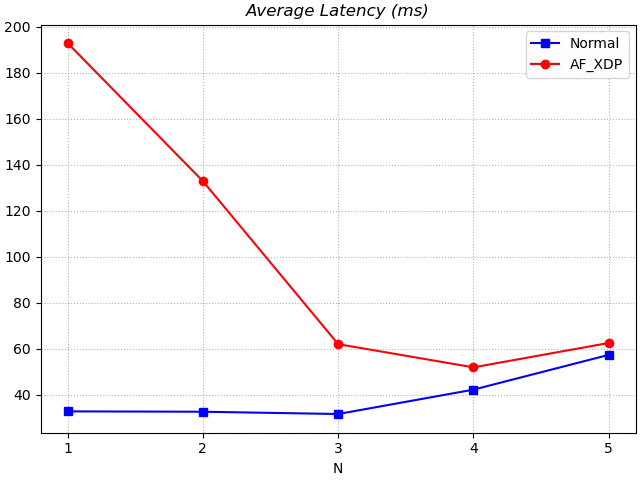
Looking at the average latency first, there is a decreasing trend in the average latency regardless of the fold. The decreasing average latency is generally due to the fact that after multiple DNSPerf executions, SmartDNS and the downstream servers have increased their hit rate for the domain name caches involved in the DNSPerf in this test. This is evidenced by the fact that the average latency of “re-running AF_XDP version” after “running Normal version” is significantly lower than the previous test results. Based on the data available at this time, it is not possible to determine the impact of AF_XDP on average latency.

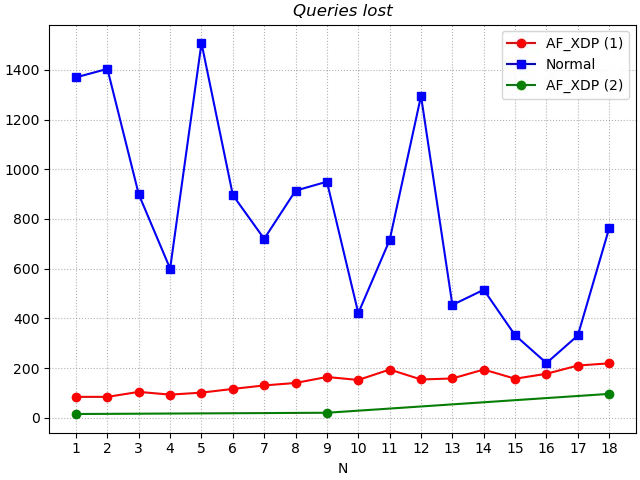
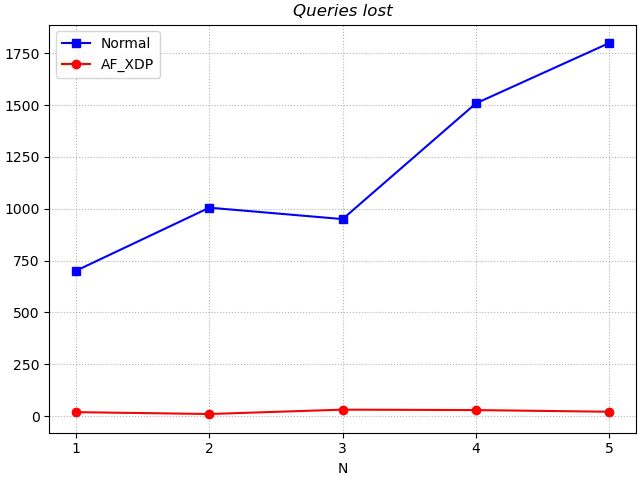
For the metric of query loss, the AF_XDP version is significantly lower than the Normal version. The number of lost queries with the AF_XDP version tends to increase slowly with the number of tests.

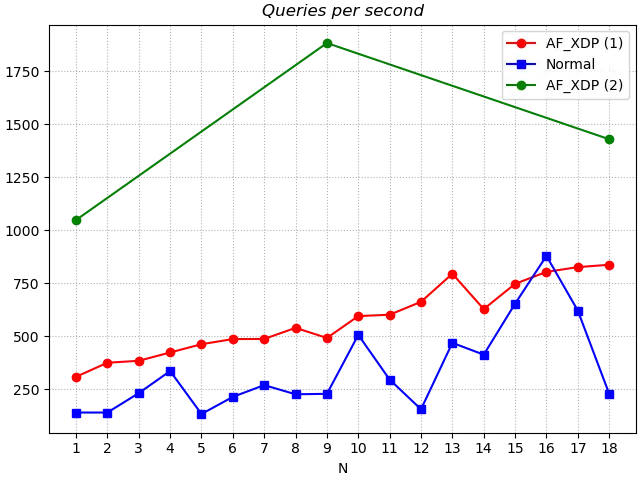
For the average number of queries per second, or throughput, using the AF_XDP version is significantly better than the Normal version. Considering that the fetch time of the data in the blue curve is between the green and red curves, the effect of caching on the AF_XDP version is that it enhances the green curve and degrades the red curve. This is a strong enough comparison for the non-AF_XDP version of DNSDist with the blue curve to show the throughput advantage of AF_XDP.

The runtime is the time consumed for a complete execution of DNSPerf. The conclusion here is also that the AF_XDP version outperforms the Normal version. The conclusions here are similar to those from the throughput analysis, and Y7n05h does not repeat them.

Even considering the caching impact on DNS in queries such as DNSDist, SmartDNS, etc. results in DNSPerf speeding up in the time dimension one by one. What can be clearly concluded at this point is that AF_XDP significantly improves DNSDist’s throughput in the current scenario. The impact on query latency may still require further testing.

Test 2

The following command was used in this test to run DNSPerf:

1
dnsperf -s 192.168.30.170 -p 5300 -d uniq.txt -c 500 -T 16

In Test 2, the concurrency of the test was increased by adding command line arguments. Test 2 ran the Normal version first and the AF_XDP version second.

Note: Test 2 was not run consecutively with Test 1, which may have affected the DNS cache.

The average latency of the AF_XDP version is still decreasing and is not significantly different from the Normal version in the last two tests. y7n05h I personally guess that if we increase the number of tests, the average latency of the AF_XDP version may be lower than the Normal version as the cache command increases. The average significant latency of the AF_XDP version was higher than the Normal version in the first 3 tests, perhaps because the cache in DNSDist was cleared by stopping the Normal version and running the AF_XDP version. the effect of AF_XDP on the average latency still needs further testing.

Comparing the query misses for the Normal and AF_XDP versions, they remain similar to those in Test 1. There is also no significant change in the number of queries lost compared to Test 1.

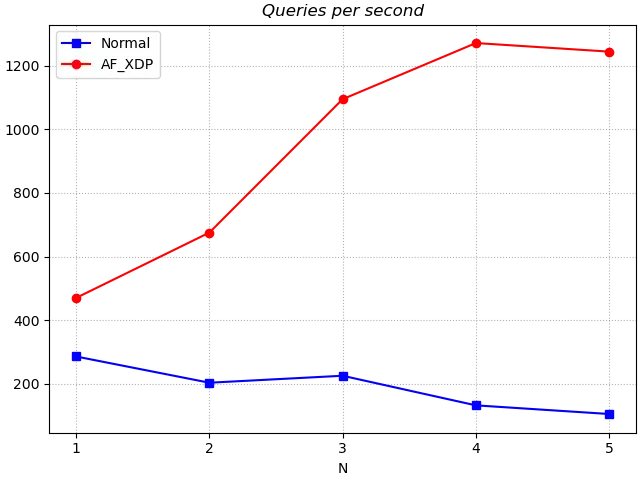
In terms of throughput, the gap between the AF_XDP version and the Normal version increases further for more concurrent query requests, and tends to increase with the number of tests.

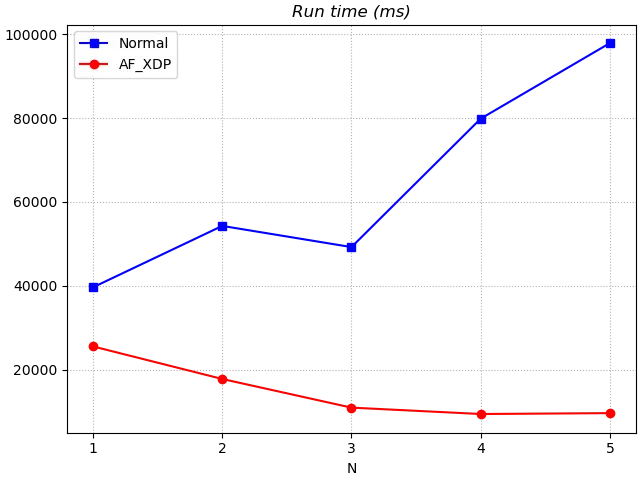
The AF_XDP version is significantly less time consuming than the Normal version for one DNSPerf execution. This is similar to what was found in Test 1.

Summary

AF_XDP significantly improves DNSDist throughput, but risks increasing the average latency per request (which needs to be further verified).

In terms of throughput alone, it is conservatively estimated that AF_XDP can more than double the throughput of DNSDist.

From the tests here, it appears that AF_XDP is a technique that has the potential to significantly improve the throughput of UDP-based web services.

用 AF_XDP 加速 DNSDist

英文读者可阅读本文的 英文版本
English readers can read the English version of this article.

前言

DNSDist 是一个优秀的 DNS 负载均衡器,AF_XDP 则是得益于 eBPF 而产生的新兴的高性能 Linux 异步 IO 接口。
很荣幸 Y7n05h 能作为一个贡献者,参与 DNSDist 的 AF_XDP 改造。

目前,对 DNSDist 的 UDP 部分的改造早已告一段落。这种意在提高性能的修改成果当然不该只是纸上谈兵。
收集压测数据,进行性能分析才是最有说服力的成绩单。

那么,便开始有趣的压测吧。

压测环境

Laptop
OS: ArchLinux
Kernel Version: 5.19.1-arch2-1
CPU: AMD Ryzen 7 4800H with Radeon Graphics
MEM: DDR4 64G
NIC: Intel Corporation Wi-Fi 6 AX200 (rev 1a)
DNSPerf Version: 2.9.0
GCC Version: 12.1.1
Libxdp Version:1.2.5
压测过程中 Laptop 的 CPU、MEM、NIC 始终保持着低负载。

PC1
OS: ArchLinux
Kernel Version: 5.19.1-arch2-1
CPU: Intel(R) Core(TM) i5-8500 CPU @ 3.00GHz
MEM: DDR4 8G
NIC: Intel Corporation Wi-Fi 6 AX200 (rev 1a)
压测过程中 PC1 除必要的系统进程外,仅运行了 DNSDist。

PC2
OS: Ubuntu
Kernel Version: 5.15.0-46-generic
CPU: 12th Gen Intel(R) Core(TM) i7-12700KF
MEM: DDR4 64G
NIC: Broadcom Inc. and subsidiaries BCM4360 802.11ac Wireless Network Adapter (rev 03)
压测过程中 PC2 的 CPU、MEM、NIC 始终保持着低负载。

感谢 @yegetables 提供的 PC2 ,让 Y7n05h 有了稳定运行的 SmartDNS 服务。这对本次压测有很大的帮助。

源码信息:
DNSDist With AF_XDP: https://github.com/Y7n05h/pdns/commit/d42e356a48a433a9f4efae9c3dd648101a37abdf
DNSDist Without AF_XDP: https://github.com/Y7n05h/pdns/commit/f5e76c2a6932ec4360d38219fb515d26d538b40d

本次测试中,Y7n05h 使用 Laptop 下发压测流量,使用 PC1 运行待测试的 DNSDist 实例,使用 PC2 运行 SmartDNS 服务。
Laptop、PC1、PC2 均使用 WIFI 连接至网关(192.168.30.1)。Laptop、PC1、PC2 通过 WIFI 相互访问。遗憾的是这次测试环境中使用的网络在测试过程中仍然被众多其他设备使用,因此 Y7n05h 也无法排除由网络环境波动导致的实验误差。

测试工具使用 DNSPerf。测试中解析 12018 个不同域名的 A 记录,每次测试中每个域名仅解析一次。

测试中,使用 SmartDNS 作为 DNS 服务器。使用 SmartDNS 并没有什么特别的原因,只是因为 Y7n05h 很熟悉它并且在 Ubuntu 上构建并部署 SmartDNS 很方便。

测试过程中,Y7n05h 使用 Laptop 向运行 DNSDist 的 PC1 发送压测请求,PC1 上运行的 DNSDist 解析并处理 DNS 请求后,发送给运行 SmartDNS 的 PC2(如果有必要的话),SmartDNS 则在收到 DNS 请求后并发的发送给 1.1.1.11.0.0.18.8.8.8119.29.29.29 这 4 个 DNS 服务器(如果有必要的话),并将最先接收到的响应回复给 DNSDist。

在本次测试中,因测试需要,Y7n05h 频繁的向上述 4 个公共 DNS 服务器发送了大量的 DNS 请求,Y7n05h 对 Cloudflare、Google、DNSPod 提供的这些公共 DNS 服务表示真心的感谢。(Y7n05h 虽然在测试中进行了大量的 DNS 查询,但这些查询会被 DNSDist、SmartDNS 缓存,并不是每次查询都会向上述服务器发送请求。因此 Y7n05h 自认为本次测试中的做法并未超出合理限度。)同时,为了尽最大可能的排除 DNS 服务的缓存为本次测试造成的干扰,在本次测试开始前,Y7n05h 已使用 DNSPerf 反复多次向 SmartDNS 发送在测试中使用的所有域名的解析请求。

目前的网络环境中,Y7n05h 主观猜测 DNS 请求仍旧以 A 记录 和 AAAA 记录为主,且 Y7n05h 所在的环境中 IPv6 支持并不好。因此 Y7n05h 在这次测试中就以 A 记录的解析能力作为衡量性能的指标。另一方面,Y7n05h 也无法验证 DNS 的解析结果的正确性,因此 Y7n05h 在这次性能分析中不考虑正确性这一指标。

还需要指明的是,这次测试中使用的 DNSDist 配置为了测试方便做出了众多简化,和生产环境中对 DNSDist 的配置可能有较大差异。因此 Y7n05h 的这次测试并不能完全反应 AF_XDP 对 DNSDist 的优化在生产环境中的表现。

众所周知,DNS 协议使用递归的解析方式,请求的响应时间极大的受查询域名是否命中 DNS 服务器的缓存影响。

综上所述,Y7n05h 的这次测试可能是有失偏颇的,可能是不精确的。以下内容仅代表 Y7n05h 观点。

压力测试

uniq.txt 中包含且仅包含 12018 个不重复的域名。

在本文中,所有折线的横轴均为运行的次数,每运行一次 DNSPerf 次数递增 1,同一条曲线对同一 DNSDist 进程实例多次执行 DNSPerf 的结果。同一条曲线上的点,按照时间顺序由左向右排列。任意两次 DNSPerf 均不重叠。

为简化本文论述,Y7n05h 在此与读者约定:

  • 使用 AF_XDP 的 DNSDist 版本省略为「AF_XDP 版」
  • 不使用 AF_XDP 的 DNSDist 版本省略为「Normal 版」

测试1

本次测试中使用如下命令运行 DNSPerf:

1
dnsperf -s 192.168.30.170 -p 5300 -d uniq.txt

在测试 1 中,Y7n05h 先运行了 AF_XDP 版本,然后运行 Normal 版本,最后再次运行 AF_XDP 版。

先看平均延迟,总体来看,无论哪条折线,平均延迟均呈递减趋势。平均延迟呈递减趋势的原因大致为多次执行 DNSPerf 后,SmartDNS 和上游服务器对本次测试中 DNSPerf 涉及的域名缓存命中率逐次提高所致。这一点在「运行完 Normal 版」后,「重新运行 AF_XDP 版」的平均延迟显著低于先前的测试成绩得到印证。根据目前现有的数据,无法判断 AF_XDP 本身对平均延迟的影响

对查询丢失这一指标而言,AF_XDP 版本显著低于正常版。使用 AF_XDP 版本的查询丢失数量随测试次数增加有缓慢递增趋势。

对平均每秒查询数量,或者说吞吐量来说,使用 AF_XDP 版本显著优于 Normal 版本。考虑蓝色折线中的数据的获取时间介于绿色折线和红色折线,缓存对 AF_XDP 版本的影响是增强了绿色曲线而劣化了红色曲线,故此,若以蓝色曲线执行时的缓存情况作为基准,使用 AF_XDP 的 DNSDist 的真实吞吐量大致引介于红色曲线和绿色曲线之间,这对蓝色曲线的不使用 AF_XDP 版本的 DNSDist 而言,有足够强的对比,足够体现 AF_XDP 的吞吐量优势。

运行时间为完整执行一次 DNSPerf 所消耗的时间。这里的结论也是 AF_XDP 版本优于 Normal 版本。这里的结论和从吞吐量分析得来的结论类似,Y7n05h 不再赘述。

即使考虑到 DNSDist、SmartDNS 等查询中对 DNS 的缓存影响导致 DNSPerf 在时间维度上逐次加速。目前能明确得出结论的是,AF_XDP 能显著提升 DNSDist 在当前场景下的吞吐量。对查询延迟的影响,可能仍然需要进一步测试。

测试2

1
dnsperf -s 192.168.30.170 -p 5300 -d uniq.txt -c 500 -T 16

在测试 2 中,通过添加命令行参数,提高了测试的并发量。测试2 中先运行了 Normal 版本,后运行了 AF_XDP 的版本。

注意:测试2 与 测试1 并不连续进行,这可能影响了 DNS 的缓存。

还是先看平均延迟,可以看到后运行的 AF_XDP 版本的延迟仍然呈现递减趋势,在最后的两次测试中与 Normal 版本并无显著差异。Y7n05h 个人猜测若增加测试次数,随着缓存命令中的提高,AF_XDP 版本的平均延迟或将低于 Normal 版。前 3 次测试中,AF_XDP 版的平均显著延迟高于 Normal 版,或许是停止 Normal 版并运行 AF_XDP 版,导致 DNSDist 中的缓存被清除所致。AF_XDP 对平均延迟的影响,仍需进一步测试。

对比 Normal 版和 AF_XDP 版的查询丢失情况,两者仍保持了与 测试1 中相似的情况。且查询丢失数量与 测试1 相比也无明显变化。

就吞吐量而言,加大并发量的查询请求中,AF_XDP 版与 Normal 版的差距进一步增大,且有随测试次数增加继续增大差距的趋势。

对执行一次 DNSPerf 的耗时而言,AF_XDP 版明显低于 Normal 版。这与 测试1 中得到的结论相似。

总结

AF_XDP 能显著提高 DNSDist 的吞吐量,但有提高平均每次请求的延迟的风险(这还需要进一步验证)。

仅就吞吐量而言,保守估计 AF_XDP 能提升 DNSDist 的吞吐量一倍以上。

从这里的测试来看, AF_XDP 这项技术有可能明显提升基于 UDP 的网络服务的吞吐量。

真正的异步--io_uring 闲谈

历史的接口

IO 一直是件麻烦事.对冯诺依曼模型的计算机来说,IO 可以说是计算的开始和结束.因此 IO 十分麻烦,但异常重要.
高效的 IO 方式,是构建高效的应用程序必不可少的,更是计算机科学家与工程师们一直探讨的话题.

在本文中,笔者将简要的回顾 Linux Kernel 已有的 IO 接口.

注:本文不涉及 io_uring 的用法.如需了解 io_uring 的用法请直接查看本文参考资料.

同步接口

常见的 readwritesyscall 都是同步 IO 的接口.
readwrite 类系统调用也衍生出了带有偏移量的接口 preadpwrite 向量读写的接口 readvwritev 和具有两者特性的 preadvpwritev,后来又出现为 preadvpwritev 加上 flag 字段的 preadv2pwritev2 接口.

说了这些,但究竟什么是同步?

同步接口最鲜明的特征就是应用程序:要么在执行应用程序中的用户代码;要么在因完成 IO.
听起来可能有人觉得模糊,请看下面这张图.同步 就是「IO 的完成」是在「请求执行 IO 的时候」(Y7n05h 嘴笨实在不知道该怎么组织语言解释了

在图中:

  • 紫色代表应用程序在执行用户代码
  • 红色代表应用程序在完成 IO

我们可以看到,紫色块和红色块在时间上没有任何的重叠区域.完成 IO 不会和用户代码同时进行.


Y7n05h 猜测一定有读者想说,为什么都说了这么多了,没有提及 阻塞非阻塞 哪怕一句.

这里请允许 Y7n05h 先说异步 IO.因为很多人把 非阻塞异步 混为一谈.Y7n05h 认为先说明异步 IO 有助于理解这二者的概念.

异步接口

同步的反面是异步.

异步就是应用程序只需要提交一次 IO 的请求,由别的组件(通常是内核)来完成完成这次 IO,并在 IO 完成时告诉应用程序 IO 已经完成.

注:有经验的读者一定发现 Y7n05h 在此处刻意模糊了内核在 IO 中的作用,也未提及系统调用导致的陷入内核态等行为.这是为了使本文对异步的描述也适用于 ASIO 等用户态对异步 IO 的实现.

如下图:应用程序无需间断对代码的执行,只需要提交一次请求,即可静待别人(通常是内核)完成 IO.

对于异步 IO :这就好比一个聪明的老板(类比应用程序)请了一个高明的助理,收发文书(类比 IO 行为)之类的事情,只需要老板吩咐一声,助理就好办妥当.助理办妥当后,告诉老板这件事办好了即可.老板只需要接着做自己的事(类比执行代码).

对于同步 IO :这就好比一个没有助理的老板(类比应用程序),收发文书(类比 IO 行为)之类的事情也得自己干.忙着收发文书就不能做自己的事情(类比执行代码)了.

阻塞与非阻塞

谈阻塞和非阻塞就一定谈谈内核了.
在 Linux 系统中,无论采用阻塞 IO 还是非阻塞 IO,若 IO 已经准备好了,那么会立刻返回.
阻塞和非阻塞的区别仅限于 IO 尚未准备就绪的情况下(例如写管道缓冲区已满、读 socket 但尚无数据到达).这类场景,在在使用非阻塞 IO 的系统调用时,系统调用会立刻返回,并通过返回值和 errno 告诉调用者出现了错误.但若是使用阻塞 IO 的系统调用,则会继续等待制止 IO 完成.

Q:那么阻塞与否和同步、异步又有什么关系?
A:平日说的阻塞与非阻塞大多数情景是指同步阻塞和同步非阻塞.对于异步 IO 是否阻塞的问题,通常不做探讨.

为什么?那就要接着回顾 IO 接口的发展了.

众所周知,无论是网络 IO 还是硬盘 IO,其速度远低于 CPU 的运行速度.因此,等待 IO 浪费了应用程序原本可以执行很多事务的时间.追求高性能的应用程序自然不肯什么都不做静静的等待 IO 的发生.
在 Y7n05h 看来 同步非阻塞 的 IO 调用就是为了解决应用程序长时间等待 IO 浪费时间的问题.使用阻塞 IO 之后,应用程序自然可以过每过一小段时间尝试一次 IO 是否已经就绪,别的时间继续用来做别的事,这也就是是所谓的 轮询
倘若一个 IO 密集型应用(例如一个服务器)那么可能需要同时处理大量的 IO 请求,当然遍历并轮询所有的 IO 是否就绪是一个做法.内核也提供了相关的设施用来完成遍历并轮询的操作(selectpoll) ,但这在同步 IO 中也不是一个最好的做法.内核还提供了 epoll 这种机制,当内核通过中断机制得知有 IO 时间发生时通知应用程序.这样便避免了遍历之苦也提高了 IO 的效率.这也就是 IO 的多路复用了.

非阻塞 IO 的语义是:试一试,若能完成 IO 就完成;完不成就算了.

说了这么多,我想读者一定发现了:非阻塞 IO 无非是想提高 CPU 的利用率.

谈回异步,既然异步 IO 已经不可能卡住应用程序的代码了.那么阻塞与否就已经没了意义.
不但非阻塞在异步 IO 中没有意义,反而会制造麻烦.何处此言?因为非阻塞 IO 遇到 IO 未就绪时会直接返回.

回到之前老板请助理的例子.老板一定不会希望他请助理去送一份文件,仅仅是因为助理没找到收件人就回来向他报告失败,而是希望他去等收件人回来再把文件交给他.这才是一个聪明的助理.异步 IO 完美的符合了这一切的标准.

io_uring 一统天下

在 io_uring 出现之前,追求高性能 IO 的应用程序有这几种常见做法:

  • 针对文件 IO 可采用 AIO 异步接口.
  • epoll + 同步非阻塞.
  • 使用类似 boost Asio 的方式,使用 IO 线程模拟异步接口.

但这几种方式都有自己的问题:

  • AIO 仅支持文件 Direct IO.
  • epoll + 同步非阻塞在大量连接的高并发场景中比 io_uring 有更高的开销和更高的延迟.
  • boost Asio 与 io_uring 同为异步接口,但 io_uring 的在内核态的实现比在用户态基于多线程模拟异步 IO 更高效.
    可以说,AIO 被 io_uring 最主要是因为 AIO 的应用面太窄.而「epoll 同步非阻塞」和「boost Asio」被 io_uring 打败是因为 io_uring 的性能更好.

但 io_uring 并非没有缺点.

可移植性差.
这是 io_uring 的一个硬伤.io_uring 是 Linux 5.1 中加入的新接口.且 io_uring 还有部分特性在 5.6 才最终加入.因此想体验 io_uring 的一个相对完整的特性可能需要 Linux Kernel 5.6+.(虽然 Linux Kernel 5.6 中的 io_uring 已经相对完整了,但 Linux Kernel 5.10-5.15 中也为 io_uring 添加了更多的新特性)

接口复杂.
注意到了吗?io_uring 代替的是 「epoll + 同步非阻塞」而不仅仅是 epoll.为了支持各种 IO 调用,io_uring 通过庞大 struct io_uring_sqe 描述各种各样的 IO 请求.但 io_uring 接口的复杂性不仅仅体现在这里.io_uring_setupio_uring_enterio_uring_register 看似仅仅只有 3 个系统调用,但它们却都分别支持了十多个 flag 来改变系统调用的行为.

那么 io_uring 的性能为什么会好呢?

  • 内核和用户态通过 mmap 共享 io_uring 相关的部分数据结构.
  • 内核可以并行执行应用程序提交的 IO 请求.
  • 节省系统调用次数.将 IO 请求放入提交队列(SQ)即可,无需通过中断陷入内核执行系统调用.

MoreInfo

本文到这里就结束了.读者可能会觉得有点突兀,但 Y7n05h 写本文的意愿本就不是去介绍 io_uring 的用法.本文仅仅是为了科普这几种不同的 IO 的方式的区别,区分 「阻塞」 与 「非阻塞」 这一对概念和 「同步」与「异步」这一堆概念.对于需要详细了解 io_uring 的读者,请看下面的 参考资料

参考资料

1. Efficient IO with io_uring.[G/OL].https://kernel.dk/io_uring.pdf.
2. What is io_uring?. [G/OL]. Lord of the io_uring, https://unixism.net/loti/what_is_io_uring.html.
3. IO_URING(7). [G/OL]. Linux Programmer’s Manual, https://man.archlinux.org/man/io_uring.7.
4. IO_URING_SETUP(2). [G/OL]. Linux Programmer’s Manual, https://man.archlinux.org/man/io_uring_setup.2.
5. IO_URING_ENTER(2). [G/OL]. Linux Programmer’s Manual, https://man.archlinux.org/man/io_uring_enter.2.
6. IO_URING_REGISTER(2). [G/OL]. Linux Programmer’s Manual, https://man.archlinux.org/man/io_uring_register.2.

Arch Linux 安装指引

info
LICENSE
本文使用 GNU自由文档许可证1.3 发布.

secondary

致谢

  • 感谢 VincilLau 指出本文的一处错误.
  • 感谢 ZtXavier 指出本文的一处错误.
  • 感谢 Celestial 指出本文的一处 Typo.

Arch Linux 安装指引

相信读者们早都听说过了 Arch Linux 的名声,笔者也从接触 Arch Linux 起就被他所具有的特性吸引.

本文中将讲述从 Arch Linux Live CD 中安装 Arch Linux 的方法.本文中假设读者已经完成了 下载、验证 Arch Linux 安装镜像以及将 Arch Linux 安装镜像写入物理介质并使用其介质以 UEFI 模式下完成引导,启动欲安装 Arch Linux 的设备的步骤.如有读者对该部分的操作方式存在疑问,请查阅 Installation guide 获得更多信息.

连接网络

Arch Linux 安装过程必须连接网络.在以 UEFI 模式启动至 Arch Linux 安装环境后,首先要做的便是连接网络.因在「Arch Linux 安装环境」中连接 WiFi 较为麻烦,笔者推荐一下两种方式在「 Arch Linux 安装环境」中连接网络,读者任选其一即可:

  • 使用「网线」连接「设备」与「路由器」的 LAN 插口
  • 使用「数据线」连接「设备」与「Android 手机」,并在「『系统设置』—『热点和网络共享』」中开启「USB 网络共享共享」

请读者在安装环境中使用

1
# ping archlinux.org

来测试网络连接是否通畅.

时间校准

在系统中开启时间同步服务:

1
# timedatectl set-ntp true

使用使用 timedatectl status 检查服务状态.
请在进行下一步前确保系统的时间正确.

建立硬盘分区

warn
WARNNING
本步骤中请勿直接套用本文中的命令.
在进行分区操作时,请仔细检查防止错误操作带来不良后果.

使用 lsblk 命令能清晰的看到目前电脑中的硬盘的分区情况.固态硬盘通常以 nvme 开头,机械硬盘通常以 sda 开头.请使用 cfdisk 工具,完成对硬盘的分区.
例如,如需对 /dev/sda 进行分区操作,请使用:

1
# cfdisk /dev/sda

同理,对 nvme0n1 进行分区操作的指令为:
1
# cfdisk /dev/nvme0n1

在分区时,需要分出 至少 两个分区.

分区名大小Type备注
/越大越好Linux filesystem必选
boot至少 260 MB ,一般不超过 500 MBEFI System必选
swap通常和内存大小近似,可根据喜好适量扩大或缩小Linux swap小内存设备可选,大内存设备不需要
home越大越好Linux filesystem可选
  1. 需要注意的是 swap 即交换空间可以是一个分区(「swap 分区」)也可以是一个文件(「swap 文件」),甚至可以选择不需要 swap.如果读者的设备的内存足够大(例如:32 GB 或以上)那么通常不需要 swap.
  2. 笔者十分推荐创建 home 分区,有了它读者在日后重新安装 GNU/Linux 操作系统的时候,就不再需要备份个人的数据,仅需要将 home 分区挂载即可.笔者使用 512 GB 的固态硬盘安装 Arch Linux,对 home 分区和 / 分区的存储空间分配是各占一半,home 分区稍多一些,/ 分区仅有 200 GB 但对笔者而言已经十分充足.
  3. 在使用 cfdisk 时请通过界面下方的 Type 栏选择合适的类型(表中已注明).

选择文件系统 格式化硬盘分区

warn
WARNNING
本步骤中请勿直接套用本文中的命令.
在进行格式化操作时,请仔细检查防止错误操作带来不良后果.

笔者推荐使用 ext4xfs作为 /home 的文件系统.

如果读者想尝试一下 COW ( Copy-On-Write ) 的文件系统的话,那也可以尝试一下 btrfs

当然,选择文件系统时也需要充分的考虑文件系统所具有的各种特性和自身的需求,最终还请读者们理性选择.

如果读者不知道如何选择的话,那便使用 ext4 作为 /home 的文件系统吧.

  • 格式化 boot 分区,请将 /dev/nvme0nxpy 替换为 boot 分区的位置
    1
    # mkfs.fat -F32 /dev/nvme0nxpy
  • (如果没有swap分区则跳过)格式化swap分区,请将 请将 /dev/nvme0nxpy 替换为 swap 分区的位置
    1
    # mkswap /dev/nvme0nxpy

请根据在上文中选择的文件系统,选择合适的格式化指令.请把 nvme0nxpy 替换成合适的名称.

  • 选择 ext4 作为文件系统格式化 /dev/nvme0nxpy
    1
    # mkfs.ext4 /dev/nvme0nxpy
  • 选择 xfs 作为文件系统格式化 /dev/nvme0nxpy
    1
    # mkfs.xfs /dev/nvme0nxpy
  • 选择 btrfs 作为文件系统格式化 /dev/nvme0nxpy
    1
    # mkfs.btrfs /dev/nvme0nxpy
    请选择合适的文件系统,并用相应的指令格式化「/ 分区」和「home 分区」(如果没有「home 分区」则不需要格式化「home 分区」).

挂载

  1. 挂载 / 分区
    1
    # mount /dev/nvme0nxpy /mnt
  2. 创建 /boot
    1
    # mkdir /mnt/boot
  3. 挂载 boot 分区
    1
    # mount /dev/nvme0nxpy /mnt/boot
  4. 如果读者创建了 swap 分区,那么请挂载 swap 分区
    1
    # swapon /dev/nvme0nxpy
  5. 如果读者创建了 home 分区,那么请创建 /home 目录
    1
    # mkdir /mnt/home
  6. 如果读者创建了 home 分区,那么请挂载 home 分区
    1
    # mount /dev/nvme0nxpy /mnt/home

tip
TIP

选择 btrfs 作为文件系统的读者,可以考虑笔者在上面提供的方案.
也可以考虑使用 btrfs 的子卷管理功能,将 home 分区作为 btrfs 的子卷

在使用 btrfs 前请读者务必查阅 Btrfs

首先将格式化好的 btrfs 分区挂载至 /mnt,然后在创建子卷

1
mount /dev/nvme0nxpy /mnt

@ 子卷将作为新安装的系统的根目录, @home 将作为新安装的系统的 /home 目录.

创建 @ 子卷

1
btrfs subvolume create /mnt/@

创建 @home 子卷

1
btrfs subvolume create /mnt/@home

然后 umount /mnt
将刚才创建的 btrfs 的 @ 子卷 挂载至 /mnt

1
mount -o subvol=@ /dev/nvmen0nxpy /mnt

如果你还想启用透明压缩,那么可以使用(下面以使用 zstd 压缩算法作为演示)

1
mount -o compress=zstd,subvol=@ /dev/nvmen0nxpy /mnt

如需手动指定 zstd 压缩级别可使用(下面指定 zstd 压缩级别为 6 作为演示):

1
mount -o compress=zstd:6,subvol=@ /dev/nvmen0nxpy /mnt

/mnt 下创建 home 文件夹

1
mkdir /mnt/home

将 @home 子卷挂载至 /mnt/home 并使用 zstd 并指定压缩级别为6级的透明压缩:

1
mount -o compress=zstd:6,subvol=@home /nvmen0nxpy /mnt/home

安装

编辑镜像源列表

文件 /etc/pacman.d/mirrorlist 定义了软件包会从哪个镜像源下载.[3]

Arch Linux 在安装过程中会下载大量的软件包,因此选择一个访问速度较快的镜像源是十分重要的.
在执行下载并安装的操作前请使用 nano(推荐) 或 vim 或其他的编辑器修改镜像源.
笔者在此推荐使用 nano ,因为其操作简便对新手更加友好.

1
# nano /etc/pacman.d/mirrorlist

注意:在修改的时候去掉表示内容是注释的#号,将访问速度最快的镜像源的行放在文件的最上面./etc/pacman.d/mirrorlist 将被从前至后读取,写在前面的镜像源具有更高的优先级.

安装必要的软件包

在完成修改并保存后,请强制同步软件包的数据库.

1
# pacman -Syy

其后使用 pacstrap 安装 Arch Linux
1
# pacstrap /mnt base base-devel linux linux-firmware linux-headers nano

生成 fstab

fstab 用来说明在启动过程中如何挂载硬盘分区.在 Arch Linux 上只需要简单的命令即可生成 fstab

1
2
# genfstab -U /mnt >> /mnt/etc/fstab

chroot

Chroot 就是变更当前进程及其子进程的可见根路径.变更后,程序无法访问可见根目录外文件和命令.这个目录叫作 chroot jail.[4]

1
# arch-chroot /mnt

本地化设置

以中国大陆的用户为例,这条语句在系统层面更改了时区的配置.

1
# ln -sf /usr/share/zoneinfo/Asia/Shanghai /etc/localtime

设置标准时间为世界协调时(UTC).

1
# hwclock --systohc --utc

这里的配置影响「地域、货币、时区日期的格式、字符排列方式」等.只需要用文版编辑器打开它然后编辑并保存.

1
# nano /etc/locale.gen

需要作的是在文件中找到#en_US.UTF-8 UTF-8#zh_CN.UTF-8 UTF-8#zh_TW.UTF-8 UTF-8这三行,并删掉这三行中的#
然后执行

1
# locale-gen

其后执行

1
# echo LANG=en_US.UTF-8 > /etc/locale.conf

设置主机名

1
# echo myhostname > /etc/hostname

安装引导程序

1
# pacman -S grub  efibootmgr dosfstools

有多系统的需求的读者还需要执行

1
# pacman -S os-prober

并且在 /etc/default/grub 中添加

1
GRUB_DISABLE_OS_PROBER=false

有安装多系统的需求,且多系统中含有 Microsoft Windows 操作系统的,可执行以便在 ArchLinux 中挂在 Microsoft Windows 中的 NTFS 文件系统的分区.

1
# pacman -S ntfs-3g

安装 grub 引导

1
2
# grub-install --target=x86_64-efi --efi-directory=/boot --bootloader-id=grub --recheck
# grub-mkconfig -o /boot/grub/grub.cfg

用户管理

首先配置 sudo,和上面一样,还是使用 nano 作为编辑的工具.但是这次打开方式与以往不太相同.

1
# EDITOR=nano visudo

寻找到下面这行的内容,删掉这行中的 #
1
# %wheel ALL=(ALL:ALL) ALL

设置 root 用户密码

1
# passwd

在日常的操作中不推荐使用 root 用户,因此需要创建一个新的用户.下面的命令讲创建一个叫 username 的用户,并将其加入了 wheel 用户组.
1
# useradd -m -G wheel username

设置用户的密码
1
# passwd username

配置 swap 文件

  • 如果创建了 swap 分区,则跳过本节
  • 如果设备的内存大于等于 32 GB,通常也该跳过本节的内容
    正如前文所说的那样: swap 可以是一个硬盘分区也可以是一个文件
    创建 swap 文件的方式本文不在说明,请查阅 Swap

安装桌面环境

安装 KDE

1
# pacman -S plasma sddm

开启 sddm
1
# systemctl enable sddm

安装字体

安装 Google Noto Fonts 字体

1
# pacman -S noto-fonts noto-fonts-cjk noto-fonts-emoji noto-fonts-extra

安装 更纱黑体
1
# pacman -S ttf-sarasa-gothic

安装网络管理器

1
# pacman -S networkmanager

启用网络管理器

1
# systemctl enable NetworkManager

此时 Arch Linux 的安装步骤全部结束.重启设备享受 Arch Linux 即可.


启用 Arch Linux 中文社区仓库

使用 nano 编辑 /etc/pacman.conf

1
2
#[multilib]
#Include = /etc/pacman.d/mirrorlist

后面加入
1
2
[archlinuxcn]
Server = https://repo.archlinuxcn.org/$arch

保存并退出后执行
1
2
$ sudo pacman -Syy && sudo pacman -S archlinuxcn-keyring
$ sudo pacman -S archlinuxcn-mirrorlist-git

再次编辑 /etc/pacman.conf
将刚才加入的内容中的 Server = https://repo.archlinuxcn.org/$arch
修改为 Include = /etc/pacman.d/archlinuxcn-mirrorlist

编辑 /etc/pacman.d/archlinuxcn-mirrorlist
Arch Linux 中文社区 仓库选择你喜欢的镜像源.如何编辑镜像源请参照前文.

配置中文拼音输入法

安装 fcitx5-imfcitx5-chinese-addonsfcitx5-pinyin-zhwiki

1
$ sudo pacman -S fcitx5-im fcitx5-chinese-addons fcitx5-pinyin-zhwiki

安装完编辑或创建 /etc/environment 添加以下内容:

1
2
3
4
5
GTK_IM_MODULE=fcitx
QT_IM_MODULE=fcitx
XMODIFIERS=@im=fcitx
SDL_IM_MODULE=fcitx
GLFW_IM_MODULE=ibus

fcitx5 配置中将 拼音 加入当前输入法.

使用蓝牙

在使用蓝牙前,请安装 bluezbluez-utilspulseaudio-bluetooth

1
2
3
4
$ sudo pacman -S bluez bluez-utils pulseaudio-bluetooth
$ sudo modprobe btusb
$ sudo systemctl enable bluetooth.service
$ sudo systemctl start bluetooth.service

设置用户 locale

创建或编辑 ~/.config/locale.conf

1
2
3
4
5
6
7
8
9
10
11
12
13
14
LANG=zh_CN.UTF-8
LC_CTYPE="zh_CN.UTF-8"
LC_NUMERIC="zh_CN.UTF-8"
LC_TIME="zh_CN.UTF-8"
LC_COLLATE="zh_CN.UTF-8"
LC_MONETARY="zh_CN.UTF-8"
LC_MESSAGES="zh_CN.UTF-8"
LC_PAPER="zh_CN.UTF-8"
LC_NAME="zh_CN.UTF-8"
LC_ADDRESS="zh_CN.UTF-8"
LC_TELEPHONE="zh_CN.UTF-8"
LC_MEASUREMENT="zh_CN.UTF-8"
LC_IDENTIFICATION="zh_CN.UTF-8"
LC_ALL=

使用 zsh

1
2
$ sudo pacman -S zsh
$ sudo chsh -s /bin/zsh username

参考资料

1. ArchWiki编者. Installation guide (简体中文)[G/OL]. ArchWiki, https://wiki.archlinux.org/index.php/Installation_guide_(简体中文).
2. ArchWiki编者. Installation guide[G/OL]. ArchWiki, https://wiki.archlinux.org/index.php/Installation_guide.
3. ArchWiki编者. pacman (简体中文)[G/OL]. ArchWiki, https://wiki.archlinux.org/index.php/Pacman_(简体中文).
4. ArchWiki编者. Chroot (简体中文)[G/OL]. ArchWiki, https://wiki.archlinux.org/index.php/Chroot_(简体中文).
5. 约伊兹的萌狼乡手札.给 GNU/Linux 萌新的 Arch Linux 安装指南 rev.B[G/OL]. 约伊兹的萌狼乡手札, https://blog.yoitsu.moe/arch-linux/installing_arch_linux_for_complete_newbies.html.

GNU/Linux 环境检测系统限制

GNU/Linux 环境检测系统限制

为了充分保证程序的可移植性,开发人员通常该在 「POSIX」、「X/Open Curses Issue 4」等主流标准的范围内小心的使用 GNU/Linux 系统资源.
话虽如此,但标准一旦制定就已经代表着过去,随着计算机硬件的飞速发展,过去的标准 可能 难以反映今日计算机所拥有的资源.
如果愿意放弃些许可移植性,那么开发人员 或许能 够更大程度的利用 GNU/Linux 所能提供和管理的资源.那么,作为开发人员,该如何查询系统资源的限制呢?

ulimit

通过 which ulimit 便可知晓 ulimitshell 的内建命令.通过 ulimit 命令能设置 shell 的资源限制,该限制在调用 fork() 是,将被其子进程继承.

标准限制

POSIX

The Portable Operating System Interface (POSIX) is a family of standards specified by the IEEE Computer Society for maintaining compatibility between operating systems. POSIX defines the application programming interface (API), along with command line shells and utility interfaces, for software compatibility with variants of Unix and other operating systems.[6]

POSIX.1 定义了很多涉及操作系统实现限制的常量,遗憾的是,这是 POSIX.1 中最令人迷惑不解的部分之一.虽然POSIX.1定义了大量限制和常量,我们只关心与基本 POSIX.1接口有关的部分.
在这些限制和常量中,某些可能定义在中,其余的则按具体条件可定义、可不定义.[1]

POSIX.1 中,定义了 _POSIX_OPEN_MAX 的值为 20 .可想而志,这难以满足当今应用程序开发的需求.
CHILD_MAXPOSIX.1 的标准中,是一个与设备资源有关「运行时不变值」,POSIX.1 仅保证了其最小值为 _POSIX_CHILD_MAX

XSI

The Single UNIX Specification (SUS) is the collective name of a family of standards for computer operating systems, compliance with which is required to qualify for using the “UNIX” trademark. The core specifications of the SUS are developed and maintained by the Austin Group, which is a joint working group of IEEE, ISO JTC 1 SC22 and The Open Group. If an operating system is submitted to The Open Group for certification, and passes conformance tests, then it is deemed to be compliant with a UNIX standard such as UNIX 98 or UNIX 03.[7]

XSI定义了代表实现限制的几个常量.[1]

操作系统的资源限制

上文只是从各项标准层面十分简单的叙述各项标准中的要求,但操作系统实际上能提供的资源 可能 远比标准中要求的多.因此,在运行时进行对系统能提供的资源的限制的查询是有必要的.

获取操作系统资源限制

1
2
3
4
#include <unistd.h>
long sysconf(int name);
long pathconf(const char *pathname, int name);
log fpathconf(int fd, int name);

这几个函数的接口都十分简单,更多信息请查看 Linux Programmer's Manual

更改系统资源限制

每个进程都有一组资源限制,其中一些可以用getrlimit和setrlimit函数查询和更改.

1
2
3
#include <sys/resource.h>
int getrlimit(int resource, struct rlimit *rlptr);
int setrlimit(int resource, const struct rlimit *rlptr);

两个函数返回值:若成功,返回0;若出错,返回非0
这两个函数在Single UNIX Specification的XSI扩展中定义.进程的资源限制通常是在系统初始化时由0进程建立的,然后由后续进程继承.每种实现都可以用自己的方法对资源限制做出调整.
对这两个函数的每一次调用都指定一个资源以及一个指向下列结构的指针.
1
2
3
4
struct rlimit {
rlim_t rlim_cur; /* soft limit: current limit */
rlim_t rlim_max; /* hard limit: maximum value for rlim_cur */
};

在更改资源限制时,须遵循下列3条规则.

  1. 任何一个进程都可将一个软限制值更改为小于或等于其硬限制值.
  2. 任何一个进程都可降低其硬限制值,但它必须大于或等于其软限制值.这种降低,对普通用户而言是不可逆的.
  3. 只有超级用户进程可以提高硬限制值.[1]

参考资料

1. W.RichardStevens.Stephen.UNIX环境高级编程[M].第3版.戚正伟,译.北京:人民邮电出版社
2. ulimit(1p)[G/OL].POSIX Programmer’s Manual,https://man.archlinux.org/man/ulimit.1p.
3. ulimit(3)[G/OL].Linux Programmer’s Manual,https://man.archlinux.org/man/ulimit.3.
4. ulimit(3p)[G/OL].Linux Programmer’s Manual,https://man.archlinux.org/man/ulimit.3p.
5. Unix标准和实现[G/OL]https://klose911.github.io/html/apue/standard.html.
6. Wikipedia contributors. POSIX[G/OL]. Wikipedia, https://en.wikipedia.org/wiki/POSIX.
7. Wikipedia contributors. Single UNIX Specification[G/OL]. Wikipedia, https://en.wikipedia.org/wiki/Single_UNIX_Specification.

GNU/Linux_C 开发实战--myshell

Linux C 开发实战—myshell

时间过的飞快,不知不觉中离笔者写完myshell已经过了不少时间了.为了进一步的巩固笔者当初从开发实战中学习到的知识,笔者决定还是补上这篇拖延了很久的博客.

需求

  • 支持使用任意数量的 管道
  • 支持使用命令调用其他程序
  • 支持使用任意数量的重定向输入输出
  • 内置 cd 命令
  • 内置 history 命令
  • 支持Tab键 补全
  • 实现光标移动
  • 屏蔽相关信号,防止 Ctrl+C 杀死
  • 界面美观

开发过程

头文件

1
2
3
4
5
6
7
8
9
10
#include <ctype.h>
#include <errno.h>
#include <fcntl.h>
#include <stdio.h>
#include <stdlib.h>
#include <string.h>
#include <sys/wait.h>
#include <unistd.h>
#include <readline/history.h>
#include <readline/readline.h>

宏和全局变量

1
2
3
4
5
6
7
8
extern char **environ;
struct COMMAND
{
int argc; //参数数量
int Redirect_FD[3]; //标准输入、标准输出、错误输出的重定向情况
char **argv;
};
char *oldpath;

错误处理

1
2
3
4
5
6
void myerror(char *string, int line)
{
fprintf(stderr, "\aLine:%d,error:\a\n", line);
fprintf(stderr, "%s:%s\n", string, strerror(errno));
exit(EXIT_FAILURE);
}

开发前的分析

  • 多重管道可以使用 分治 的思想逐层处理,化简为单重管道的情况,而单重管道可视为先后发生A >./tmpfileB <./tmpfile 的情况,因此管道和重定向符的实现紧密相关.
  • 重定向符有很多种格式,例如:>>>1>1>>2>2>><<<1>&21>>&22>&12>>&1 ,但这次练习的重点不是字符串的解析,故此笔者不计划实现最后的五种.
  • Tab键 补全、历史记录的存放等功能均由 readline 库实现(感谢GNU Project为此作出的贡献).
  • 界面美观的要求通过输出带有颜色的文字和输出对齐的文本来实现
  • 调用其他程序则涉及进程控制的相关内容

获取并解析用户输入

1
2
3
4
5
6
7
8
9
10
11
12
13
14
15
16
17
18
int main(void)
{
read_history(NULL);

while (1)
{
char *command = readline("MYSHELL$");
add_history(command);
write_history(NULL);
launch(command);
free(command);
}

if (oldpath != NULL)
{
free(oldpath);
}
}

通过 readline 库提供的 readline() 函数,便可轻松的输出 命令提示符 并获取用户输入.

将命令拆分成多段

此时,笔者运用著名的 分治 思想,将形如 A -b cde -f | g -hi | j -k lmn >123.txt 的命令以 | 为界线拆成多段,分别处理.

笔者在前文分析过 管道 可以用两个输入输出重定向来实现.
下面分析实现的具体方法,取一条以|符号为界分为 $n$段的命令( $\forall n \in\mathbb N^+, n \geq 3$ )

  1. 考察该命令的第 $1$ 段.管道要求第二段命令的输入为第一段命令的输出.因此可将第 $1$ 段命令的标准输出重定向至临时文件,并将第 $2$ 段命令的标准输入重定向至该临时文件.
  2. 考察该命令的第 $i$ 段( $\forall i \in\mathbb N, 1 < i < n $).该段命令的输入为第 $i-1$ 段的输出,可将第 $i-1$ 段的标准输出重定向至临时文件,并将第 $i$ 段的标准输入重定向至该临时文件;该段命令的输出为第 $i+1$ 段的输入,可将第 $i$ 段的标准输出重定向至临时文件,并将第 $i+1$ 段的标准输入重定向至该临时文件
  3. 考察该命令的第 $n$ 段.该段的输入为第 $n-1$ 段的输出.因此可将第 $n-1$ 段的标准输出重定向至临时文件,并将第 $n$ 段的标准输入重定向至该临时文件.

这就是实现管道的全部流程.

但问题来了,如何处理形如 A -b cde -f >./log.txt | g -hi | j -k lmn <123.txt 的命令?在上段中,笔者分析了第 $1$ 段的标准输入要重定向至临时文件,但命令中却要求重定向至 log.txt
笔者曾考虑复制一份重定向中产生的临时文件至 ./log.txt 或者用 log.txt 代替临时文件的功能,这样就能上例中的冲突.但是请思考这个例子 ls -al >/dev/null |wc -c
这个命令中wc -c命令读的结果根据实现方法会有不同.在笔者的环境中使用 zsh 执行该命令的结果不为 0 ,但使用 GNU bash 执行该命令的结果为 0 .笔者认为类似上面的命令具有 二义性 ,故此笔者的 myshell 实现中对形如 A -b cde -f >./log.txt | g -hi | j -k lmn >123.txtls -al >/dev/null |wc -cls -alR / |grep test <./result.md 这类命令做报错处理,欢迎读者们在评论区留言和笔者讨论这个问题.

好了,至此笔者说明了本程序的绝大部分设定和思想,下面就可以来讨论 launch() 函数的具体实现了.

首先遍历一遍命令,计算命令中的管道数量.

1
2
3
4
5
6
7
8
int pipe = 0; //管道计数器
for (char *pr = command; *pr != '\0'; pr++)
{
if (*pr == '|')
{
pipe++;
}
}

计算出了管道的数量也就知道了命令需要被分成几段.那么就可以根据分段的数量创建一个 COMMAND 的数组.

1
2
3
4
5
struct COMMAND *cmd = (struct COMMAND *)calloc(pipe + 1, sizeof(struct COMMAND));
if (cmd == NULL)
{
myerror("malloc", __LINE__);
}

然后就是将命令分段的实现了.

1
2
3
4
5
6
7
8
9
char *remain = NULL;
char *part = strtok_r(command, "|", &remain);
for (int i = 0; i <= pipe; i++)
{
/* 初始化 */
cmd[i].Redirect_FD[STDIN_FILENO] = -1;
cmd[i].Redirect_FD[STDOUT_FILENO] = -1;
cmd[i].Redirect_FD[STDERR_FILENO] = -1;
}

还记得吗?笔者用 Redirect_FD 表示每段命令中重定向的文件的文件描述符.因为合法的文件描述符都是非负的,那么笔者必须要将 Redirect_FD 中的每个元素都初始化为 -1 才能表达不需要重定向的情况.

tip

TIP

笔者猜会有读者对strtok_r()函数的使用产生疑惑.strtok_r()函数的用法与strtok()函数的用法类似,只是多了一个参数.

这两个函数的函数原型为:

char strtok(char str, const char delim);
char
strtok_r(char str, const char delim, char **saveptr);

简单的说,strtok_r() 是可重入版本的 strtok() ,就是将使用 static 变量保存的数据保存在了参数里,实现了可重入的需求.
至于为什么要用 strtok_r() 而不是 strtok() ?因为后文还有一处有分割字符串的需求,如果都用 strtok() 来实现,那么在第2处调用(指第一个参数不为NULL的第2处调用)会覆盖先前保存在 static 变量中的数据,无法满足笔者的需求.后文会再次重复该问题.

在这之后,分别处理每段命令.

1
2
3
4
5
6
7
8
9
10
11
12
13
14
15
16
17
18
19
20
21
22
23
24
25
26
27
28
29
30
31
32
33
34
35
36
37
38
39
40
41
42
43
44
45
46
47
48
    for (int i = 0; i <= pipe; i++)
{

if (pipe && i < pipe)
{
/* 生成临时文件 */
char TempFile[] = "/tmp/MyShell_XXXXXX";
int TempFile_FD = mkstemp(TempFile);
/* 检测生成临时文件是否成功 */
if (TempFile_FD == -1)
{
myerror("mkstemp", __LINE__);
}
/* 将本段命令的标准输出重定向至临时文件 */
cmd[i].Redirect_FD[STDOUT_FILENO] = TempFile_FD;
/* 将下段命令的标准输入重定向至临时文件 */
cmd[i + 1].Redirect_FD[STDIN_FILENO] = TempFile_FD;
unlink(TempFile);
//删除临时文件(临时文件在被close前依然可用,不会被立即删除)
}
analyze(part, &cmd[i]);//分析与检测本段命令中的参数与重定向符
if (不是内置命令)
{
执行本段命令
}
if (pipe && i < pipe)
{
lseek(cmd[i].Redirect_FD[STDOUT_FILENO], 0, SEEK_SET);
cmd[i].Redirect_FD[STDOUT_FILENO] = -1;
}
part = strtok_r(NULL, "|", &remain);
for (int IO_Steam = 0; IO_Steam < 3; IO_Steam++)
{
if (cmd[i].Redirect_FD[IO_Steam] >= 0)
{
close(cmd[i].Redirect_FD[IO_Steam]);
//关闭文件,释放相关资源
}
}

for (int j = 0; j < cmd[i].argc; j++)
{
free(cmd[i].argv[j]);
}
free(cmd[i].argv);
}
free(cmd);
}

为了便于读者们阅读和理解,第22行和第23行笔者使用了伪码来描述其中的逻辑.具体的实现将在后文说明.

请读者们注意第28 行,该行将文件的读取位置重置为0.以便下一段命令从文件头读取内容.

29 行,在本段命令执行结束后,将因实现管道产生的重定向中的输出重定向设为-1.为什么要这样做?为了避免 close 临时文件,在第18行已经对临时文件执行了unlinkclose 后临时文件的引用计数递减为0,会导致临时文件被真正的删除,下一段命令将无法完成输入重定向.故此,临时文件只能在完成输入重定向的使命之后关闭.

最终,所有打开的重定向文件都该被将被close

分析处理命令段

首先将正在处理的命令段复制一份,因为在分析中会更改命令段的值.

1
2
3
4
5
char *string = strdup(OriginString);
if (string == NULL)
{
myerror("malloc", __LINE__);
}

tip

TIP

strdup()的用法等于用strlen()计算源字符串的长度后分配为新字符串分配内存空间并完成复制最终返回原字符串的副本的地址.

srdup() 的函数签名为:

char *strdup(const char *s);

在这之后定义变量char *end = string + strlen(string); 作为一个哨兵指向\0,标记string的结束位置,防止指针越界.

下面就是查找命令段中是否含有输入输出重定向,重定向是否合法,以及解析命令行的参数,将其转换为char **argv; 的形式.

处理标准输出、错误输出重定向

1
2
3
4
5
6
7
8
9
10
11
12
13
14
15
16
17
18
19
20
21
22
23
24
25
26
27
28
29
30
31
32
33
34
35
36
37
38
39
40
41
42
43
44
45
46
47
char *result = NULL;
while ((result = strchr(string, '>')) != NULL)
{
*result = ' ';
int IO_Steam = 1;

result--;
if (result > string && isdigit(*result))
{
if (*result - '0' != STDOUT_FILENO && *result - '0' != STDERR_FILENO)
{
printf("Unknow COMMAND\n");
exit(EXIT_FAILURE);
}
else
{
IO_Steam = *result - '0';
*result = ' ';
}
}
if (cmd->Redirect_FD[IO_Steam] >= 0)
{
printf("Unknow COMMAND\n");
exit(EXIT_FAILURE);
}
result += 2;
_Bool Append = 0;
if (result < end && *result == '>')
{
Append = 1; //附加模式
*result = ' ';
}
while (result < end && isspace(*result))
{
result++;
}

if (result < end)
{
cmd->Redirect_FD[IO_Steam] = OpenFile(result, O_WRONLY | O_CREAT | (Append ? O_APPEND : O_TRUNC));
}
else
{
printf("Unknow COMMAND\n");
exit(EXIT_FAILURE);
}
}

处理输入重定向

有了标准输出、错误输出重定向的处理方式,那标准输入重定向的处理方式也不会很难.

1
2
3
4
5
6
7
8
9
10
11
12
13
14
15
16
17
18
19
20
21
22
while ((result = strchr(string, '<')) != NULL)
{
*result = ' ';
if (cmd->Redirect_FD[STDIN_FILENO] >= 0)
{
printf("Unknow COMMAND\n");
exit(EXIT_FAILURE);
}
while (result < end && isspace(*result))
{
result++;
}
if (result < end)
{
cmd->Redirect_FD[STDIN_FILENO] = OpenFile(result, O_RDONLY);
}
else
{
printf("Unknow COMMAND\n");
exit(EXIT_FAILURE);
}
}

解析命令行参数

1
2
3
4
5
6
7
8
9
10
11
12
13
14
15
16
17
18
19
20
21
22
23
24
25
26
27
28
29
30
31
32
33
int arg_max = 16; //参数上限,在无法满足需求时会自动增加

cmd->argv = (char **)calloc(arg_max, sizeof(char *));
if (cmd->argv == NULL)
{
myerror("malloc", __LINE__);
}
char *remain = NULL;
result = strtok_r(string, " ", &remain);
while (result != NULL)
{
if (arg_max < cmd->argc)
{
arg_max *= 2; //参数数量上限扩充至原来的2倍
cmd->argv = (char **)realloc(cmd->argv, arg_max * sizeof(char *)); //扩充指针数组大小
}
cmd->argv[cmd->argc++] = strdup(result);
if (cmd->argv == NULL)
{
myerror("malloc", __LINE__);
}
result = strtok_r(NULL, " ", &remain);
}
if (arg_max < cmd->argc)
{
arg_max++;
cmd->argv = (char **)realloc(cmd->argv, arg_max * sizeof(char *)); //扩充指针数组大小
if (cmd->argv == NULL)
{
myerror("malloc", __LINE__);
}
}
cmd->argv[cmd->argc] = NULL; //argv[argv]的值为NULL

好了,这段命令的解析终于是结束了.当然还有一点小小的工作需要完成.free(string); 释放命令段的副本所占用的内存.

打开重定文件

临时文件的打开笔者在上文中已经实现完成.但用户在命令行中指定的重定向文件的打开还需要单独实现.

1
2
3
4
5
6
7
8
9
10
11
12
13
14
15
16
17
18
19
20
21
22
23
24
25
26
27
28
int OpenFile(char *string, int flags)
{

size_t len = 0;
char *pr = string;
while (!isspace(*pr) && *pr++ != '\0')
{
len++;
}

char *dest = malloc((len + 1) * sizeof(char));
if (dest == NULL)
{
myerror("malloc failed", __LINE__);
}
strncpy(dest, string, len);
dest[len] = '\0';
memset(string, ' ', sizeof(char) * len);
PathAnalyze(&dest);
int fd = open(dest, flags, S_IRUSR | S_IWUSR);
if (fd == -1)
{
printf("error:fd:%d path:%s\n", fd, string);
myerror("open", __LINE__);
}
free(dest);
return fd;
}

传入的string是命令段的副本,这意味着重定向文件的路径后面可能还有以空格分隔的其他参数,这意味这不能直接使用string调用open()

此处,笔者通过计算空格前的字符数量并将其复制到新的字符串中使字符串中只含有重定向文件的路径.

转换相对路径

遗憾的是,至此依然不能把dest字符串直接当作参数去调用open() .莫着急,请听笔者慢慢道来.

在此时,string是重定向文件的路径是毫无疑问的.但路径并不都是可被open() 直接使用的.请参考笔者的前作(命令行参数的误区),文中说明了函数接受的路径只能是绝对路径或以.开头的相对路径.但用户输入的路径却不总是符合这里的要求.而将其他的相对路径格式转换为绝对路径是shell的任务.

思考需要转换的两种相对路径格式.

  • ~/123.md 该类相对路径只需要读取HOME环境变量然后通过简单的字符串拼接就可完成转换.
  • ~root/123.md 该类相对路径的处理更加简单,直接完成拼接即可完成转换.
1
2
3
4
5
6
7
8
9
10
11
12
13
14
15
16
17
18
19
20
21
22
23
24
25
void PathAnalyze(char **path) //处理~开头的相对路径
{
char *RelativePath = *path;
if (isalpha(*(RelativePath + 1)))
{
*path = malloc(strlen(RelativePath) + 1 + strlen("/home/") + 1);
if (*path == NULL)
{
myerror("malloc", __LINE__);
}
strcpy(*path, "/home/");
}
else
{
char *home = getenv("HOME"); //获得HOME环境变量的值
*path = malloc(strlen(RelativePath) + 1 + strlen(home) + 1);
if (*path == NULL)
{
myerror("malloc", __LINE__);
}
strcpy(*path, home);
}
strcat(*path, RelativePath + 1);
free(RelativePath);
}

至此,只需要根据传入的参数直接调用open()函数便可完成打开.

执行命令段

有了刚才的准备工作,现在是万事俱备了,只需要真正的执行命令段中的命令.

1
2
3
4
5
6
7
8
9
10
11
12
13
14
15
16
17
18
19
20
21
22
23
24
25
26
27
28
29
30
31
32
void execute(struct COMMAND *cmd)
{

pid_t pid = fork();
if (pid > 0)
{
wait(NULL);
return;
}
for (int i = 1; i < cmd->argc; i++)
{
#ifndef NDEBUG
printf("DEBUG,pid: %d LINE:%d\n", pid, __LINE__);
#endif
if (*cmd->argv[i] == '~')
{
PathAnalyze(&cmd->argv[i]);
}
}
#ifndef NDEBUG
printf("DEBUG:argv[0]:%s\n", cmd->argv[0]);
#endif
for (int IO_Steam = 0; IO_Steam < 3; IO_Steam++)
{
if (cmd->Redirect_FD[IO_Steam] >= 0 && dup2(cmd->Redirect_FD[IO_Steam], IO_Steam) == -1)
{
myerror("dup2", __LINE__);
}
}
execvp(cmd->argv[0], cmd->argv);
myerror("exec", __LINE__);
}

首先执行fork(),创建子进程,然后子进程根据struct COMMAND的指示完成输入输出的重定向,并在struct COMMAND中找到作为新的进程的调用参数的argv.好了,直接调用即可.如果在未出错的情况下,程序不该执行到 第31行,故在执行到第31行时说明程序已出错.

内置命令

1
2
3
4
5
6
7
8
9
10
11
12
13
14
15
16
17
18
19
20
21
22
23
24
25
26
27
28
29
30
31
32
33
34
35
_Bool BuiltInCommand(struct COMMAND *cmd)
{
/* 内建 历史记录命令 */
if (strcmp(cmd->argv[0], "history") == 0)
{
HIST_ENTRY **history = NULL;
history = history_list();
for (int i = 0; history[i] != NULL; i++)
{
printf("%s\n", history[i]->line);
}
return 0;
}
/* 内建 切换工作目录命令 */
if (strcmp(cmd->argv[0], "cd") == 0)
{
if (*cmd->argv[1] == '-')
{
chdir(oldpath);
}
else if (*cmd->argv[1] == '~')
{
PathAnalyze(&cmd->argv[1]);
}
oldpath = getcwd(NULL, 0);
chdir(cmd->argv[1]);
return 0;
}
/* 内建 退出命令 */
if (strcmp(cmd->argv[0], "exit") == 0 || strcmp(cmd->argv[0], "q") == 0)
{
exit(EXIT_SUCCESS);
}
return 1;
}

收尾工作

屏蔽相关信号

1
2
3
4
5
signal(SIGHUP, SIG_IGN);
signal(SIGINT, SIG_IGN);
signal(SIGTTIN, SIG_IGN);
signal(SIGTTOU, SIG_IGN);
signal(SIGTSTP, SIG_IGN);

输出颜色

main() 中,笔者希望命令提示符和当前工作目录的输出为红色.因此对代码做了如下的改动:

1
2
3
4
5
6
7
8
9
10
11
12
13
14
15
16
17
18
19
20
21
22
23
24
25
26
27
28
29
30
31
int main(void)
{
/* 屏蔽相关信号 */
signal(SIGHUP, SIG_IGN);
signal(SIGINT, SIG_IGN);
signal(SIGTTIN, SIG_IGN);
signal(SIGTTOU, SIG_IGN);
signal(SIGTSTP, SIG_IGN);

read_history(NULL); //调用 readline 库提供的函数,读取历史记录
char Prompt[P_SIZE]; //命令提示符
while (1)
{
strcpy(Prompt, RED);
char *pwd = getcwd(NULL, 0); //getcwd在第一个参数为NULL时会分配内存空间存储工作目录
strncat(Prompt, pwd, 100);
free(pwd);
strcat(Prompt, " MYSHELL$" CLOSE);

char *command = readline(Prompt);
add_history(command); //将读取到的命令添加至历史记录
write_history(NULL);
launch(command); //执行命令
free(command); //readline 为读取的命令分配内存空间,需释放防止内存泄漏
}

if (oldpath != NULL)
{
free(oldpath); //防止内存泄漏和重复释放
}
}

反思

必要说明

笔者在本文中launch()的实现很低效,实际上不先行对管道数量进行计数是完全可行的.
analyze()中不去复制字符串也是完全可行的.
还有,丢弃掉strtok_r(),自己实现查找和分割能比本文中的代码高效不止一点点.
笔者也曾想过是否要把文中的代码做一次重构之后在发出来,这样读者们便能看到一个更好的版本.
但笔者最终没有这样做主要是为了激励自己在日后的程序设计过程中更加深入的思考.当然,笔者相信,这点小小的修改一定难不到聪明的读者们,欢迎读者们修改本文中的代码,实现更高效的程序.

不够友善的错误处理

在本文中,笔者采用了最简单也最不友好的方式处理一切的错误.
但这种处理方式并不总是合理的,例如在myshell中,输入错误的指令导致报错是一个常见但并不致命的错误.但笔者依旧采取了这种最简单的错误处理方式,确实未能人性化的设计程序.

不够合理的调用方式

注意launch()

1
2
3
4
if (BuiltInCommand(&cmd[i]))
{
execute(&cmd[i]);
}

笔者认为此处的设计并不合理,笔者认为更合理的做法可能是将 execute() 交由 BuiltInCommand() 在判断出本段命令不是内置命令之后自动调用,而不是判断BuiltInCommand()的返回至然后在调用execute()


回看近3个月前笔者自己写出的myshell ,笔者不得不承认自己的能力是多么的有限.万幸的是,笔者在这3个月中也得到了足够的提高,才能看出原来写的程序的问题.

测试环境

GNU bash : 5.1.4(1)-release

zsh : 5.8

OS : Arch Linux

Kernel : 5.9.14-arch1-1

附录--完整源码
1
2
3
4
5
6
7
8
9
10
11
12
13
14
15
16
17
18
19
20
21
22
23
24
25
26
27
28
29
30
31
32
33
34
35
36
37
38
39
40
41
42
43
44
45
46
47
48
49
50
51
52
53
54
55
56
57
58
59
60
61
62
63
64
65
66
67
68
69
70
71
72
73
74
75
76
77
78
79
80
81
82
83
84
85
86
87
88
89
90
91
92
93
94
95
96
97
98
99
100
101
102
103
104
105
106
107
108
109
110
111
112
113
114
115
116
117
118
119
120
121
122
123
124
125
126
127
128
129
130
131
132
133
134
135
136
137
138
139
140
141
142
143
144
145
146
147
148
149
150
151
152
153
154
155
156
157
158
159
160
161
162
163
164
165
166
167
168
169
170
171
172
173
174
175
176
177
178
179
180
181
182
183
184
185
186
187
188
189
190
191
192
193
194
195
196
197
198
199
200
201
202
203
204
205
206
207
208
209
210
211
212
213
214
215
216
217
218
219
220
221
222
223
224
225
226
227
228
229
230
231
232
233
234
235
236
237
238
239
240
241
242
243
244
245
246
247
248
249
250
251
252
253
254
255
256
257
258
259
260
261
262
263
264
265
266
267
268
269
270
271
272
273
274
275
276
277
278
279
280
281
282
283
284
285
286
287
288
289
290
291
292
293
294
295
296
297
298
299
300
301
302
303
304
305
306
307
308
309
310
311
312
313
314
315
316
317
318
319
320
321
322
323
324
325
326
327
328
329
330
331
332
333
334
335
336
337
338
339
340
341
342
343
344
345
346
347
348
349
350
351
352
353
354
355
356
357
358
359
360
361
362
363
364
365
366
367
368
369
370
371
372
373
374
375
376
377
378
379
380
381
382
383
384
#define NDEBUG
#include <ctype.h>
#include <errno.h>
#include <fcntl.h>
#include <stdio.h>
#include <stdlib.h>
#include <string.h>
#include <sys/wait.h>
#include <unistd.h>
//
#include <readline/history.h>
#include <readline/readline.h>
extern char **environ;
#define P_SIZE 128 //命令提示符长度限制
#define RED "\033[31m" //红色
#define CLOSE "\033[0m" //关闭
struct COMMAND
{
int argc; //参数数量
int Redirect_FD[3]; //标准输入、标准输出、错误输出的重定向情况
char **argv;
};
char *oldpath;
void PathAnalyze(char **path);
int OpenFile(char *string, int flags);
void execute(struct COMMAND *cmd);
_Bool BuiltInCommand(struct COMMAND *cmd);
void launch(char *command);
void myerror(char *string, int line);
_Bool analyze(char *string, struct COMMAND *cmd);
int main(void)
{
/* 屏蔽相关信号 */
signal(SIGHUP, SIG_IGN);
signal(SIGINT, SIG_IGN);
signal(SIGTTIN, SIG_IGN);
signal(SIGTTOU, SIG_IGN);
signal(SIGTSTP, SIG_IGN);
read_history(NULL); //调用 readline 库提供的函数,读取历史记录
char Prompt[P_SIZE]; //命令提示符
while (1)
{
strcpy(Prompt, RED);
char *pwd = getcwd(NULL, 0); //getcwd在第一个参数为NULL时会分配内存空间存储工作目录
strncat(Prompt, pwd, 100);
free(pwd);
strcat(Prompt, " MYSHELL$" CLOSE);

char *command = readline(Prompt);
add_history(command); //将读取到的命令添加至历史记录
write_history(NULL);
launch(command); //执行命令
free(command); //readline 为读取的命令分配内存空间,需释放防止内存泄漏
}

if (oldpath != NULL)
{
free(oldpath); //防止内存泄漏和重复释放
}
}
void launch(char *command)
{
int pipe = 0; //管道计数器
for (char *pr = command; *pr != '\0'; pr++)
{
if (*pr == '|')
{
pipe++;
}
}
struct COMMAND *cmd = (struct COMMAND *)calloc(pipe + 1, sizeof(struct COMMAND));
if (cmd == NULL)
{
myerror("malloc", __LINE__);
}
char *remain = NULL;
char *part = strtok_r(command, "|", &remain);
for (int i = 0; i <= pipe; i++)
{
/* 初始化 */
cmd[i].Redirect_FD[STDIN_FILENO] = -1;
cmd[i].Redirect_FD[STDOUT_FILENO] = -1;
cmd[i].Redirect_FD[STDERR_FILENO] = -1;
}
for (int i = 0; i <= pipe; i++)
{

if (pipe && i < pipe)
{
/* 生成临时文件 */
char TempFile[] = "/tmp/MyShell_XXXXXX";
int TempFile_FD = mkstemp(TempFile);
/* 检测生成临时文件是否成功 */
if (TempFile_FD == -1)
{
myerror("mkstemp", __LINE__);
}
/* 将本段命令的标准输出重定向至临时文件 */
cmd[i].Redirect_FD[STDOUT_FILENO] = TempFile_FD;
/* 将下段命令的标准输入重定向至临时文件 */
cmd[i + 1].Redirect_FD[STDIN_FILENO] = TempFile_FD;
unlink(TempFile);
//删除临时文件(临时文件在被close前依然可用,不会被立即删除)
}
analyze(part, &cmd[i]); //分析与检测本段命令中的参数与重定向符
if (BuiltInCommand(&cmd[i]))
{
execute(&cmd[i]);
}
if (pipe && i < pipe)
{
lseek(cmd[i].Redirect_FD[STDOUT_FILENO], 0, SEEK_SET);
cmd[i].Redirect_FD[STDOUT_FILENO] = -1;
}
part = strtok_r(NULL, "|", &remain);
for (int IO_Steam = 0; IO_Steam < 3; IO_Steam++)
{
if (cmd[i].Redirect_FD[IO_Steam] >= 0)
{
close(cmd[i].Redirect_FD[IO_Steam]);
//关闭文件,释放相关资源
}
}

for (int j = 0; j < cmd[i].argc; j++)
{
free(cmd[i].argv[j]);
}
free(cmd[i].argv);
}
free(cmd);
}

int OpenFile(char *string, int flags)
{

size_t len = 0;
char *pr = string;
while (!isspace(*pr) && *pr++ != '\0')
{
len++;
}

char *dest = malloc((len + 1) * sizeof(char));
if (dest == NULL)
{
myerror("malloc failed", __LINE__);
}
strncpy(dest, string, len);
dest[len] = '\0';
memset(string, ' ', sizeof(char) * len);
PathAnalyze(&dest);
int fd = open(dest, flags, S_IRUSR | S_IWUSR);
if (fd == -1)
{
printf("error:fd:%d path:%s\n", fd, string);
myerror("open", __LINE__);
}
free(dest);
return fd;
}
void myerror(char *string, int line)
{
fprintf(stderr, "\aLine:%d,error:\a\n", line);
fprintf(stderr, "%s:%s\n", string, strerror(errno));
exit(EXIT_FAILURE);
}
_Bool analyze(char *OriginString, struct COMMAND *cmd)
{
//string 代表使用管道分割后的「命令段」
//返回值表示重定向情况,0代表无重定向,1代表有重定向

char *string = strdup(OriginString);
if (string == NULL)
{
myerror("malloc", __LINE__);
}
char *end = string + strlen(string);
char *result = NULL;
#ifndef NDEBUG
printf("DEBUG:string:%s\n", string);
#endif
//处理标准输出、错误输出重定向
while ((result = strchr(string, '>')) != NULL)
{
*result = ' ';
int IO_Steam = 1;

result--;
if (result > string && isdigit(*result))
{
if (*result - '0' != STDOUT_FILENO && *result - '0' != STDERR_FILENO)
{
printf("Unknow COMMAND\n");
exit(EXIT_FAILURE);
}
else
{
IO_Steam = *result - '0';
*result = ' ';
}
}
if (cmd->Redirect_FD[IO_Steam] >= 0)
{
printf("Unknow COMMAND\n");
exit(EXIT_FAILURE);
}
result += 2;
_Bool Append = 0;
if (result < end && *result == '>')
{
Append = 1; //附加模式
*result = ' ';
}
while (result < end && isspace(*result))
{
result++;
}

if (result < end)
{
cmd->Redirect_FD[IO_Steam] = OpenFile(result, O_WRONLY | O_CREAT | (Append ? O_APPEND : O_TRUNC));
}
else
{
printf("Unknow COMMAND\n");
exit(EXIT_FAILURE);
}
}
//处理输入重定向
while ((result = strchr(string, '<')) != NULL)
{
*result = ' ';
if (cmd->Redirect_FD[STDIN_FILENO] >= 0)
{
printf("Unknow COMMAND\n");
exit(EXIT_FAILURE);
}
while (result < end && isspace(*result))
{
result++;
}
if (result < end)
{
cmd->Redirect_FD[STDIN_FILENO] = OpenFile(result, O_RDONLY);
}
else
{
printf("Unknow COMMAND\n");
exit(EXIT_FAILURE);
}
}

/* 解析命令行参数 */
int arg_max = 16; //参数上限,在无法满足需求时会自动增加

cmd->argv = (char **)calloc(arg_max, sizeof(char *));
if (cmd->argv == NULL)
{
myerror("malloc", __LINE__);
}
char *remain = NULL;
result = strtok_r(string, " ", &remain);
while (result != NULL)
{
if (arg_max < cmd->argc)
{
arg_max *= 2; //参数数量上限扩充至原来的2倍
cmd->argv = (char **)realloc(cmd->argv, arg_max * sizeof(char *)); //扩充指针数组大小
}
cmd->argv[cmd->argc++] = strdup(result);
if (cmd->argv == NULL)
{
myerror("malloc", __LINE__);
}
result = strtok_r(NULL, " ", &remain);
}
if (arg_max < cmd->argc)
{
arg_max++;
cmd->argv = (char **)realloc(cmd->argv, arg_max * sizeof(char *)); //扩充指针数组大小
if (cmd->argv == NULL)
{
myerror("malloc", __LINE__);
}
}
cmd->argv[cmd->argc] = NULL; //argv[argv]的值为NULL
free(string);
return 0;
}
void PathAnalyze(char **path) //处理~开头的相对路径
{
char *RelativePath = *path;
if (isalpha(*(RelativePath + 1)))
{
*path = malloc(strlen(RelativePath) + 1 + strlen("/home/") + 1);
if (*path == NULL)
{
myerror("malloc", __LINE__);
}
strcpy(*path, "/home/");
}
else
{
char *home = getenv("HOME"); //获得HOME环境变量的值
*path = malloc(strlen(RelativePath) + 1 + strlen(home) + 1);
if (*path == NULL)
{
myerror("malloc", __LINE__);
}
strcpy(*path, home);
}
strcat(*path, RelativePath + 1);
free(RelativePath);
}
void execute(struct COMMAND *cmd)
{

pid_t pid = fork();
if (pid > 0)
{
wait(NULL);
return;
}
for (int i = 1; i < cmd->argc; i++)
{
#ifndef NDEBUG
printf("DEBUG,pid: %d LINE:%d\n", pid, __LINE__);
#endif
if (*cmd->argv[i] == '~')
{
PathAnalyze(&cmd->argv[i]);
}
}
#ifndef NDEBUG
printf("DEBUG:argv[0]:%s\n", cmd->argv[0]);
#endif
for (int IO_Steam = 0; IO_Steam < 3; IO_Steam++)
{
if (cmd->Redirect_FD[IO_Steam] >= 0 && dup2(cmd->Redirect_FD[IO_Steam], IO_Steam) == -1)
{
myerror("dup2", __LINE__);
}
}
execvp(cmd->argv[0], cmd->argv);
myerror("exec", __LINE__);
}

_Bool BuiltInCommand(struct COMMAND *cmd)
{
/* 内建 历史记录命令 */
if (strcmp(cmd->argv[0], "history") == 0)
{
HIST_ENTRY **history = NULL;
history = history_list();
for (int i = 0; history[i] != NULL; i++)
{
printf("%s\n", history[i]->line);
}
return 0;
}
/* 内建 切换工作目录命令 */
if (strcmp(cmd->argv[0], "cd") == 0)
{
if (*cmd->argv[1] == '-')
{
chdir(oldpath);
}
else if (*cmd->argv[1] == '~')
{
PathAnalyze(&cmd->argv[1]);
}
oldpath = getcwd(NULL, 0);
chdir(cmd->argv[1]);
return 0;
}
/* 内建 退出命令 */
if (strcmp(cmd->argv[0], "exit") == 0 || strcmp(cmd->argv[0], "q") == 0)
{
exit(EXIT_SUCCESS);
}
return 1;
}

参考资料

1. 童永清.Linux C 编程实战[M].第1版.北京:人民邮电出版社
2. W.RichardStevens.Stephen.UNIX环境高级编程[M].第3版.戚正伟,译.北京:人民邮电出版社
3. Linux Programmer’s Manual
4. General Commands Manual
5. 鸟哥.鸟哥的Linux私房菜[M].第四版.北京:人民邮电出版社

GNU/Linux_C 开发实战--myls

GNU/Linux C 开发实战—myls

需求

  • 对不同类型或不同权限的的文件,输出不同颜色的文字
  • 实现ls的以下7个参数任意组合
    • -a 不隐藏任何以 . 开始的项目
    • -i 显示每个文件的索引编号(inode 号)
    • -l 使用较长格式列出信息
    • -s 以块数形式显示每个文件分配的尺寸
    • -t 按时间排序,最新的最前
    • -r 逆序排列
    • -R 递归显示子目录

必要的头文件

1
2
3
4
5
6
7
8
9
10
11
12
13
14
#include <dirent.h>
#include <errno.h>
#include <fcntl.h>
#include <grp.h>
#include <locale.h>
#include <pwd.h>
#include <signal.h>
#include <stdio.h>
#include <stdlib.h>
#include <string.h>
#include <sys/stat.h>
#include <sys/types.h>
#include <time.h>
#include <unistd.h>

开发过程

获取并解析用户输入

分别声明7个_Bool类型的全局变量存储解析到的各个参数的使用情况

1
2
3
4
5
6
7
_Bool Options_a;
_Bool Options_i; //显示i-node
_Bool Options_l;
_Bool Options_r; //逆序
_Bool Options_R;
_Bool Options_s; //以块数形式显示每个文件分配的尺寸
_Bool Options_t; //时间排序

通过判断argv中的指针指向的字符串的首字符是不是-来判断这个字符串是参数还是路径

1
2
3
4
5
6
7
8
9
10
11
12
13
14
15
16
17
18
19
20
21
22
23
24
25
26
27
28
29
30
31
32
33
34
35
36
37
38
39
40
41
42
_Bool p = 0; //表明是否读取到路径
char *path;//指向存储路径字符串的指针
for (int i = 1; i < argc; i++)
{
if (*argv[i] == '-') //判断是参数还是路径
{ //是参数
for (unsigned int n = 1; n < strlen(argv[i]); n++) //遍历每一格字母
switch (argv[i][n])
{
case 'a':
Options_a = 1;
break;
case 'i':
Options_i = 1;
break;
case 'l':
Options_l = 1;
break;
case 'r':
Options_r = 1;
break;
case 'R':
Options_R = 1;
break;
case 's':
Options_s = 1;
break;
case 't':
Options_t = 1;
break;
default: //错误的参数
printf("%s error:Unknow options: %s\n", __FILE__, argv[i]);
exit(EXIT_FAILURE);
break;
}
}
else
{ //是路径
p = 1; //表明已经读到了路径
path = argv[i];
}
}

info

在ls中,如果用户输入了路径,那么应该输出用户输入的路径下的文件,否则路径的缺省值应该为当前目录

1
2
3
4
5
6
if (!p) //如果没读取到路径(等价于路径是通过getcwd获得的)
{
path = getcwd(NULL, 0); //获取当前路径
if (path == NULL)
myerror("getcwd", " ", __LINE__);
}

上面的代码调用了笔者为了简化错误处理流程写的myerror()函数,该函数定义如下

1
2
3
4
5
6
void myerror(const char *string1, const char *string2, int line)
{
printf("\033[31mline:%d:file:%s\n%s:%s\033[0m\n", line, string2, string1, strerror(errno));//strerror()需要 string.h

exit(EXIT_FAILURE);
}

笔者相信细致的读者一定会觉得!p的设计时不必要的,因为可以通过预先执行path=NULL;,然后在解析完成后判断if (path==NULL)区分是否已经读取到路径,从而删去p变量,但这样的做法是有缺陷的.

  • 当用户输入路径时,path指向某一个argv中的某一个指针指向的字符串.不需要执行free(path)
  • 当用户不输入路径时,path指向由getcwd函数自动分配内存存储的当前路径.需要执行free(path)

为了区分是否需要执行free,防止产生内存泄漏,笔者设置p变量来完成对是否需要free的检测.

递归打开目录

在需求中的7个参数中,-R的实现无疑是最为困难的.
笔者通过设计一个以存储目标文件夹路径的字符串为参数的函数,并通过递归调用该函数实现 -R 参数.

首先,笔者定义了几个宏:

1
2
3
#define StackPush(x) FileStack[++FileStackTop] = (x)
#define StackTop FileStack[FileStackTop]
#define StackPop free(FileStack[FileStackTop--])

下面是OpenADirectory的大致流程:

warning
TIP
笔者为了方便各位读者理解该函数运行的流程,在下面的代码中笔者省略了很多细节.
请读者们此时更多的关注该函数的「整体流程与思想」,而不是细枝末节.
请不要担心、不要着急,后文中笔者将逐一说明被笔者省略的内容.

1
2
3
4
5
6
7
8
9
10
11
12
13
14
15
16
17
18
19
20
21
22
23
24
25
26
27
28
29
30
31
32
33
34
35
36
37
38
39
40
41
42
43
44
45
46
47
48
49
50
typedef struct
{
struct stat FileStat;
struct dirent File_di;

} FileInfo;

void OpenADirectory(const char *path)
{
/* 保存原目录 */
char *oldpath = getcwd(NULL, 0);
if (oldpath == NULL)
myerror("getcwd", " ", __LINE__);

DIR *CurrentDir = opendir(path);
/* 此处省略打开目录失败的错误处理 */

/* 切换目录 */
if (chdir(path) == -1)
/* 此处省略切换目录失败的错误处理 */

/* 文件堆 */
FileInfo **FileStack = (FileInfo **)malloc(sizeof(FileInfo *) * FileNumberMax);
if (FileStack == NULL)
myerror("malloc", " ", __LINE__);
int FileStackTop = -1;


/* 文件读取 */
struct dirent *CurrentFile;
while ((CurrentFile = readdir(CurrentDir)) != NULL)
{
FileInfo *temp = (FileInfo *)malloc(sizeof(FileInfo));
if (temp == NULL)
myerror("malloc", "", __LINE__);
temp->File_di = *CurrentFile;
if (lstat(CurrentFile->d_name, &(temp->FileStat)) == -1)
{
printf("\033[31mError:Line:%d: can't get stat of %s,%s\033[0m\n", __LINE__, CurrentFile->d_name, strerror(errno));
free(temp);
continue;
}
if (FileStackTop < FileNumberMax)
StackPush(temp);
else
myerror("\033[31mToo much File\033[0m\n", " ", __LINE__);
}
/* readdir错误检查 */
if (errno) //需要 error.h
printf("\033[31mline:%d:error:%s\033[0m\n", __LINE__, strerror(errno));

该函数在运行的开始,首先保存当前的工作目录的路径,然后打开作为参数的路径中指定的文件夹.

OpenADirectory()新建了一个名叫FileStack的指针,该指针指向指向FileInfo类型的指针,换而言之,FileStack是一个二级指针.由于使用malloc()为其分配了sizeof(FileInfo *) * FileNumberMax字节的空间,即FileNumberMaxFileInfo *类型所占的空间,那么此时,FileStack就相当与一个「内含FileNumberMax个指针元素的数组」.在此,笔者将该数组作为存储path指定的文件夹内每个文件对应的FIleInfo堆栈

danger
ERROR
可能会有读者在想,FileStack不就是个指针数组嘛.直接使用FileInfo (*FileStack)[FileNumberMax];便可以自动分配一个指针数组,何必使用malloc()呢?
这不是笔者在使用二级指针故作高深,而是确有必要.FileInfo (*FileStack)[FileNumberMax];语句定义的是自动变量,占用栈区空间,而栈区空间通常较小,在多层递归中容易出现栈溢出的错误.而malloc()分配的空间在堆区上,堆区远大于栈区,这样才能保证程序的正常运行.
还有人可能会问,那能否这样调用malloc呢?

FileInfo *array=malloc(sizeof(FileInfo) * FileNumberMax);

这样的做法,由FileInfo *类型的指针数组改为FileInfo数组,这样确实也不占用栈区空间,也避免了二级指针带来的理解困难,但却存在着更为严重的内存浪费问题.在绝大多数文件夹中,文件数量远远少于FileNumberMax,在相同的文件夹,如果使用指针数组的方案,浪费的空间仅为多个指针所占据的空间,而使用FileInfo数组的方案却浪费了多个FileInfo的空间,要知道FileInfo所占的空间远大于FileInfo *.所以使用FileInfo的方案也不合理.

假设打开文件夹成功,则将程序的工作目录切换至已打开的文件夹(也就是参数中指定的文件夹),这是因为笔者需要调用lstat函数获取文件夹下每个文件的属性.
lstat以文件路径为参数.切换目录后,笔者便可以以文件名作为相对路径直接调用lstat函数.如不切换目录则会找不到文件,当然也可以采取字符串拼接的做法,但这样做需要对文件夹下每个文件都执行一次字符串拼接,效率较低,而且字符串的长度不定,分配空间也易出现浪费或溢出.笔者直接切换目录避免了这些麻烦,也提升了效率.

在此后笔者使用循环遍历文件夹中的每个文件,获取每个文件的属性,并将每个文件对应的struct statstruct dirent一同存储在的struct FileInfo
这样做的好处有很多,完成了这步后,输出文件信息所必要的所以内容已被集中在了一个struct FileInfo结构体中,为后面对详细信息的输出和文件信息的排序排序给予了极大的便利.

1
qsort(FileStack, FileStackTop + 1, sizeof(FileInfo *), cmp);

之后笔者使用qsort函数对FileStack进行排序处理,作为函数指针传递的cmp函数要如何写,请容笔者在后文交代.
这这里,需要注意的是,真正被排序的是FileInfo *,而每个FileInfo元素都还存储在原来的位置.排序FileInfo *,代替FileInfo是一个十分有用的小技巧,能提升排序的效率.

1
2
3
4
5
6
7
8
9
10
11
12
13
14
15
16
17
18
19
20
    for (int i = FileStackTop; i >= 0; i--)
{
/* 此处省略输出文件信息的函数 */
}

while (FileStackTop >= 0)
{
if (Options_R && S_ISDIR(StackTop->FileStat.st_mode) && strcmp(StackTop->File_di.d_name, ".") != 0 && strcmp(StackTop->File_di.d_name, "..") != 0)
OpenADirectory(StackTop->File_di.d_name);
StackPop;
}

if (chdir(oldpath) == -1) //切回目录
myerror("chdir", path, __LINE__);

/* 释放与关闭 */
free(oldpath);
closedir(CurrentDir);
free(FileStack);
}

如上,笔者使用for循环从堆的顶部遍历每个元素,并输出其中的所需的信息,这样便做到了排序输出.

其后,笔者再次从堆顶逐一访问每个元素,在启用了-R参数时,检测堆栈顶部的元素是否为文件夹,如果堆栈顶部为文件夹,且不是...则把堆栈顶部的元素对应的文件夹的路径作为参数递归调用OpenADirectory().完成后对先free堆栈顶的元素所指向的FileInfo分配的空间并对堆栈执行pop操作.
最终释放堆栈空间及其他内存分配.

secondary
SECONDARY

获取文件属性的函数还有stat,为什么要选择lstat而不是stat呢?

原因很简单lstat函数获取符号链接(Symbolic link)本身的属性,而stat获取被链接的文件的属性.

顺带一提,得益于FileStack已经被qsort函数完成了排序,所以接下来通过递归调用打开子文件夹也是有序的.这使得myls程序运行期间所有文件的输出顺序是正确的.

至此,笔者终于完整的描述了OpenADirectory()的运行的流程.

打开目录过程中的细节

首先需要关注的是错误处理.其中readdir()函数的错误处理需要特别的关注.

tip

TIP

readir()在读到目录结尾和出错时返回NULL.仅在出错时设置errno

If the end of the directory stream is reached, NULL is returned and errno is not changed. If an error occurs, NULL is returned and errno is set appropriately. To distinguish end of stream from an error, set errno to zero before calling readdir() and then check the value of errno if NULL is returned.

readdir()的返回值NULL具有双重含义,只能使用检测errno的值是否为0来判断readdir()是否执行正常.
在检测前需保证errno==0


调用opendir时,易因权限不足等原因致使opendir无法正常执行.在发生错误时,笔者并未选择直接退出程序,而是选择报错并跳过打开失败的文件夹.
记得要释放getcwd中为了存储当前工作目录路径的字符串分配的内存空间,清除errno的值.

1
2
3
4
5
6
7
8
DIR *CurrentDir = opendir(path);
if (CurrentDir == NULL)
{
printf("\033[31mLine:%d:readfailed:%s/%s\t %s\033[0m\n", __LINE__, oldpath, path, strerror(errno));
errno = 0;
free(oldpath);
return;
}

切换目录过程中,也可能因权限不足而导致切换失败,例如:用户缺少文件夹的x权限时,便无法进入相应的文件夹.因此,这一步的错误检查同样必不可少.
同样不能忘记释放内存空间、清除errno的值,额外的还需要关闭已打开的文件夹.

1
2
3
4
5
6
7
8
9
/* 切换目录 */
if (chdir(path) == -1)
{
printf("\033[31mLine:%d:chdir:%s\t %s\033[0m\n", __LINE__, path, strerror(errno));
errno = 0;
free(oldpath);
closedir(CurrentDir);
return;
}

当然不必笔者多提的就是malloc()的错误处理,相信各位读者一定知道该怎么做,笔者便不再赘述.

OpenADirectory的结尾,笔者将工作目录切换回去,方便递归中打开后续文件夹.

实现文件详细信息输出

格式化输出文件大小

这部分十分容易实现,只需要从相应的struct stat中访问st_size成员,并将其作为参数传递给相应的格式化输出函数即可.

1
2
3
4
5
6
7
8
9
10
11
void FormatBytes(off_t size)
{
char *array[] = {"B", "KB", "MB", "GB", "TB", "PB"};
int n = 0;
while (size >= 1024)
{
n++;
size /= 1024;
}
printf("%ld%s\t", size, array[n]);
}
格式化输出修改时间
1
2
3
4
5
6
7
void FormatTime(time_t mtime)
{
char string[20];
struct tm *timeinfo = gmtime(&mtime);
strftime(string, 17, "%b %e %R", timeinfo);
printf("%s\t", string);
}

文件的修改时间被存储在struct statst_mtim.tv_sec成员中.有必要多说一句的是,为了输出本地时间(UTC +8),还需要设置本地化的时间,笔者将这部分需求在main函数中实现.

1
2
3
/* 本地化时间设置 */
if (setlocale(LC_TIME, "") == NULL)
myerror("setlocale", " ", __LINE__);
格式化输出文件所属的用户和用户组
1
2
3
4
5
6
7
8
9
10
11
12
13
14
15
16
void FormateUserAndGroup(uid_t userid, gid_t groupid)
{
struct passwd *owner = getpwuid(userid);//#include <pwd.h>

if (owner == NULL)
{
printf("%s\n", getcwd(NULL, 0));
printf("uid:%u\n", userid);
}

struct group *group = getgrgid(groupid);//include <grp.h>
if (group == NULL)
myerror("getgruid", " ", __LINE__);

printf("%s\t%s\t", owner->pw_name, group->gr_name);
}

函数以struct stat中的st_uid成员和st_gid成员为实际参数,分别通过uidgid调用getpwuid()函数和getgrgid()函数,获取相关结构体,并输出其中的用户名和用户组名称.

tip

TIP

  • getpwuid()函数 由 pwd.h 提供
  • getgrgid()函数 由 grp.h 提供
格式化输出文件权限

文件权限的格式化输出最为简单.只是机械的判断并输出即可.

考录到存在SUIDSGIDSBIT 这些特殊权限的存在,笔者并未尝试使用位移运算符来复用部分代码,使得这部分代码显得很长.

1
2
3
4
5
6
7
8
9
10
11
12
13
14
15
16
17
18
19
20
21
22
23
24
25
26
27
28
29
30
31
32
33
34
35
36
37
38
39
40
41
42
43
44
45
46
47
48
49
50
51
52
53
54
55
56
57
58
59
60
61
62
63
64
65
66
67
68
69
70
71
72
73
74
void prauthority(mode_t mode)
{
if (S_ISREG(mode))
putchar('-');
else if (S_ISDIR(mode))
putchar('d');
else if (S_ISLNK(mode))
putchar('l');
else if (S_ISFIFO(mode))
putchar('f');
else if (S_ISBLK(mode))
putchar('b');
else if (S_ISCHR(mode))
putchar('c');
else if (S_ISSOCK(mode))
putchar('s');
//Owner
if (S_IRUSR & mode)
putchar('r');
else
putchar('-');
if (S_IWUSR & mode)
putchar('w');
else
putchar('-');
if (S_IXUSR & mode)
{
if (S_ISUID & mode)
putchar('s');
else
putchar('x');
}
else
putchar('-');

//group
if (S_IRGRP & mode)
putchar('r');
else
putchar('-');
if (S_IWGRP & mode)
putchar('w');
else
putchar('-');
if (S_IXGRP & mode)
{
if (S_ISGID & mode)
putchar('s');
else
putchar('x');
}
else
putchar('-');

//Other
if (S_IROTH & mode)
putchar('r');
else
putchar('-');
if (S_IWOTH & mode)
putchar('w');
else
putchar('-');
if (S_IXOTH & mode)
{
if (S_ISVTX & mode)
putchar('t');
else
putchar('x');
}
else
putchar('-');
putchar('\t');
}
格式化输出文件的i-node编号和以块为单位文件的大小

直接从struct stat 中读取相关信息并输出即可.

1
2
3
4
if (Options_i)
printf("%-10lu\t", FileStack[i]->FileStat.st_ino);
if (Options_s)
printf("%-8ld\t", FileStack[i]->FileStat.st_blksize);
根据文件的类型和权限输出不同颜色的文件名

根据struct dirent中的char d_name[256]输出即可.无非是根据不同类型输出不同的颜色而已.

1
2
3
4
5
6
7
8
9
10
11
if (S_ISREG(FileStack[i]->FileStat.st_mode) &&
((S_IXUSR & FileStack[i]->FileStat.st_mode) ||
(S_IXGRP & FileStack[i]->FileStat.st_mode) ||
(S_IXOTH & FileStack[i]->FileStat.st_mode)))
printf("\033[32m%s\033[0m\n", FileStack[i]->File_di.d_name);
else if (S_ISREG(FileStack[i]->FileStat.st_mode))
printf("%s\n", FileStack[i]->File_di.d_name);
else if (S_ISDIR(FileStack[i]->FileStat.st_mode))
printf("\033[34m%s\033[0m\n", FileStack[i]->File_di.d_name);
else if (S_ISLNK(FileStack[i]->FileStat.st_mode))
printf("\033[31m%s\033[0m\n", FileStack[i]->File_di.d_name);

实现排序输出

在用OpenADirectory()中笔者调用了qsort().其中,qsort()cmp进行隐式类型转换函数指针,完成了对FileStack这个指针数组的排序.

1
qsort(FileStack, FileStackTop + 1, sizeof(FileInfo *), cmp);

在此,笔者来实现cmp()

1
2
3
4
5
6
7
8
9
10
11
12
13
14
15
16
17
18
19
20
21
int cmp(const void *a, const void *b)
{
const FileInfo *A = *(FileInfo **)a;
const FileInfo *B = *(FileInfo **)b;
int i;
if (Options_t)
{
time_t t = B->FileStat.st_mtim.tv_sec - A->FileStat.st_mtim.tv_sec;
if (t > 0)
i = -1;
else if (t == 0)
i = 0;
else
i = 1;
}
else
i = strcmp(B->File_di.d_name, A->File_di.d_name);
if (Options_r)
i = -i;
return i;
}

其中,根据用户是否输入了参数-r决定是否进行逆序排列,根据用户是否输入了参数-t决定排序的方式.

至此,myls终于完成了,完整的代码见本文末的附录.

反思

动态分配 FileStack

在上面的实现中,笔者粗暴的使用了一个FileNumbertMax作为FileStack中指针的数量,但这并非最优解.

大多数文件夹中,文件数量远远小于 FileNumbertMax 意味着浪费了很多空间.

更合理的做法是,为FileStack设置一个大于「大多数文件夹中存放文件数量」的初始值,在遇到FileStack满后,使用realloc()扩充FileStack的空间即可.

当然,这不可避免的是在一定程度上减缓myls的运行速度,这个运行速度与消耗空间的平衡需要读者自行考量.

获取文件属性

warning

WARNING

该部分内容含较多的笔者的未验证个人观点,不保证正确.欢迎读者们指出错误.

OpenADirectory()中,使用readdir()读取目录的记录项,获取的struct dirent中包含文件名与i-node编号.

然后,使用lstat()根据文件路径(笔者使用文件名作为相对路径)读取文件的属性.

在使用i-node的文件系统中,文件的属性存储在i-node中,lstat()可能的读取文件属性的方式为:

  1. 打开并遍历文件所在目录
  2. 读取目录的记录项,直到找到指定的文件所对应的记录项
  3. 从文件所对应的记录项中得到文件的i-node编号
  4. 根据文件的i-node编号找到对应的i-node,完成读取文件的属性

读者们一定能发现根据获取的struct dirent已经可以读取到i-node编号了,但使用lstat()函数却还要重复上面的1-3步.

笔者未能想到如何更好的读取文件的属性,欢迎对此有了解的读者告诉笔者.

点击三角形展开附录

附录--完整源码
1
2
3
4
5
6
7
8
9
10
11
12
13
14
15
16
17
18
19
20
21
22
23
24
25
26
27
28
29
30
31
32
33
34
35
36
37
38
39
40
41
42
43
44
45
46
47
48
49
50
51
52
53
54
55
56
57
58
59
60
61
62
63
64
65
66
67
68
69
70
71
72
73
74
75
76
77
78
79
80
81
82
83
84
85
86
87
88
89
90
91
92
93
94
95
96
97
98
99
100
101
102
103
104
105
106
107
108
109
110
111
112
113
114
115
116
117
118
119
120
121
122
123
124
125
126
127
128
129
130
131
132
133
134
135
136
137
138
139
140
141
142
143
144
145
146
147
148
149
150
151
152
153
154
155
156
157
158
159
160
161
162
163
164
165
166
167
168
169
170
171
172
173
174
175
176
177
178
179
180
181
182
183
184
185
186
187
188
189
190
191
192
193
194
195
196
197
198
199
200
201
202
203
204
205
206
207
208
209
210
211
212
213
214
215
216
217
218
219
220
221
222
223
224
225
226
227
228
229
230
231
232
233
234
235
236
237
238
239
240
241
242
243
244
245
246
247
248
249
250
251
252
253
254
255
256
257
258
259
260
261
262
263
264
265
266
267
268
269
270
271
272
273
274
275
276
277
278
279
280
281
282
283
284
285
286
287
288
289
290
291
292
293
294
295
296
297
298
299
300
301
302
303
304
305
306
307
308
309
310
311
312
313
314
315
316
317
318
319
320
321
322
323
324
325
326
327
328
329
330
331
332
333
334
335
336
337
338
339
340
341
342
343
344
345
346
347
348
349
350
351
352
353
354
355
356
/* myls.c */
#include <dirent.h>
#include <errno.h>
#include <fcntl.h>
#include <grp.h>
#include <locale.h>
#include <pwd.h>
#include <signal.h>
#include <stdio.h>
#include <stdlib.h>
#include <string.h>
#include <sys/stat.h>
#include <sys/types.h>
#include <time.h>
#include <unistd.h>

// #define NDEBUG

#define StackPush(x) FileStack[++FileStackTop] = (x)
#define StackTop FileStack[FileStackTop]
#define StackPop free(FileStack[FileStackTop--])
#define FileNumberMax 40960

_Bool Options_a;
_Bool Options_i; //显示i-node
_Bool Options_l;
_Bool Options_r; //逆序
_Bool Options_R;
_Bool Options_s; //以块数形式显示每个文件分配的尺寸
_Bool Options_t; //时间排序

typedef struct
{
struct stat FileStat;
struct dirent File_di;

} FileInfo;
void prauthority(mode_t mode);
void myerror(const char *string, const char *filename, int line);
void OpenADirectory(const char *path);
int cmp(const void *a, const void *b);
void FormateUserAndGroup(uid_t userid, gid_t groupid);
void FormatTime(time_t mtime);
void FormatBytes(off_t size);

int main(int argc, char **argv)
{

/* 本地化时间设置 */
if (setlocale(LC_TIME, "") == NULL)
myerror("setlocale", " ", __LINE__);
signal(SIGTTIN, SIG_IGN); //忽略SIGTTIN信号

_Bool p = 0; //表明是否读取到路径
char *path; //指向存储路径字符串的指针
for (int i = 1; i < argc; i++)
{
if (*argv[i] == '-') //判断是参数还是路径
{ //是参数
for (unsigned int n = 1; n < strlen(argv[i]); n++) //遍历每一格字母
switch (argv[i][n])
{
case 'a':
Options_a = 1;
break;
case 'i':
Options_i = 1;
break;
case 'l':
Options_l = 1;
break;
case 'r':
Options_r = 1;
break;
case 'R':
Options_R = 1;
break;
case 's':
Options_s = 1;
break;
case 't':
Options_t = 1;
break;
default: //错误的参数
printf("%s error:Unknow options: %s\n", __FILE__, argv[i]);
exit(EXIT_FAILURE);
break;
}
}
else
{ //是路径
p = 1; //表明已经读到了路径
path = argv[i];
}
}
if (!p) //如果没读取到路径(等价于路径是通过getcwd获得的)
{
path = getcwd(NULL, 0); //获取当前路径
if (path == NULL)
myerror("getcwd", " ", __LINE__);
}
OpenADirectory(path);
if (!p)
free(path);
}

int cmp(const void *a, const void *b)
{
const FileInfo *A = *(FileInfo **)a;
const FileInfo *B = *(FileInfo **)b;
int i;
if (Options_t)
{
time_t t = B->FileStat.st_mtim.tv_sec - A->FileStat.st_mtim.tv_sec;
if (t > 0)
i = -1;
else if (t == 0)
i = 0;
else
i = 1;
}
else
i = strcmp(B->File_di.d_name, A->File_di.d_name);
if (Options_r)
i = -i;
return i;
}

void OpenADirectory(const char *path)
{
/* 保存原目录 */
char *oldpath = getcwd(NULL, 0);
if (oldpath == NULL)
myerror("getcwd", " ", __LINE__);

DIR *CurrentDir = opendir(path);
if (CurrentDir == NULL)
{
printf("\033[31mLine:%d:readfailed:%s/%s\t %s\033[0m\n", __LINE__, oldpath, path, strerror(errno));
errno = 0;
free(oldpath);
return;
}

/* 切换目录 */
if (chdir(path) == -1)
{
printf("\033[31mLine:%d:chdir:%s\t %s\033[0m\n", __LINE__, path, strerror(errno));
errno = 0;
free(oldpath);
closedir(CurrentDir);
return;
}

/* 文件堆 */
FileInfo **FileStack = (FileInfo **)malloc(sizeof(FileInfo *) * FileNumberMax);
if (FileStack == NULL)
myerror("malloc", " ", __LINE__);
int FileStackTop = -1;

if (Options_R) /* 如果开启了递归显示子目录,则输出切换结果 */
{
char *NewPath = getcwd(NULL, 0);
if (NewPath == NULL)
myerror("getcwd", " ", __LINE__);
printf("%s:\n", NewPath);
free(NewPath);
}

/* 文件读取 */
struct dirent *CurrentFile;
while ((CurrentFile = readdir(CurrentDir)) != NULL)
{
FileInfo *temp = (FileInfo *)malloc(sizeof(FileInfo));
if (temp == NULL)
myerror("malloc", "", __LINE__);
temp->File_di = *CurrentFile;
if (lstat(CurrentFile->d_name, &(temp->FileStat)) == -1)
{
printf("\033[31mError:Line:%d: can't get stat of %s,%s\033[0m\n", __LINE__, CurrentFile->d_name, strerror(errno));
free(temp);
continue;
}
if (FileStackTop < FileNumberMax)
StackPush(temp);
else
myerror("\033[31mToo much File\033[0m\n", " ", __LINE__);
}
/* readdir错误检查 */
if (errno) //需要 error.h
printf("\033[31mline:%d:error:%s\033[0m\n", __LINE__, strerror(errno));

qsort(FileStack, FileStackTop + 1, sizeof(FileInfo *), cmp);

for (int i = FileStackTop; i >= 0; i--)
{
if (Options_a == 0 && *FileStack[i]->File_di.d_name == '.')
continue;
if (Options_l)
{
if (Options_i)
printf("%-10lu\t", FileStack[i]->FileStat.st_ino);
if (Options_s)
printf("%-8ld\t", FileStack[i]->FileStat.st_blksize);
prauthority(FileStack[i]->FileStat.st_mode);
FormateUserAndGroup(FileStack[i]->FileStat.st_uid, FileStack[i]->FileStat.st_gid);
FormatBytes(FileStack[i]->FileStat.st_size);
FormatTime(FileStack[i]->FileStat.st_mtim.tv_sec);
}

if (S_ISREG(FileStack[i]->FileStat.st_mode) &&
((S_IXUSR & FileStack[i]->FileStat.st_mode) ||
(S_IXGRP & FileStack[i]->FileStat.st_mode) ||
(S_IXOTH & FileStack[i]->FileStat.st_mode)))
printf("\033[32m%s\033[0m\n", FileStack[i]->File_di.d_name);
else if (S_ISREG(FileStack[i]->FileStat.st_mode))
printf("%s\n", FileStack[i]->File_di.d_name);
else if (S_ISDIR(FileStack[i]->FileStat.st_mode))
printf("\033[34m%s\033[0m\n", FileStack[i]->File_di.d_name);
else if (S_ISLNK(FileStack[i]->FileStat.st_mode))
printf("\033[31m%s\033[0m\n", FileStack[i]->File_di.d_name);
}

while (FileStackTop >= 0)
{
if (Options_R && S_ISDIR(StackTop->FileStat.st_mode) && strcmp(StackTop->File_di.d_name, ".") != 0 && strcmp(StackTop->File_di.d_name, "..") != 0)
OpenADirectory(StackTop->File_di.d_name);
StackPop;
// FileStackTop--;
}

if (chdir(oldpath) == -1) //切回目录
myerror("chdir", path, __LINE__);

/* 释放与关闭 */
free(oldpath);
closedir(CurrentDir);
free(FileStack);
}
void myerror(const char *string1, const char *string2, int line)
{
printf("\033[31mline:%d:file:%s\n%s:%s\033[0m\n", line, string2, string1, strerror(errno)); //strerror()需要 string.h

exit(EXIT_FAILURE);
}

void FormatBytes(off_t size)
{
char *array[] = {"B", "KB", "MB", "GB", "TB", "PB"};
int n = 0;
while (size >= 1024)
{
n++;
size /= 1024;
}
printf("%ld%s\t", size, array[n]);
}

void FormatTime(time_t mtime)
{
char string[20];
struct tm *timeinfo = gmtime(&mtime);
strftime(string, 17, "%b %e %R", timeinfo);
printf("%s\t", string);
}

void FormateUserAndGroup(uid_t userid, gid_t groupid)
{
struct passwd *owner = getpwuid(userid);//#include <pwd.h>

if (owner == NULL)
{
printf("%s\n", getcwd(NULL, 0));
printf("uid:%u\n", userid);
}

struct group *group = getgrgid(groupid);//include <grp.h>
if (group == NULL)
myerror("getgruid", " ", __LINE__);

printf("%s\t%s\t", owner->pw_name, group->gr_name);
}
void prauthority(mode_t mode)
{
if (S_ISREG(mode))
putchar('-');
else if (S_ISDIR(mode))
putchar('d');
else if (S_ISLNK(mode))
putchar('l');
else if (S_ISFIFO(mode))
putchar('f');
else if (S_ISBLK(mode))
putchar('b');
else if (S_ISCHR(mode))
putchar('c');
else if (S_ISSOCK(mode))
putchar('s');
//Owner
if (S_IRUSR & mode)
putchar('r');
else
putchar('-');
if (S_IWUSR & mode)
putchar('w');
else
putchar('-');
if (S_IXUSR & mode)
{
if (S_ISUID & mode)
putchar('s');
else
putchar('x');
}
else
putchar('-');

//group
if (S_IRGRP & mode)
putchar('r');
else
putchar('-');
if (S_IWGRP & mode)
putchar('w');
else
putchar('-');
if (S_IXGRP & mode)
{
if (S_ISGID & mode)
putchar('s');
else
putchar('x');
}
else
putchar('-');

//Other
if (S_IROTH & mode)
putchar('r');
else
putchar('-');
if (S_IWOTH & mode)
putchar('w');
else
putchar('-');
if (S_IXOTH & mode)
{
if (S_ISVTX & mode)
putchar('t');
else
putchar('x');
}
else
putchar('-');
putchar('\t');
}

参考资料

1. 童永清.Linux C 编程实战[M].第1版.北京:人民邮电出版社
2. W.RichardStevens.Stephen.UNIX环境高级编程[M].第3版.戚正伟,译.北京:人民邮电出版社
3. Linux Programmer’s Manual
4. General Commands Manual
5. 鸟哥.鸟哥的Linux私房菜[M].第四版.北京:人民邮电出版社

命令行参数的解析

info
LICENSE
本文使用 GNU通用公共许可证 v3(GNU General Public License, version 3) 发布.

命令行参数的解析

真巧,在笔者近日的程序设计实践中又涉及到了命令行参数,笔者便再谈谈他.因单篇博客不宜过长,该内容将拆分在一系列博文中,该系列博文中,笔者将只讨论 getopt()getopt_long()getopt_long_only() 的使用,不涉及其他方案.

getopt() 的基本信息

1
2
3
4
#include <unistd.h>
int getopt(int argc, char *const argv[], const char *optstring);
extern char *optarg;
extern int optind, opterr, optopt;

上面有 getopt() 函数的函数原型和相关全局变量,注意使用 getopt() 函数需要包含 unistd.h

getopt() 被用来处理遵循 Single UNIX Specification 的命令行参数

Single UNIX Specification 要求[1]:

  • 限制每个命令行选项为一个单一的阿拉伯字符

  • 所有选项必须以 - 作为开头字符

举例来说就是getopt()可用于处理 command -t 123 -p 456.txt -uroot 这类命令,而不能用于 command --times 123 --path 456.txt --userroot

getopt()的参数

argvargc

这两个参数即为待解析的命令行参数的计数和指向字符串存储位置的指针数组.这两个参数的实参通常作为int main(int argc,char *argv[])的参数传入程序.对该处有疑问的读者可参考笔者的博文命令行参数的误解

optstring

optstring是一个字符串,用来说明预期的命令行参数的格式.它的作用可能有点类似 scanf() 中转换说明的作用.

optstring is a string containing the legitimate option characters. If such a character is followed by a colon, the option requires an argument, so getopt() places a pointer to the following text in the same argv-element, or the text of the following argv-element, in optarg. Two colons mean an option takes an optional arg

  • if there is text in the current argv-element (i.e., in the same word as the option name itself, for example, −oarg), then it is returned in optarg, otherwise optarg is set to zero. This is a GNU extension.
  • If optstring contains W followed by a semicolon, then −W foo is treated as the long option −−foo. (The −W option is reserved by POSIX.2 for implementation extensions.) This behavior is a GNU extension, not available with libraries before glibc 2.

optstring 是包含合法选项字符的字符串.如果此类字符后接 : ,则该选项需要一个参数,因此 getopt() 将指针指向位于同一 argv 元素中的后续文本,或位于 argarg 中的后续 argv 元素的文本. :: 表示一个选项带有一个可选的参数

  • 如果当前argv元素中有文本( 例如与选项名称本身相同的词,例如 -oarg ),则将其以 optarg 返回,否则 optarg 设置为 0.这是一个 GNU 扩展
  • 如果 optstring 包含 W 后跟一个分号,则将 -W foo 视为长选项 --foo .( -W 选项由 POSIX.2 保留用于实现扩展.)此行为是 GNU 扩展 ,不适用于 glibc 2 之前的库.

getopt()的返回值

  • If an option was successfully found, then getopt() returns the option character.

  • If all command-line options have been parsed, then getopt() returns −1.

  • If getopt() encounters an option character that was not in optstring, then ? is returned.

  • If getopt() encounters an option with a missing argument, then the return value depends on the first character in optstring:

    • if it is :, then : is returned
    • otherwise ? is returned.[3]

用笔者糟糕的英语勉强翻译一下:

warning

受限于笔者低劣的英文水平,笔者的翻译可能存在众多谬误,更无法做到 信、达、雅 的要求.笔者提供的翻译内容仅供参考.建议读者自行翻译或直接阅读英文原文.笔者不为本文中翻译内容的准确性负责.

  • 如果一个选项被成功的找到,getopt() 返回这个选项的字母

  • 如果完成了所有的选项的解析,getopt() 将返回 -1

  • 如果发现不在 optstring 中的选项,则返回 ?
  • 如果发现丢失参数的选项,返回值取决于 optstring[0]
    • 如果 optstring[0]:,则返回 :
    • 否则返回 ?,即 return optstring[0] == ':' ? ':' : '?';

getopt() 的扫描模式

  • If the first character of optstring is + or the environment variable POSIXLY_CORRECT is set, then option processing stops as soon as a nonoption argument is encountered.
  • If the first character of optstring is , then each nonoption argv-element is handled as if it were the argument of an option with character code 1. (This is used by programs that were written to expect options and other argv-elements in any order and that care about the ordering of the two.)
  • The special argument −− forces an end of option-scanning regardless of the scanning mode.[3]

还是由笔者来翻译一下

  • 如果 optstring[0]+ 或者 环境变量 POSIXLY_CORRECT 被设置,则 getopt() 将会在遇到非 optsting 中的选项时停止.

  • 如果 optstring[0]- ,则任何一个非选项的 argv 中的元素将被按照 ASCII 编码1 的字符处理.(这常被用于期待 选项argv 的元素 按某种顺序排列并关注两者的顺序的程序 )

  • 特殊的参数 -- 将强制结束选项扫描,无论扫描模式是什么.

请看示例:

1
2
3
4
5
6
7
8
9
10
11
12
13
14
15
16
17
18
/* getopt1.c */
#include <stdio.h>
#include <unistd.h>
int main(int argc, char *argv[])
{
int ch;
// opterr = 0;
while ((ch = getopt(argc, argv, "a:b:c::d::e::fxg:")) != -1)
{
printf(" ch\t函数的返回值\t%c\n", ch);
printf("optarg\t当前选项的参数\t%s\n", optarg);
printf("optind\t指向下个字符串\t%d\n", optind);
printf("argv[optind]\t\t%s\n", argv[optind]);
printf("optopt\t指向出错字符串\t%d\n", optopt);
printf("opterr\t若出错输出消息\t%d\n", opterr);
printf("\n");
}
}

请读者们编译后以参数 -a -- -c-- -- -g 运行程序.

笔者得到的输出内容
1
2
3
4
5
6
7
8
9
10
11
12
13
    ch  函数的返回值    a
optarg 当前选项的参数 --
optind 指向下个字符串 3
argv[optind] -c--
optopt 指向出错字符串 0
opterr 若出错输出消息 1

ch 函数的返回值 c
optarg 当前选项的参数 --
optind 指向下个字符串 4
argv[optind] --
optopt 指向出错字符串 0
opterr 若出错输出消息 1

请读者注意:-- 作为 选项的参数 被读取时 getopt() 正常的的返回 选项字符 ,但当 -- 不作为 选项的参数 被读取时,getopt() 返回值为 -1 ,循环中止.

danger

The use of + and - in optstring is a GNU extension.[3]

optstring中使用+- 是一个 GNU 扩展

这意味着使用+-的程序在不兼容 GNU 扩展编译器可能 无法正常的编译或运行

如果在编译中使用了的-std=c99-std=c11 等指定 C语言标准 的编译选项需对应替换成 -std=gnu99-std=gnu11

getopt() 的错误处理

While processing the option list, getopt() can detect two kinds of errors:

  1. an option character that was not specified in optstring

  2. a missing option argument (i.e., an option at the end of the command line without an expected argument).

Such errors are handled and reported as follows:

  • By default, getopt() prints an error message on standard error, places the erroneous option character in optopt, and returns ? as the function result.

  • If the caller has set the global variable opterr to zero, then getopt() does not print an error message. The caller can determine that there was an error by testing whether the function return value is ?. (By default, opterr has a nonzero value.)

  • If the first character (following any optional + or described above) of optstring is a colon (:), then getopt() likewise does not print an error message. In addition, it returns : instead of ? to indicate a missing option argument. This allows the caller to distinguish the two different types of errors.[3]

笔者翻译成中文便是

在处理选项列表时, getopt() 可以检测两种错误:

  1. 未在 optstring 中指定的选项字符

  2. 选项缺少参数(例如,命令行末尾没有预期参数的选项)

这些错误的处理和报告如下:

  • 默认情况下,getopt() 会在标准错误上显示一条错误消息,将错误的选项字符放入 optopt ,然后返回 ? 作为函数结果.
  • 如果调用者已将全局变量 opterr 设置为零,则 getopt() 不会输出错误消息. 调用方可以通过测试函数返回值是否为 ? 来确定是否存在错误.(默认情况下, opterr 具有非零值.)
  • 如果optstring的第一个字符(上述任意可选的 +- 之后)是冒号(:),则getopt()同样不会输出错误消息. 另外,它返回:而不是?表示缺少选项参数. 这使调用者可以区分两种不同类型的错误.

getopt() 相关的全局变量

其后,来讨论与 getopt() 相关的 4 个 全局变量

optarg 如果一个选项需要参数,在处理该选项时,getopt会设置optarg指向该选项的参数字符串.

opterr 如果一个选项发生了错误,getopt会默认打印一条出错消息.应用程序可以通过设置opterr参数为0来禁止这个行为.

optind 用来存放下一个要处理的字符串在argv数组里的下标.它从1开始,每处理一个参数,getopt都会对其递增1.

optopt 如果处理选项时发生了错误,getopt会设置optopt指向导致出错的选项字符串.[1]

请看示例:

1
2
3
4
5
6
7
8
9
10
11
12
13
14
15
16
17
18
/* getopt1.c */
#include <stdio.h>
#include <unistd.h>
int main(int argc, char *argv[])
{
int ch;
// opterr = 0;
while ((ch = getopt(argc, argv, "a:b:c::d::e::fxg:")) != -1)
{
printf(" ch\t函数的返回值\t%c\n", ch);
printf("optarg\t当前选项的参数\t%s\n", optarg);
printf("optind\t指向下个字符串\t%d\n", optind);
printf("argv[optind]\t\t%s\n", argv[optind]);
printf("optopt\t指向出错字符串\t%d\n", optopt);
printf("opterr\t若出错输出消息\t%d\n", opterr);
printf("\n");
}
}

这段代码将演示getopt()的使用方法与 getopt()调用中相关的变量的变化.
请读者一定要使用-a 234 -b -c456 -d 789 -e -f -h -g作为参数运行该程序,查看输出逐个分析原因.

笔者得到的输出内容
1
2
3
4
5
6
7
8
9
10
11
12
13
14
15
16
17
18
19
20
21
22
23
24
25
26
27
28
29
30
31
32
33
34
35
36
37
38
39
40
41
42
43
44
45
46
47
48
49
50
    ch  函数的返回值    a
optarg 当前选项的参数 234
optind 指向下个字符串 3
argv[optind] -b
optopt 指向出错字符串 0
opterr 若出错输出消息 1

ch 函数的返回值 b
optarg 当前选项的参数 -c456
optind 指向下个字符串 5
argv[optind] -d
optopt 指向出错字符串 0
opterr 若出错输出消息 1

ch 函数的返回值 d
optarg 当前选项的参数 (null)
optind 指向下个字符串 6
argv[optind] 789
optopt 指向出错字符串 0
opterr 若出错输出消息 1

ch 函数的返回值 e
optarg 当前选项的参数 (null)
optind 指向下个字符串 8
argv[optind] -f
optopt 指向出错字符串 0
opterr 若出错输出消息 1

ch 函数的返回值 f
optarg 当前选项的参数 (null)
optind 指向下个字符串 9
argv[optind] -h
optopt 指向出错字符串 0
opterr 若出错输出消息 1

./getopt1.out: invalid option -- 'h'
ch 函数的返回值 ?
optarg 当前选项的参数 (null)
optind 指向下个字符串 10
argv[optind] -g
optopt 指向出错字符串 104
opterr 若出错输出消息 1

./getopt1.out: option requires an argument -- 'g'
ch 函数的返回值 ?
optarg 当前选项的参数 (null)
optind 指向下个字符串 11
argv[optind] (null)
optopt 指向出错字符串 103
opterr 若出错输出消息 1

值得特别关注的是:

  • 2 段,-c456 被解释为 选项b 的参数,而不是 选项c 和其参数 456
  • 4 段,定义为含有可选参数选项d 的参数为 null ,而不是 789,因为可选参数的选项的参数和选项间不能加空格,要使 789选项d 的参数,则该写为 -d789

请读者再次以参数 -ab -c123 -de -fx 执行该程序.

笔者得到的输出内容
1
2
3
4
5
6
7
8
9
10
11
12
13
14
15
16
17
18
19
20
21
22
23
24
25
26
27
28
29
30
31
32
33
34
    ch  函数的返回值    a
optarg 当前选项的参数 b
optind 指向下个字符串 2
argv[optind] -c123
optopt 指向出错字符串 0
opterr 若出错输出消息 1

ch 函数的返回值 c
optarg 当前选项的参数 123
optind 指向下个字符串 3
argv[optind] -de
optopt 指向出错字符串 0
opterr 若出错输出消息 1

ch 函数的返回值 d
optarg 当前选项的参数 e
optind 指向下个字符串 4
argv[optind] -fx
optopt 指向出错字符串 0
opterr 若出错输出消息 1

ch 函数的返回值 f
optarg 当前选项的参数 (null)
optind 指向下个字符串 4
argv[optind] -fx
optopt 指向出错字符串 0
opterr 若出错输出消息 1

ch 函数的返回值 x
optarg 当前选项的参数 (null)
optind 指向下个字符串 5
argv[optind] (null)
optopt 指向出错字符串 0
opterr 若出错输出消息 1

值得特别关注的是:

  • 1 段,b 被解释为 选项a 的参数,而不是 选项a选项b .请将第 1 段 和 第 4 与 第 5 段比较, -fx 被解释为了 选项f选项x
  • 4 段,定义为可选参数选项d的参数为 null ,而不是 789,因为含「可选参数的选项的参数」和选项间不能加空格,要使 789选项d 的参数,则该写为 -d789

    长选项

    长选项以两个「-」开头,长选项的参数写法可以为以下两种格式:「--arg=param」或「--arg param」.

    基本信息

1
2
3
4
5
6
7
8
9
10
#include <getopt.h>
struct option
{
const char *name;
int has_arg;
int *flag;
int val;
};
int getopt_long(int argc, char *const argv[], const char *optstring, const struct option *longopts, int *longindex);
int getopt_long_only(int argc, char *const argv[], const char *optstring, const struct option *longopts, int *longindex);

getopt_long()

  • argcargv 不必解释含义.
  • optstring:当程序只接受长选项时,optstring 应该为 ""(空字符串),而不是 NULL
  • longopts:是一个 struct option 的数组.
  • name
    is the name of the long option.
  • has_arg
    is: no_argument (or 0) if the option does not take an argument; required_argument (or 1) if the option requires an argument; or optional_argument (or 2) if the option takes an optional argument.
  • flag
    specifies how results are returned for a long option.
    • If flag is NULL , then getopt_long() returns val . (For example, the calling program may set val to the equivalent short option character.)
    • Otherwise, getopt_long() returns 0, and flag points to a variable which is set to val if the option is found, but left unchanged if the option is not found.
  • val
    is the value to return, or to load into the variable pointed to by flag .>The last element of the array has to be filled with zeros.[1]

也就是说:

  • name
    选项名.
  • has_arg
    需要为 no_argument(无参数)、required_argument(需要参数)、optional_argument(可选参数)这三个宏中的一个.
  • flagval
    当解析到该长选项时:
    • 如果 flagNULLgetopt_only() 返回 val.(例如,调用者设置 val 为对应的短选项字符)
    • 如果 flag 不为 NULLgetopt_only() 返回 0,并且 flag 指向的变量将被设置为 val.当未解析的该选项时,flag 指向的值不变.
      longopts 数组的最后一个元素需要全部字段为 0

If longindex is not NULL, it points to a variable which is set to the index of the long option relative to longopts.[1]
如果 longinedx 不是 NULL,它指向的值将被设置为解析到的长选项在 longopt 中的索引.

getopt_long_only()

getopt_long_only()getopt_long() 是相似的.但 - 开头的选项也被认为是选项,当选项以 - 开头时,getopt_long_only() 将认为他是一个长选项.当选项以 - 开头且不匹配长选项但却能匹配短选项时,getopt_long_only() 将这个选项解析为短选项.

整理整理思路.

对于一个以 - 开头的选项:

  • getopt_long() 认为他是一个短选项
  • getopt_long_only() 认为他是一个长选项
    换而言之,-abgetopt_long() 眼中解释为:「选项a和选项b」或者「选项a和选项a的参数b」;但是 getopt_long_only() 将他首先解释为「长选项ab」,除非 longopts 的数组中不包含一个 nameab 的长选项.

示例

1
2
3
4
5
6
7
8
9
10
11
12
13
14
15
16
17
18
19
20
21
22
23
24
25
26
27
28
29
30
31
32
33
34
35
36
37
38
39
40
41
42
43
44
45
46
47
48
49
50
51
52
53
54
55
56
57
58
59
60
61
62
63
64
65
#include <stdio.h>     /* for printf */
#include <stdlib.h> /* for exit */
#include <getopt.h>
int
main(int argc, char **argv)
{
int c;
int digit_optind = 0;
while (1) {
int this_option_optind = optind ? optind : 1;
int option_index = 0;
static struct option long_options[] = {
{"add", required_argument, 0, 0 },
{"append", no_argument, 0, 0 },
{"delete", required_argument, 0, 0 },
{"verbose", no_argument, 0, 0 },
{"create", required_argument, 0, 'c'},
{"file", required_argument, 0, 0 },
{0, 0, 0, 0 }
};
c = getopt_long(argc, argv, "abc:d:012",
long_options, &option_index);
if (c == -1)
break;
switch (c) {
case 0:
printf("option %s", long_options[option_index].name);
if (optarg)
printf(" with arg %s", optarg);
printf("\n");
break;
case '0':
case '1':
case '2':
if (digit_optind != 0 && digit_optind != this_option_optind)
printf("digits occur in two different argv-elements.\n");
digit_optind = this_option_optind;
printf("option %c\n", c);
break;
case 'a':
printf("option a\n");
break;
case 'b':
printf("option b\n");
break;
case 'c':
printf("option c with value '%s'\n", optarg);
break;
case 'd':
printf("option d with value '%s'\n", optarg);
break;
case '?':
break;
default:
printf("?? getopt returned character code 0%o ??\n", c);
}
}
if (optind < argc) {
printf("non-option ARGV-elements: ");
while (optind < argc)
printf("%s ", argv[optind++]);
printf("\n");
}
exit(EXIT_SUCCESS);
}

[3]

编译并以 ./getopt_long -add --append -d34 -1 --verbose 运行,程序的输出为:

1
2
3
4
5
6
option a
option d with value 'd'
option append
option d with value '34'
option 1
option verbose

上面的代码中,如果把第 21 的代码中的 getopt_long 改成 get_long_only 再次编译并以相同的参数运行就会得到如下的输出:

1
2
3
4
option add with arg --append
option d with value '34'
option 1
option verbose

区别很明显.

getopt_long()-add 解释为了 选项a、选项 d、选项 d 的参数 d

getopt_long_only()-add 解释为了 选项 add

参考书籍

1. W.RichardStevens.Stephen.UNIX环境高级编程[M].第3版.戚正伟,译.北京:人民邮电出版社
2. C++ 命令行参数解析.[G/OL].CSDN.https://blog.csdn.net/qq_34719188/article/details/83788199
3. Linux Programmer’s Manual.[G/OL].https://man7.org/linux/man-pages/man3/getopt.3.html

在 GNU/Linux 中用 C语言计算文件的 Hash

在 GNU/Linux 中用 C语言计算文件的 Hash

在今日之前,笔者从未想到使用 C/C++GNU/Linux 计算文件的 Hash (例如:SHA-1MD5SHA-256 等)会这样的麻烦.

笔者以为会有 char * sha256sum(int fd)char * sha256sum(FILE *stream) 类似的函数来轻松的获取文件的 Hash .但事实并非如此,获取文件的 Hash 的方法远比笔者想象中的做法要复杂.

方案1 自行实现Hash函数

这种方案是最为麻烦的,但有着不依赖第三方库和程序的优点.至于如何实现 Hash 函数不是本文重点,笔者对此也不做说明.

方案2 调用Openssl

笔者的 openssl 版本为1.1.1i 8 Dec 2020/usr/include/openssl 中提供的头文件可点击下方的小三角查看.

点此查看更多信息aes.h asn1err.h asn1.h asn1_mac.h asn1t.h asyncerr.h async.h bioerr.h bio.h blowfish.h bnerr.h bn.h buffererr.h buffer.h camellia.h cast.h cmac.h cmserr.h cms.h comperr.h comp.h conf_api.h conferr.h conf.h cryptoerr.h crypto.h cterr.h ct.h des.h dherr.h dh.h dsaerr.h dsa.h dtls1.h ebcdic.h ecdh.h ecdsa.h ecerr.h ec.h engineerr.h engine.h e_os2.h err.h evperr.h evp.h hmac.h idea.h kdferr.h kdf.h lhash.h md2.h md4.h md5.h mdc2.h modes.h objectserr.h objects.h obj_mac.h ocsperr.h ocsp.h opensslconf.h opensslv.h ossl_typ.h pem2.h pemerr.h pem.h pkcs12err.h pkcs12.h pkcs7err.h pkcs7.h rand_drbg.h randerr.h rand.h rc2.h rc4.h rc5.h ripemd.h rsaerr.h rsa.h safestack.h seed.h sha.h srp.h srtp.h ssl2.h ssl3.h sslerr.h ssl.h stack.h storeerr.h store.h symhacks.h tls1.h tserr.h ts.h txt_db.h uierr.h ui.h whrlpool.h x509err.h x509.h x509v3err.h x509v3.h x509_vfy.h
1
2
3
4
5
6
7
8
9
10
11
12
13
14
15
16
17
18
19
20
21
22
23
24
25
26
27
28
29
30
31
32
33
#include <openssl/sha.h>
#include <stdio.h>

int main(void)
{
unsigned char result[SHA256_DIGEST_LENGTH];
char *filename = "README.md";

FILE *file = fopen(filename, "rb");
SHA256_CTX hash;

if (file == NULL)
{
perror("fopen");
return 1;
}
SHA256_Init(&hash);

ssize_t size;
unsigned char buf[4096];

while ((size = fread(buf, 1, 4096, file)) != 0)
{
SHA256_Update(&hash, buf, size);
}
SHA256_Final(result, &hash);
for (size_t i = 0; i < SHA256_DIGEST_LENGTH; i++)
{
printf("%02x", result[i]);
}
fclose(file);
return 0;
}

本方案调用了 openssl 提供的 sha.h 比自行实现 Hash函数 能方便一点点.使用本方案的程序在编译时需要使用 -lssl-lcrypto 参数链接相关的库.

方案3 进程间通信调用其他程序

GNU/Linux 中通常含有 sha256sumsha512summd5sum 等程序,并支持以类似 sha256sum <path> 的格式直接调用.那么,就可以使用 popen 函数完成进程间通信,直接获取文件的 Hash

1
2
3
4
5
6
7
8
9
10
11
12
13
14
15
#include <stdio.h>
int main(void)
{
FILE *target;
target = popen("sha256sum ~/README.md", "r");
if (target == NULL)
{
perror("popen");
}
char hash[65];
fscanf(target, "%64s", hash);
printf("%s\n", hash);
pclose(target);
return 0;
}

这种方式的好处显而易见「方便」,这种方法是也最容易理解的.

值得多说一句的是:Hash 函数生成的 Hash 是一个由函数决定的常数(例如:SHA-256的结果以字符串输出有 64可打印字符 ),这个特性使得 数组的长度读取的输出长度 是确定的.

测试环境

OS : Arch Linux

Kernel : 5.9.14-arch1-1

openssl : 1.1.1i 8 Dec 2020

gcc : 10.2.0

参考资料

1. W.RichardStevens.Stephen.UNIX环境高级编程[M].第3版.戚正伟,译.北京:人民邮电出版社

命令行参数的误解

命令行参数的误解

前言

我们都知道C语言中允许main函数拥有0个或2个参数,但也存在部分操作系统向程序传入更多的参数,还有部分实现中对标准进行扩展,允许main函数拥有更多的参数
命令行参数作为main函数的两个参数被传递给程序,这两个参数通常被命名为int argc,char **argv,其中argc为参数的数量,argv为一个指向内含 argc + 1char 类型指针指针数组

但仅用这段话进行描述可能难以对命令行参数有一个正确的认识,这种描述可能对命令行参数的理解不利.
我们先来分析一个程序.

1
2
3
4
5
6
7
8
9
10
11
12
13
14
/* ShowCommandLineArgument.c   */
#include <stdio.h>
int main(int argc, char **argv)
{
printf("argc:%d\n", argc);
for (int i = 0; i < argc; i++)
printf("argv[%d]:%s\n", i, argv[i]);
//argv[i]就是*(argv+i),很明显是一个指向char的指针
//程序并不以%s打印argv[argc],而是退出循环.

//请不要忘记:表达式(argv[argc]==NULL)为真
printf("argv[%d]:%p\n", argc, argv[argc]);
return 0;
}

在笔者的电脑中,该文件被存储在/home/admin/blog/ShowCommandLineArgument.c,输入命令 gcc ShowCommandLineArgument.c 进行编译,得到a.out,并以cd && ./blog/a.out -f ~/bolg/test1.md >./blog/test2.md /home/admin/blog/test3.md ./blog/test4.md执行该程序.

请思考,该程序会输出什么内容?你是否认为程序的输出为

1
2
3
4
5
6
7
8
9
argc:6
argv[0]:a.out
argv[1]:-f
argv[2]:~/bolg/test1.md
argv[3]:>./blog/test2.md
argv[4]:/home/admin/blog/test3.md
argv[5]:./blog/test4.md
argv[6]:(nil)


什么?你说没看到输出?请认真查看笔者输入的指令,其中包括了 >./blog/test2.md 意味把 a.out标准输出 重定向至文件./blog/test2.md .所以笔者使用 cat >./blog/test2.md 查看输出的内容,该程序在笔者的设备上的输出为:
1
2
3
4
5
6
7
argc:5
argv[0]:./blog/a.out
argv[1]:-f
argv[2]:/home/admin/bolg/test1.md
argv[3]:/home/admin/blog/test3.md
argv[4]:./blog/test4.md
argv[5]:(nil)

是不是和你的预期不尽相同,请听笔者逐一解释.

常见误区

误区1—-「认为 argv[0] 存储文件名」

实际上,argv[0] 会存储调用的指令中的第一个字符串,而不是文件名,strcmp(argv[0],__FILE__)并不总为0

误区2—-「认为命令行参数总是被原样传递」

在上面的例子中可以发现,相对路径 ~/blog/test1.md 作为命令行参数传给程序,程序收到的实际上是文件的绝对路径 /home/admin/blog/test3.md
但同为相对路径./blog/a.out./blog/test4.md却可以正常传递给程序,而不被转换为绝对路径
其他的相对路径写法是否能被正常传递?笔者在此使用由 ShowCommandLineArgument.c 编译得到的 a.out 文件继续测试.使用的指令为 ~/blog/a.out ./test/../blog/test1.md ../test2.md ~admin/blog/test3.md 由这两次测试,笔者大胆猜测只有以 ~ 开头的相对路径会被转换为绝对路径 然后才传递给程序.

1
2
3
4
5
6
argc:4
argv[0]:/home/admin/blog/a.out
argv[1]:./test/../blog/test1.md
argv[2]:../test2.md
argv[3]:/home/admin/blog/test3.md
argv[4]:(nil)

为什么要这么做呢?

请分析笔者的这个程序.

1
2
3
4
5
6
7
8
9
10
11
12
13
14
15
16
17
18
19
20
21
22
23
24
25
26
27
28
29
30
31
#include <stdio.h>
int main(void)
{
char path1[] = "./blog/test2.md";
char path2[] = "~/blog/test2.md";
char path3[] = "~admin/blog/test2.md";
char path4[] = "~/blog/test2.md";
char path5[] = "../blog/test2.md";

if (fopen(path1, "r") == NULL)
perror("path1");
else
printf("1Success\n");
if (fopen(path2, "r") == NULL)
perror("path2");
else
printf("2Success\n");
if (fopen(path3, "r") == NULL)
perror("path3");
else
printf("3Success\n");
if (fopen(path4, "r") == NULL)
perror("path4");
else
printf("4Success\n");
if (fopen(path5, "r") == NULL)
perror("path5");
else
printf("5Success\n");
return 0;
}

笔者用cd && ./blog/a.out调用该程序编译得到的可执行文件,得到的输出为:

1
2
3
4
5
1Success
path2: No such file or directory
path3: No such file or directory
path4: No such file or directory
path5: No such file or directory

我们可以惊讶的发现只有第一次成功的打开了文件,其他4次操作全部报错.当然,其中第五次打开文件的操作失败是理所当然的,因为确实没有这个文件存在.笔者复制该可执行文件至~/test/a.out后重新执行该程序即发现,第5次文件打开操作成功了.

1
2
3
4
5
path1: No such file or directory
path2: No such file or directory
path3: No such file or directory
path4: No such file or directory
5Success

这说明:fopen()无法识别以~开头的相对路径,也体现了命令行参数在传递过程中,转换以~开头的相对路径绝对路径的必要性.

误区3—「认为重定向是命令行参数」

重定向虽然也在命令行参数的位置,但和命令行参数具有本质的区别.

实践说明重定向指令不会被当中命令行参数传递给程序.

在开发中应该小心,防止误认,也需防止命令行参数中出现相关符号被系统当做重定向指令,导致命令行参数传递错误.

测试环境

OS: Arch Linux
Kernel: x86_64 Linux 5.8.14-arch1-1

参考书籍

1. Stephen Prata.C Primer Plus[M].第六版.姜佑,译.北京:人民邮电出版社
2. Kenneth.A.Reek.C和指针[M].徐波,译.北京:人民邮电出版社.2008